The following post contains affiliate links. Read my full disclosure here.
I feel like we are in a rush to get as many projects done as we can before the baby comes. In my head, I am thinking that anything left undone will pretty much not ever get done. I know that is not true. It will probably get done at some point. It just will be a lot longer wait. It’s the nesting mode in me, I guess. We got a ton done over the past week. We worked a little each night on the wall in the upstairs hallway from my previous post. Mr. Whitlane and I were able to use our Ryobi Cordless Nail Gun while the kids were sleeping. I seriously love this nail gun. There are no cords or loud compressors. It is still a little loud when firing a nail but waaaayyyyy less noisy than a compressor nail gun. Our kids slept through nailing up the boards every night. Our three-year-old’s door was right by this hallway too! By Saturday we had all the plans to get some other project done. I mean, we had finished the upstairs wall. So Instead, we got nothing done. You know when you have a million things to do, but decide to take a fun day instead? Mr. Whitelane and I were both tired by Saturday. We ended up taking the kids to this fun play center to skate, play arcade games, jump on bounce houses, and meet some princesses. Totally worth it!
So, this weekend I mean business. We have to get something done! Haha. A simple project on the list is to switch out faucets. I have been wanting to move our kitchen faucet to the laundry room sink. I haven’t been able to find what type of faucet I want for the kitchen. I finally, narrowed it down to two options. I really like this one because it is stainless steel and will flow with our farm sink seamlessly. It is a spring pull down faucet that has an industrial kitchen look. We had a similar one in our townhouse. I just loved the look and feel of this style.
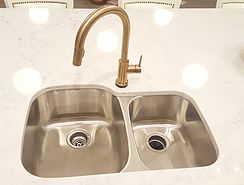
Then there is brass. We all know how much I love brass these days. My kitchen is sprinkled with brass accents. So, it is no surprise I fell in love with this brass faucet as well. Here is my dilemma with the brass faucet. I have a stainless steel farm sink. The large stainless apron can really clash with the brass faucet. If I didn’t have a stainless apron sink, or even if the farm sink was white, there would be no problem. In the picture below, you can see that the brass looks great with this traditional stainless bowl sink. Mixing metals is totally allowed in a room or house. My rule is usually two metals and no more than three. It just has to be mixed carefully so that it all meshes correctly. The brass faucet right in front of that huge stainless apron may be too much. The faucet is on the way and we will soon find out.
Which faucet do you love? I am leaning towards the brass IF it can mesh correctly with my sink. Otherwise, I will still love the Stainless spring pull down faucet. I already have the stainless Kohler faucet. It looks great and I am just waiting on the brass faucetto arrive to make my final decision. I am a visual person and I need to see them in the space on this decision. I can’t wait to show you the final choice on my Instagramnext week!
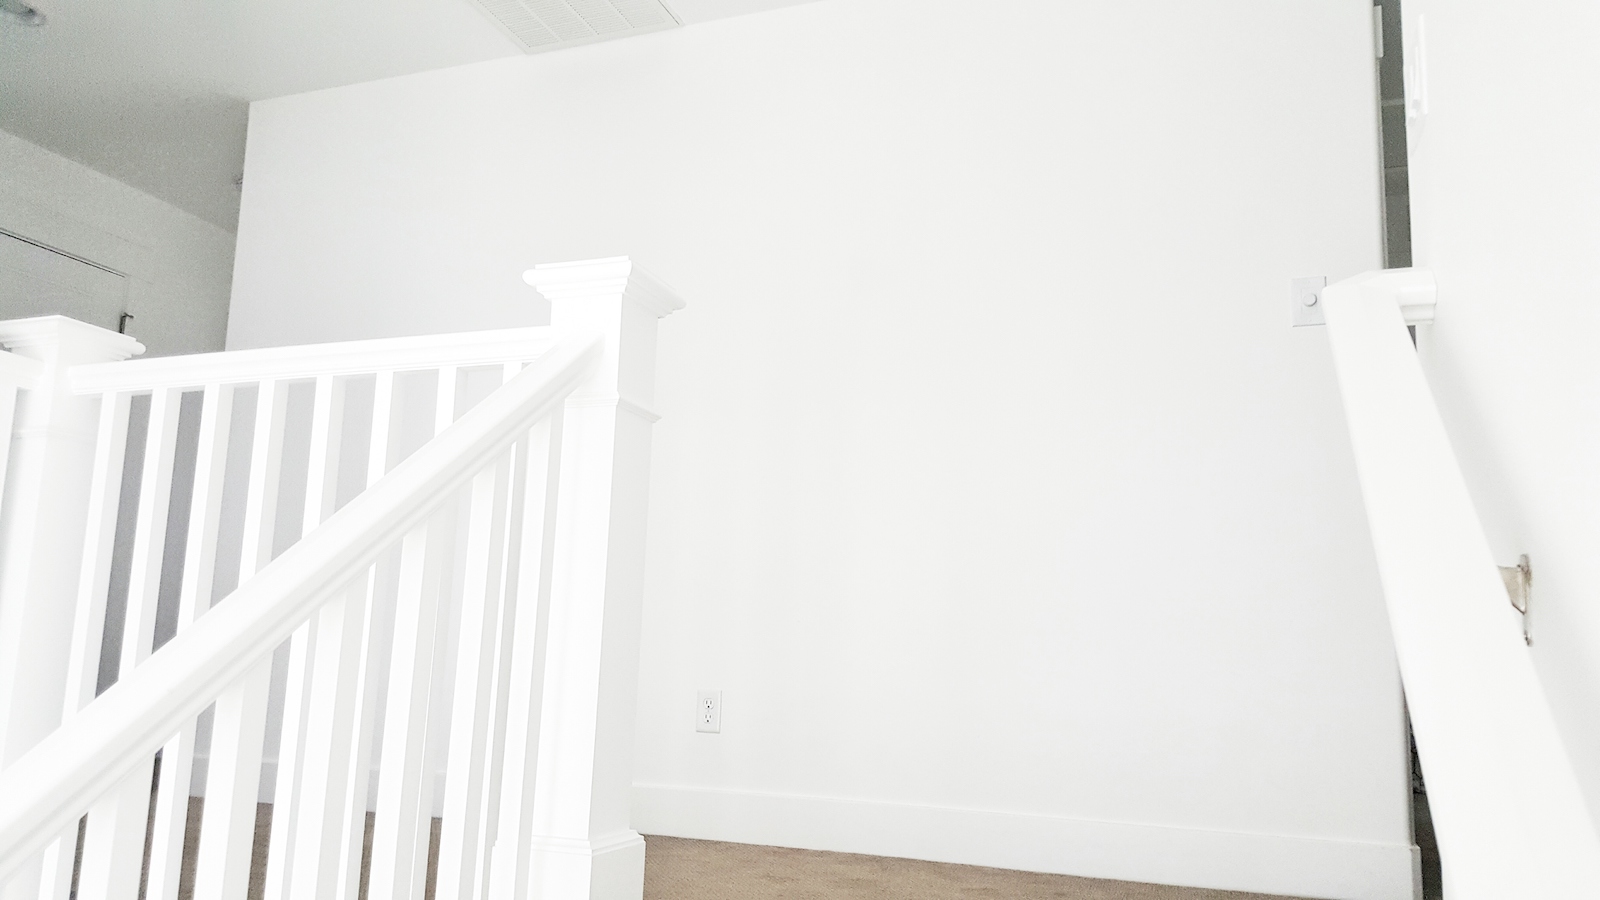
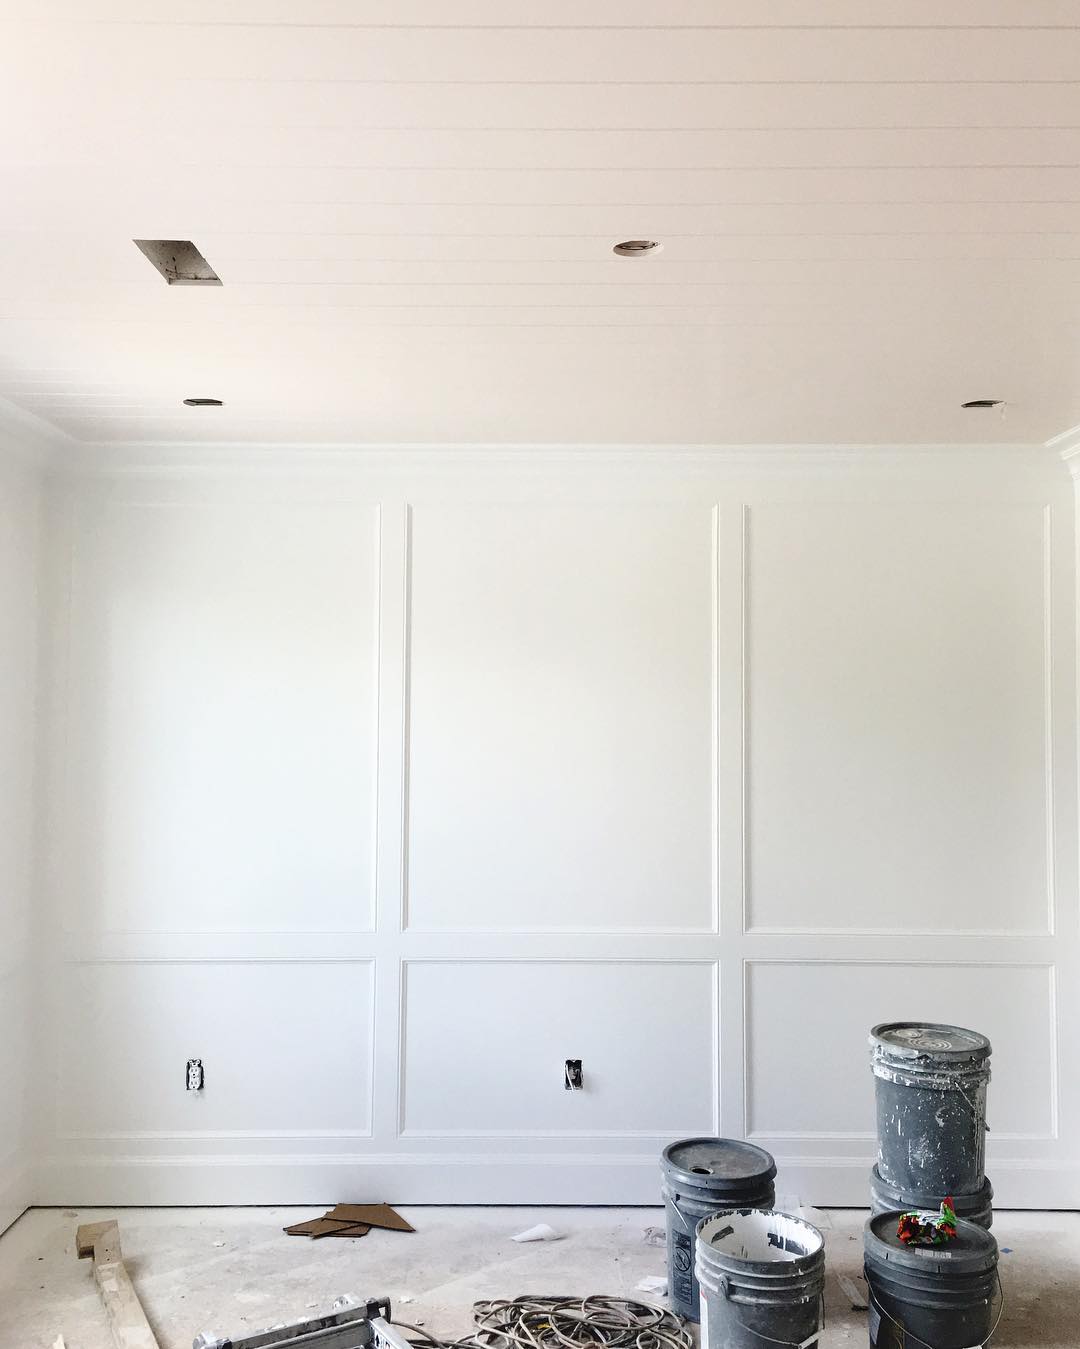
I have a big nice hallway at the top of stairs. Every time you walk up the stairs you see this nice long hallway or wall. It is just over 12 feet long and is begging for some sort of wall treatment. I mean, look at this big blank canvas. The possibilities are endless! I have narrowed down the options to just a few.
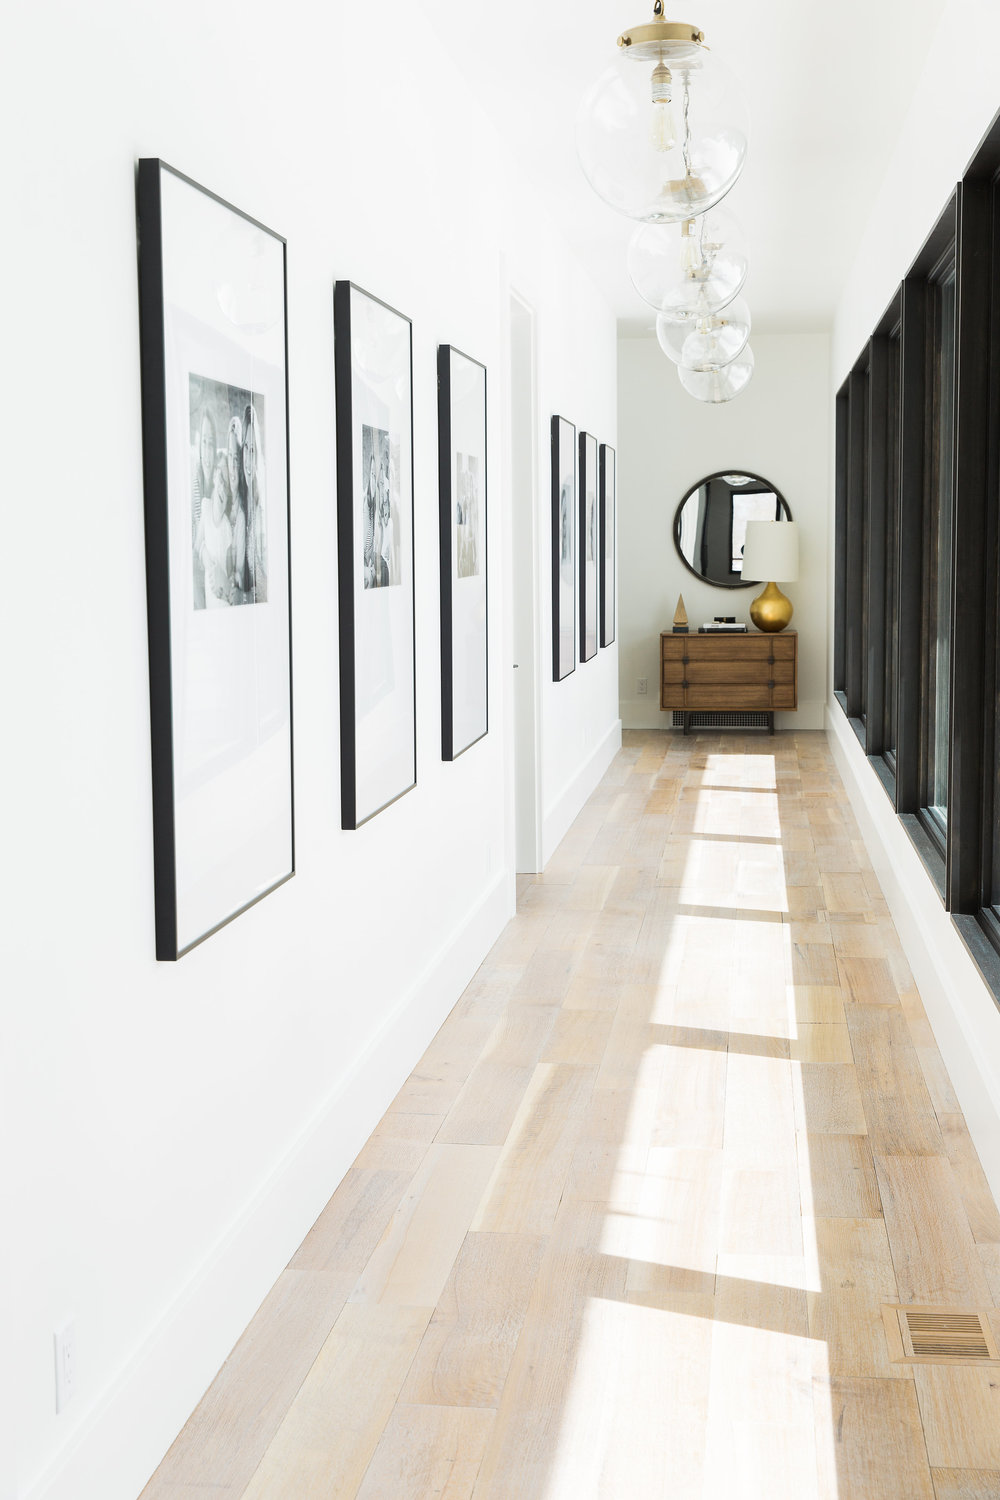
I love shiplap and I think it could look really cool here. Just picture some clean and crisp white shiplap with large black frames spaced across the wall. I found the image below, here. I think some black and white family photos inside a few large black frames will really pop against the shiplap. If we did shiplap, it would be the same as our entry shiplap. The planks are similar to tongue and groove and are about 7.5″ wide.
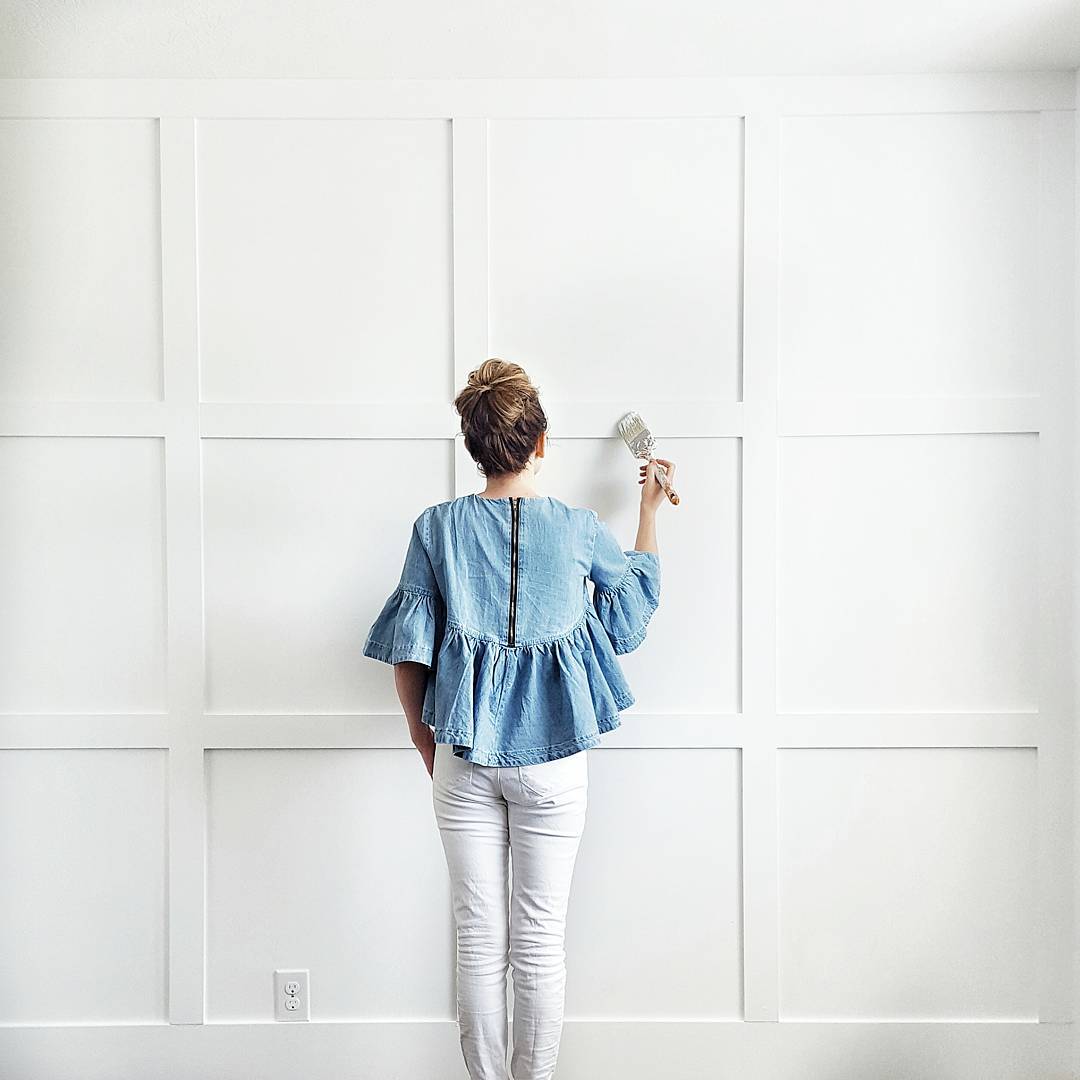
Then there is board and batten. Not just any board and batten, but square board and batten. I thought about evenly spaced squares across the wall like the first image below. I really want to hang large black frames across that wall as well. I am not sure if all the evenly spaced squares would look as good with frames over them. Then I came across the second image below. The longer spaced squares would fit a frame perfectly between each section. It is still a unique twist on your typical board and batten. Also, either of these board and batten options would be a lot easier to install than the shiplap.
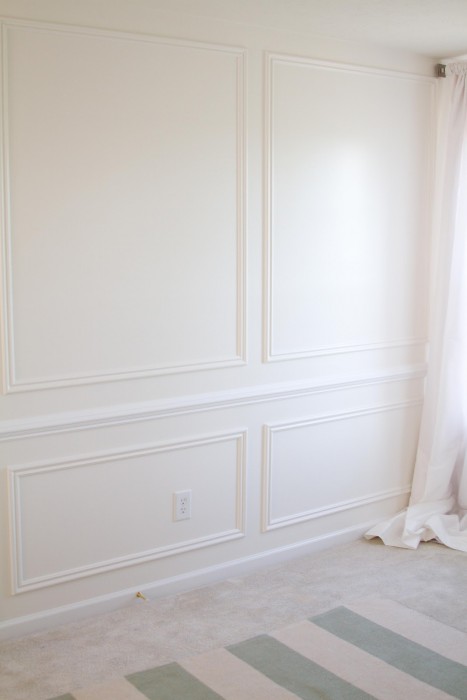
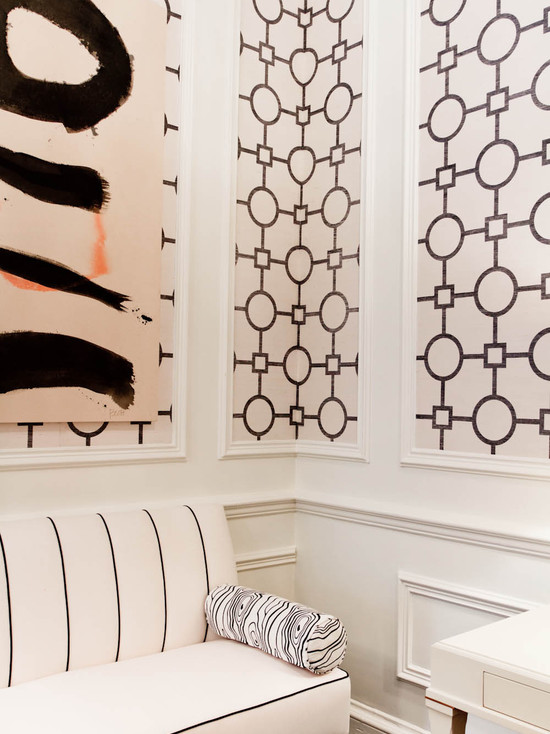
The final option I am weighing is picture frame molding. I found the first image below here. I think large black frames would look great within the larger molding. This would still be relatively easier than shiplap. Truth be told, I have never installed picture frame molding. It could be a fun learning experience. I came across this idea in the second image below as well. I could add a fun wallpaper inside the picture frame molding. I am just worried I would get tired of the wallpaper over time. Picture frames make it easier to swap out pictures when an update is needed.
What do you think? I want to knock this project out before the baby comes (along with a few others). I need to make a decision quick. This will be a weekend warrior project (or a few weekends) with Mr. Whitelane. I am leaning towards the larger board and batten squares for ease of installation and time. However, Mr. Whitelane thinks we should do the shiplap like our entry. Decisions, decisions.
I wanted to share a quick and easy decorating tip today. I am always looking for inexpensive ways to decorate and furnish a space. Home Goods, T.J. Maxx, and Target are all great. However, not leaving your home is even better. I love shopping online and finding free items.
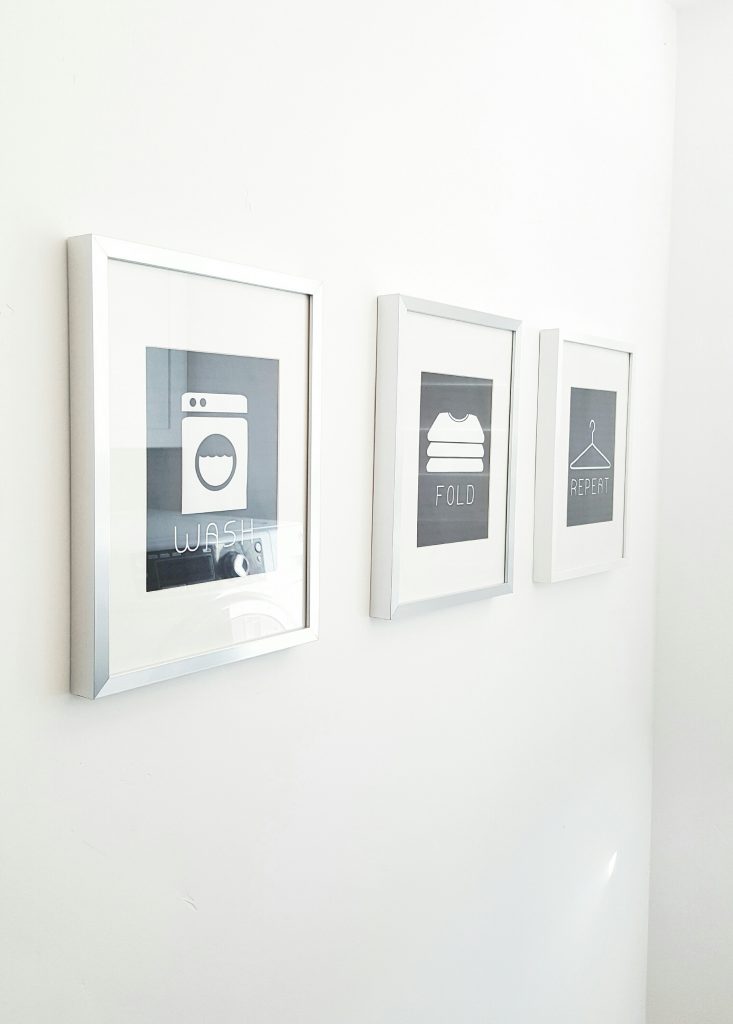
One of the simple ways I have found to fill a wall, desk, or space is with framed printables. This can be quotes, art, or pictures. A lot of times you can find free printables that can be printed right off of your home printer. I needed something to fill my laundry room wall. I was able to find these cute prints from The Cottage Market. FREE! There are so many different options she has on her site for these (color, chalkboard, etc.) I already had some IKEA Ribba frames on hand. I was able to print these laundry signs immediately on my printer and put them in frames. It was just what this space needed and it didn’t cost me a dime.
I have also seen Jane, Groupon, and Pinterest have a lot of free and inexpensive options as well. I was able to get a cute saying for my desk on Groupon a few years ago. It was a digital download for only $2. I printed it on my home printer and stuck in another Ribba frame. It added just the right amount of pop to my desk for very little time and cost.
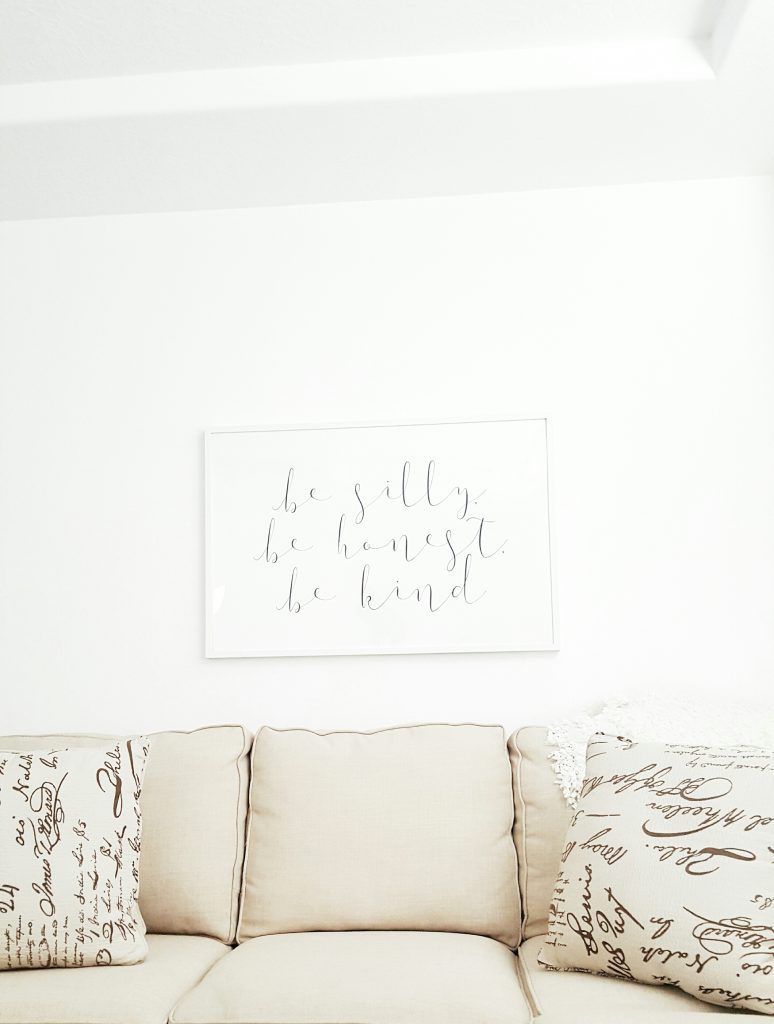
Now, I needed a large print for my bonus room living area. Something that could not be printed at home. I wanted a quote for above the couch that would be simple and clean. Etsy had a ton of options for digital downloads. I bought a 24×36 jpeg digital download quote for only $5. I then uploaded that download to Walgreens photo to be printed as poster size. I picked it up and stuck in a 24×36 white Ribba frame from IKEA. A framed picture/sign of this size would have cost a lot more anywhere else.
All of these printables have saved me a lot of money in the decorating budget. They also look great and fit into my decor seamlessly. Next time you need to fill a space, be sure to check for free or inexpensive printables first!
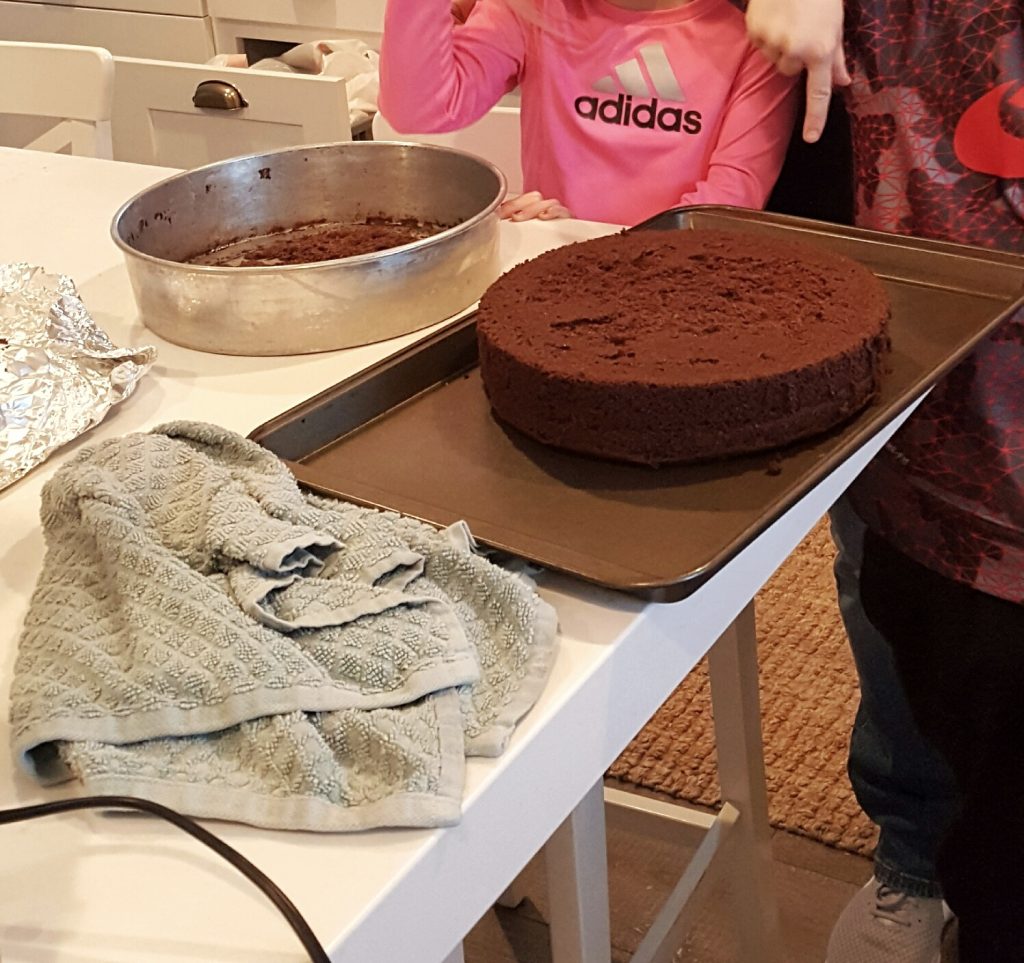
I just had to show a quick look at what we did for our Blue and Gold Scout Banquet. My little boy just entered into Cub Scouts and is having such a fun time. As part of the Blue and Gold Banquet, they are having a cake decorating contest. I quickly searched through Pinterest for some ideas to get us rolling. However, I have to give all the credit to Mr. Whitelane and our little guy. They took the idea I showed them to the next level.
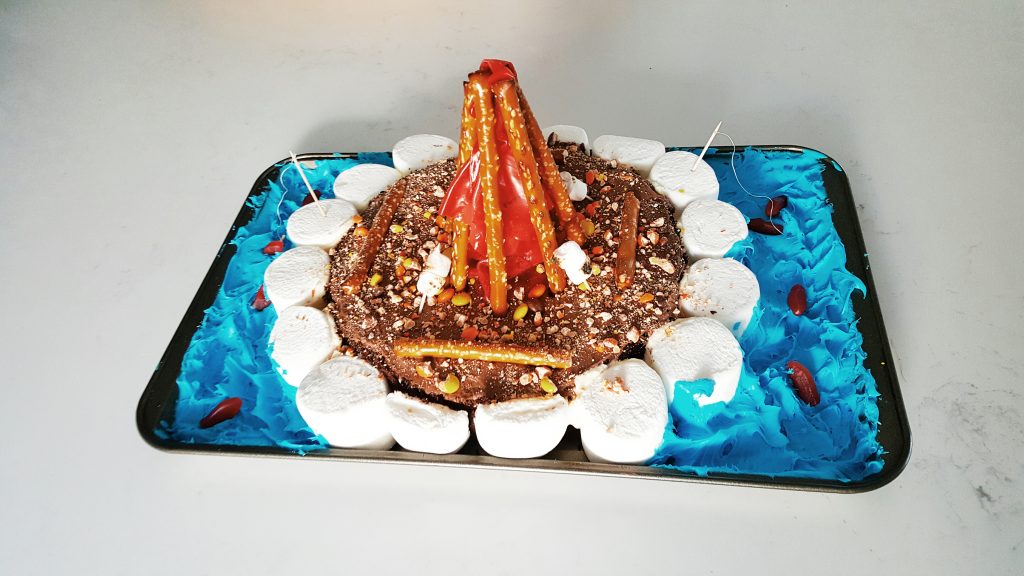
They started with a simple chocolate cake mix from a box. The secret is to add a package of instant chocolate pudding, into the batter, to make the cake extra moist. They followed the directions according to the box except for that extra secret ingredient. When the cake came out, they wrapped it in foil and stuck it in the freezer overnight (makes it extra moist). The next day, they let the cake defrost and started decorating. The idea they saw here, gave the basis for their masterpiece. Don’t mind my poor quality photos. I didn’t plan on sharing this but it just turned out too cute!
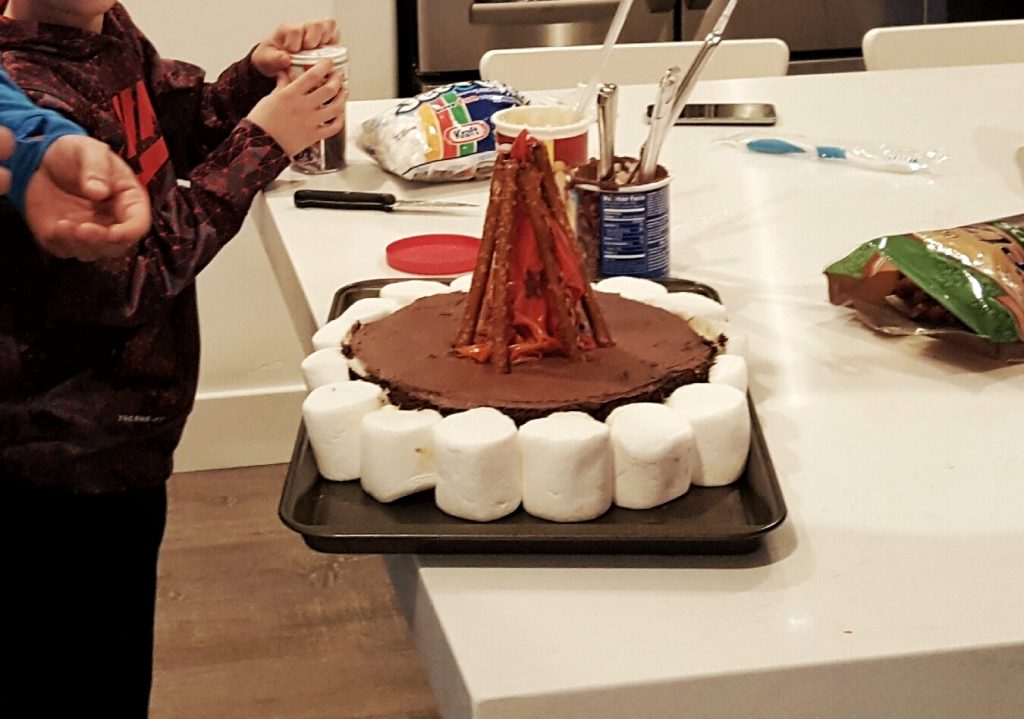
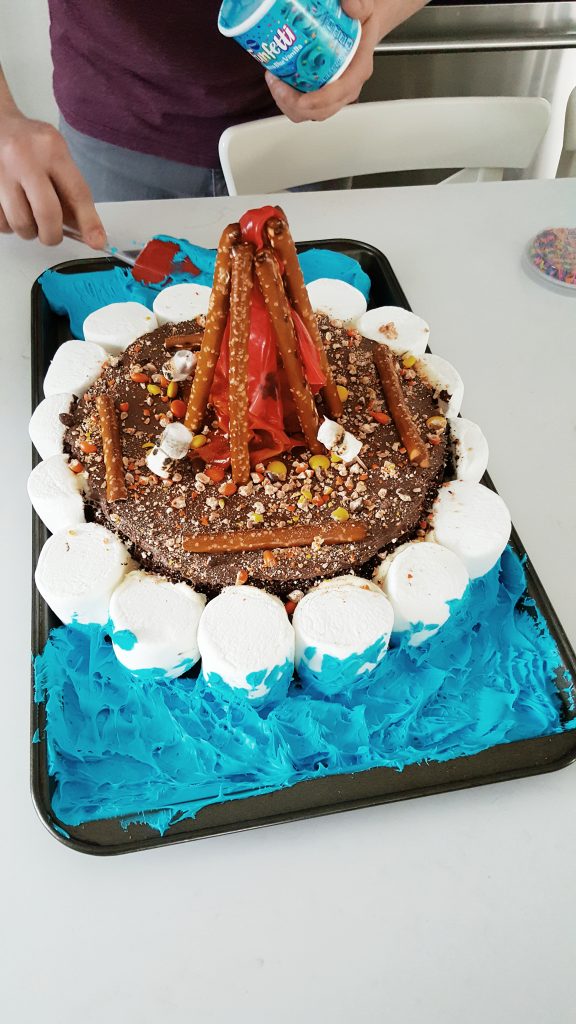
Mr. Whitelane and our little one got busy putting chocolate frosting across the top. Then they took white frosting to stick jumbo marshmallows around the outside layer of the cake. Next came the Fruit Roll-Ups for the campfire “flame.” It took some teamwork to hold the Fruit Roll-Ups in place, while the other stuck the pretzel rods in to hold up the “flame.” This sweet little duo of guys in our house came up with the idea to use some extra pretzel rods for benches around the fire. They then sprinkled Reese’s Pieces around the fire (some crushed up). They also took mini marshmallows (roasted in a flame for an authentic look) and stuck them to toothpicks to place around the “fire.” Mr. Whitelane and our son could have stopped there. It looked great! But, they decided they needed to add some fishing with the campfire. Blue icing around the outside of the marshmallows served as the “water.” They tied a string to toothpicks (fishing poles) and placed Swedish fish in the “water.”
These guys of mine were the cutest team! I loved watching them make this together. Our son said he definitely thinks he will get first place (melt my heart!). Another fun scout cake idea goes down in the books. Hopefully, it will give you some ideas too!
The following post contains affiliate links. Read my full disclosure here.
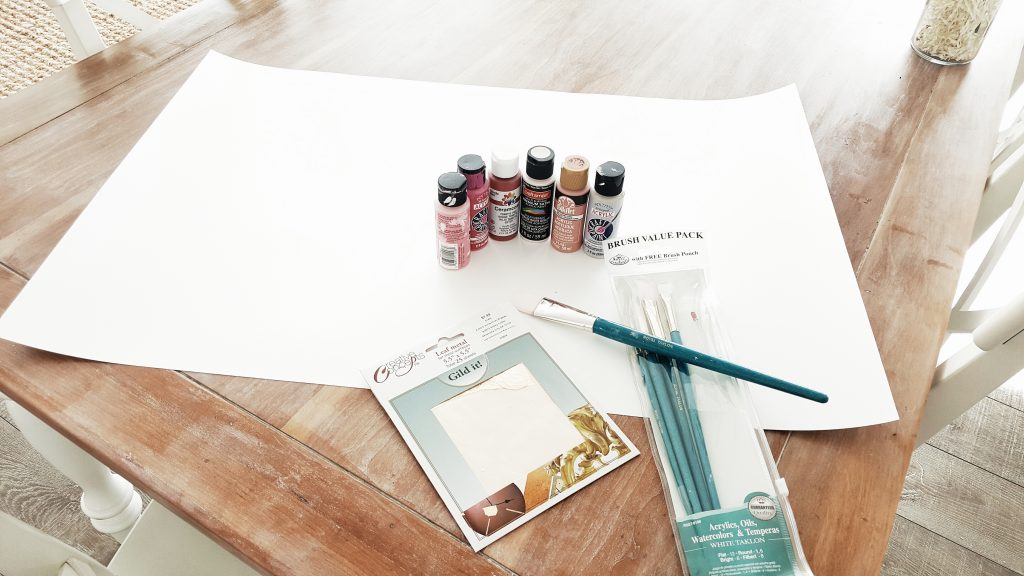
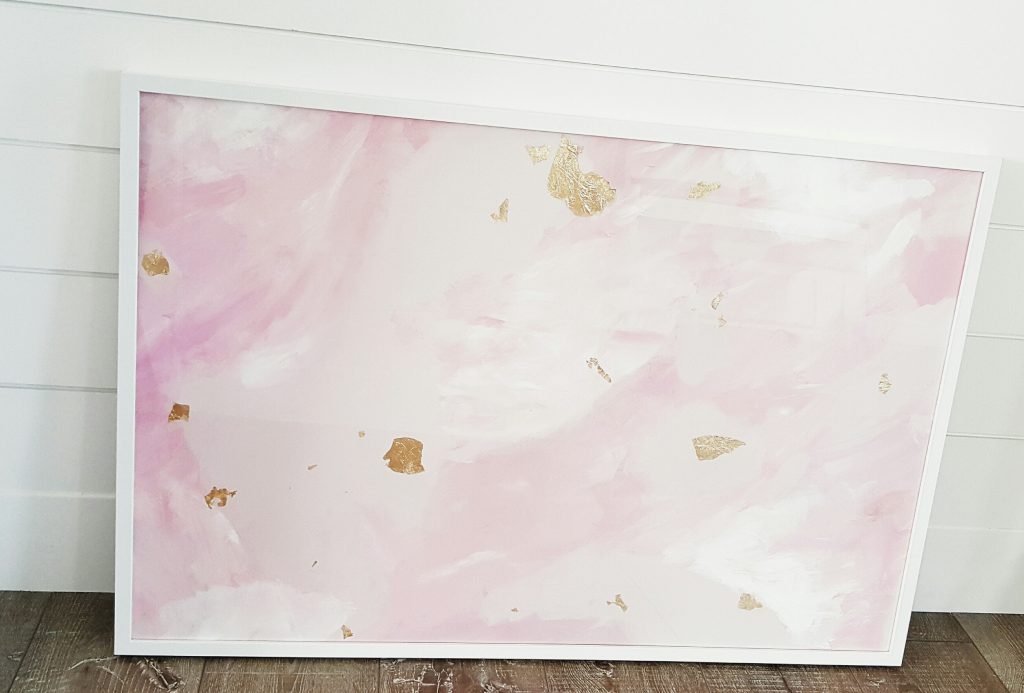
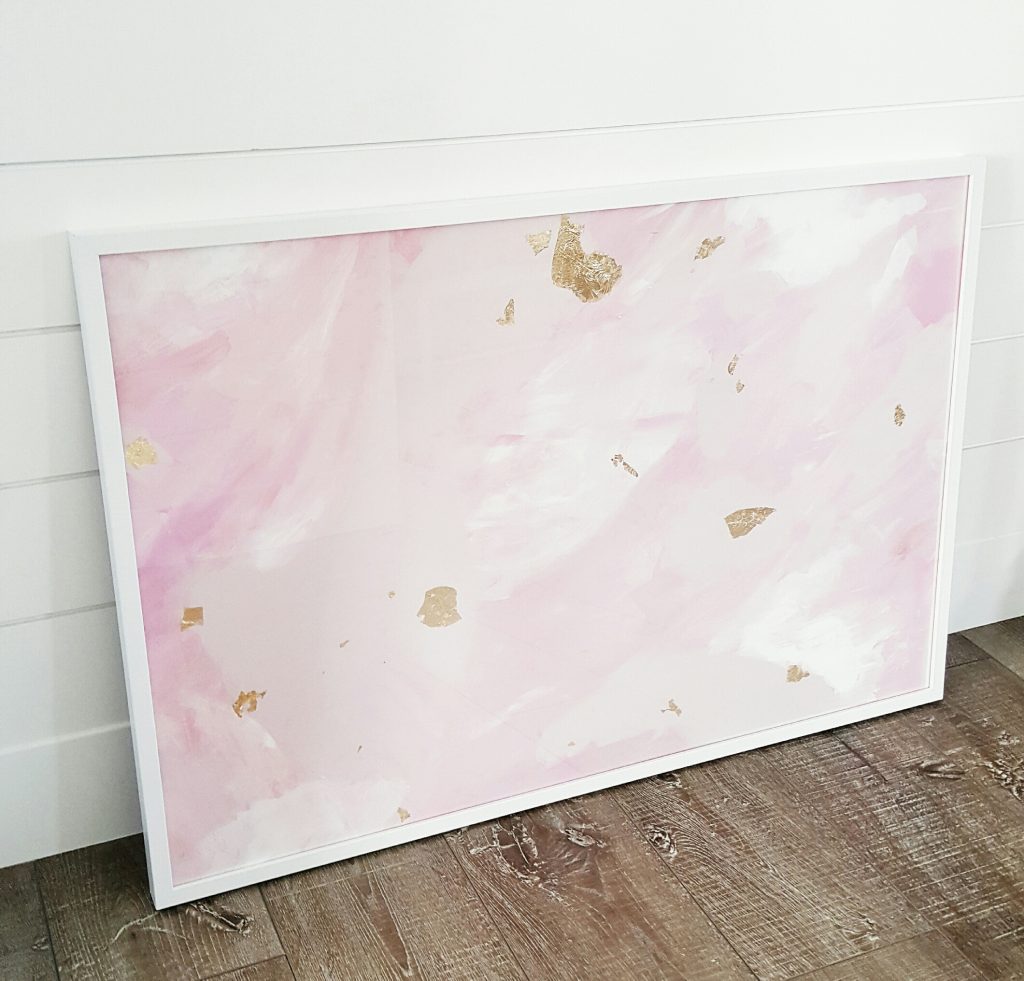
I have been working on projects for the nursery little by little. We just got the trim work I talked about in the previous post, painted this weekend. That wall is a simple beauty. I wanted something to hang on there just above the crib. Everything I looked at was very pricey and not exactly what I was looking for. I finally decided to try my hand at abstract art. If I can do it, anybody can! I am not exaggerating that by any means. My artistic ability is zero. Even my handwriting resembles a preschool work of art. When I finished this piece, I just had to share.
I needed the art to be large and around 24″x36″. I also wanted the piece to be framed which meant canvas was out of the picture. I went to Hobby Lobby to see what I could find. I came across this large cardboard poster for $6.99. It was different than regular poster board because it didn’t have a sheen on either side. Both sides of the board were a flat cardboard paper feel. Brass is another color I wanted to incorporate to the nursery. I grabbed some gold leaf papertoo, in hopes to add some flecks into my art. I used a 40% off coupon and went straight home to give it a try. I had some flat acrylic paint on hand in various colors. I really only wanted white and shades of pink. I also had a set of paint brushes in various sizes. I had no idea if any of them were the “right” type to use. I decided to use what I had and just go for it.
I started by dropping blobs of paint spaced a few inches apart onto my cardboard sheet. I used white, light pink, pink, and really all shades of light pink. I even took some red and lightened it with some white to make my own pink. Once I had a bunch of blobs spaced out across my board, I took my brush and spread the paint out. I did not mix them all together. I let them meet up with each other without running into the other color. I added more blobs where it needed in various colors. There really is no science. Just get creative. Don’t worry if your board seems to get saturated and bubble in spots. It will dry fine and it will only add texture to the backdrop. I let my first round dry and came back later to give it another look. I added a few more touch ups where I thought it could use some color. You can not mess it up because it is supposed to be abstract. I then took my gold leaf paper and some glue to add touches of gold. I broke off small random sizes of gold leaf. I put my glue stick on the poster in a small area where I wanted the gold and then pressed it down. I probably could have kept adding and tweaking, but you really just have to step back and call it good at some point.
The tricky part is finding a decent affordable frame at a 24″x36″ size. IKEA to the rescue with a frame in white and black for $17.99. I may even paint the frame a brassy gold eventually. I will decide as the nursery comes together. I took my DIY abstract art and put it in the white frame for now. I think it turned out decent considering my art skills and the price.
The following post contains affiliate links. Read my full disclosure here.
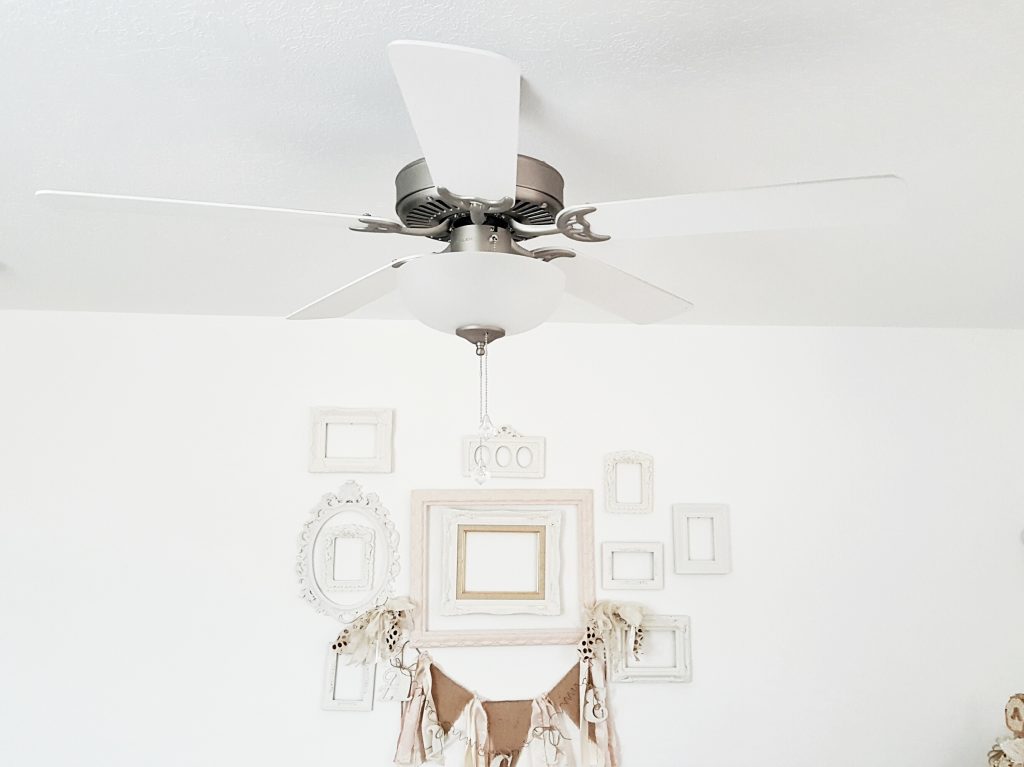
Everyone has builder basic lighting in their house somewhere. Right!? If you don’t, count yourself as one of the lucky few. From dome lights to ceiling fans, I have had it all. Changing electrical fixtures can be really easy once you learn what to do from an expert. However, ceiling fans still make me nervous. It is a lot of work to switch one out (in my opinion). I decided to work with what I had to just give the fan an update without changing it out.
When we did my little girl’s big girl room, I decided to give spray painting the fan a try. I spray paint just about everything else. So, why not a ceiling fan? The ceiling fan was brushed nickel with dark fan blades. It may work for some styles. Not in this white house. The brushed nickel worked with the colors of my little one’s room. I just needed to lighten up the blades. I started by unscrewing the blades from the fan. Each blade had three screws and it was super easy to detach.
I started by unscrewing the blades from the fan. Each blade had three screws and it was super easy to detach. You probably know the spray painting drill by now. Just in case you forgot, here is a quick video about the technique I use. Start with KILZ primer. This primer is the best primer and base layer for everything I paint. Wait for at least an hour for the primer to dry. If the surface is not as smooth as you like, sand with extra fine steel wool or 220 grit sand paper. Wipe off the blades from any sanding. Next, I took my Krylon white satin spray paint and gave it a nice even coat. I waited a day to let the blades fully cure before I brought them inside. I simply reattached the blades with the same screws as when I detached them.
Let’s talk about the ugly wood pull chain. I could spray paint those too, I guess. I still did not think it would look much better. I went to Home Depot and picked up two acrylic diamond pull chains. The attached to the existing pull chain so easily. No more big brown eyesore. These pull chains definitely added the extra girly glam the fan needed.
I already had the spray paint on hand. I really only had to spend a few bucks on new pull chains. This is not a glamorous fan to rave about. However, It is an easy and cheap fix for the time being. It fits the style of the room so much better. There are another one of these fans in the nursery. I am currently working on giving it an update as well. Stay tuned for that reveal soon. Remember, spray paint can do wonders!
Hi there, I’m Kate. Welcome to White Lane Decor. Thanks for stopping by. I love neutral, bright, and airy spaces. I’m always looking for new ways to turn our house into a home. Have a look around and find inspiration for your next project.
Search
Disclosure
Some of my blog posts, ads, and banners contain "affiliate links." This means if you click on the link and purchase the item, I will receive an affiliate compensation. However, I only recommend products or services I use personally and truly feel you will enjoy too! I am disclosing this in accordance with the Federal Trade Commission's 16 CFR, Part 255: "Guides Concerning the Use of Endorsements and Testimonials in Advertising.” White Lane Decor is a participant in the Amazon Services LLC Associates Program, an affiliate advertising program designed to provide a means for sites to earn advertising fees by advertising and linking to amazon.com.