The following post contains affiliate links. Read my full disclosure here.
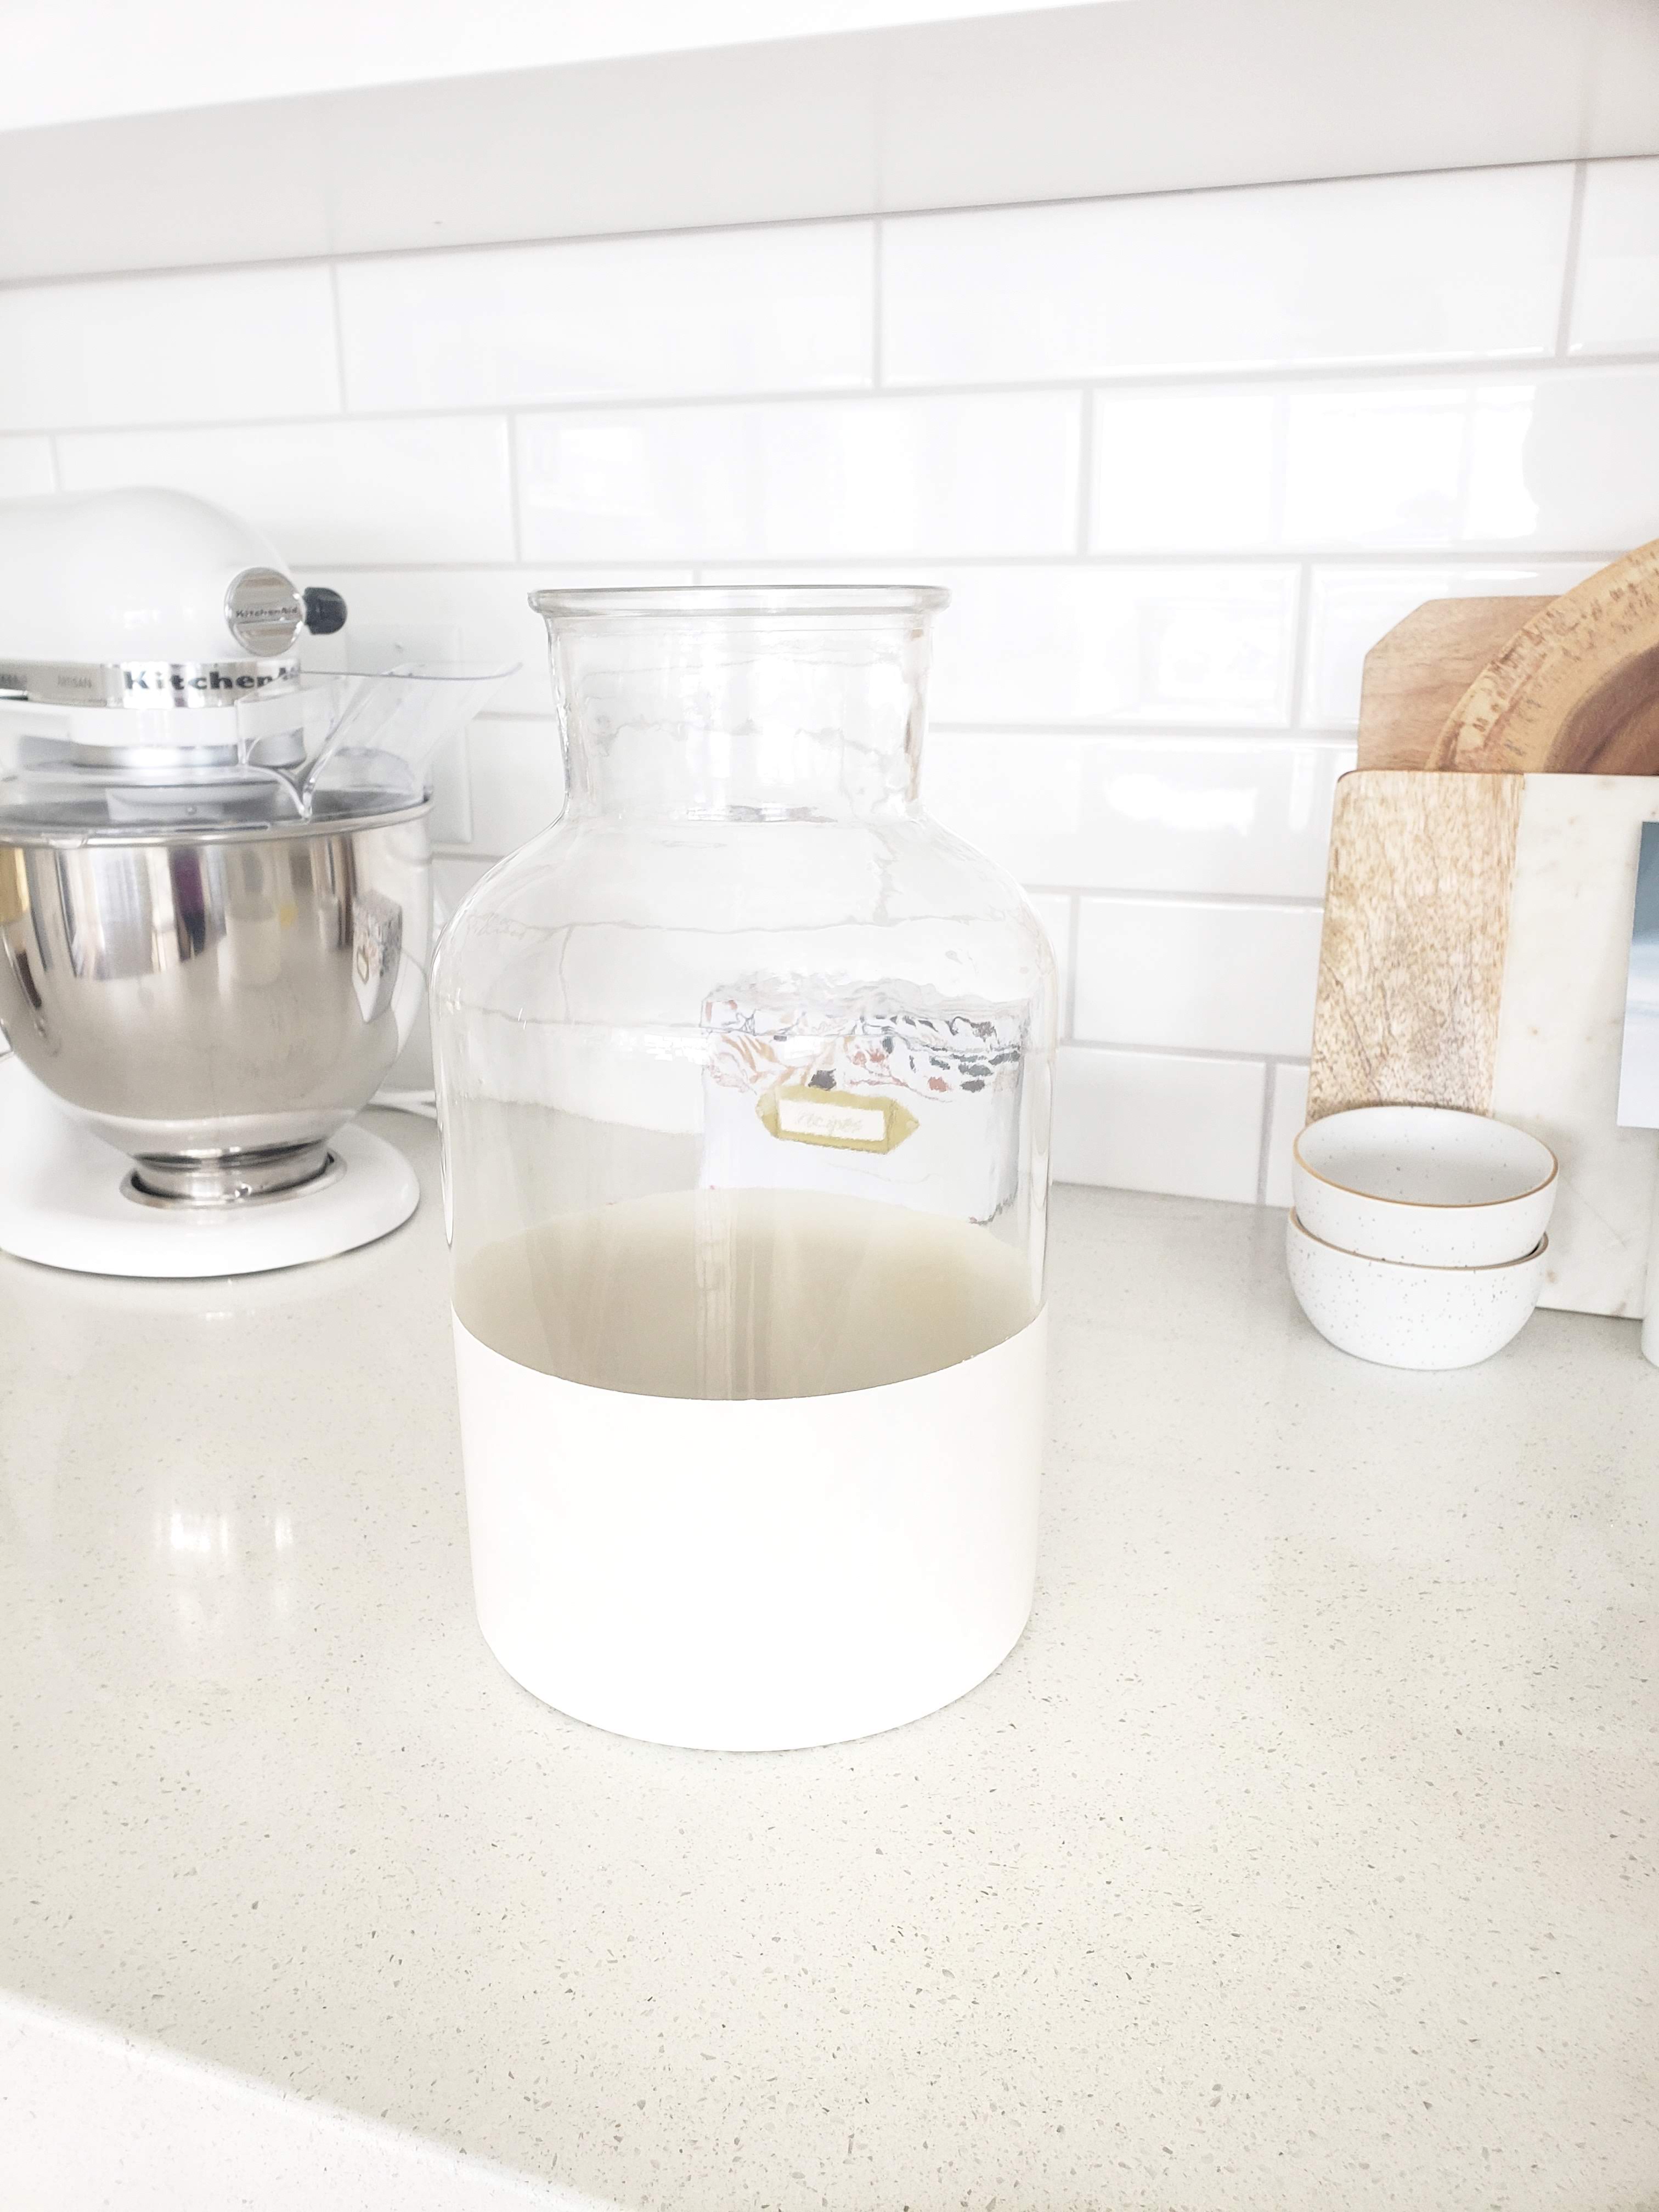
I found this awesome vaseat World Market on clearance for $10. It is normally only a few dollars more than that. There was just a small scratch on one side that didn’t bother me. I took it home but the clear glass just didn’t work anywhere I put it.
I remembered seeing similar dipped vases like this at Serena & Lily. I also had recently seen Katie from Halfway Wholeistic do a DIY on this vase. I knew that I had to go find her post and give it a try. This is a super simple project that can be finished in a few hours. Less than that if you take out the time you are waiting for paint to dry.
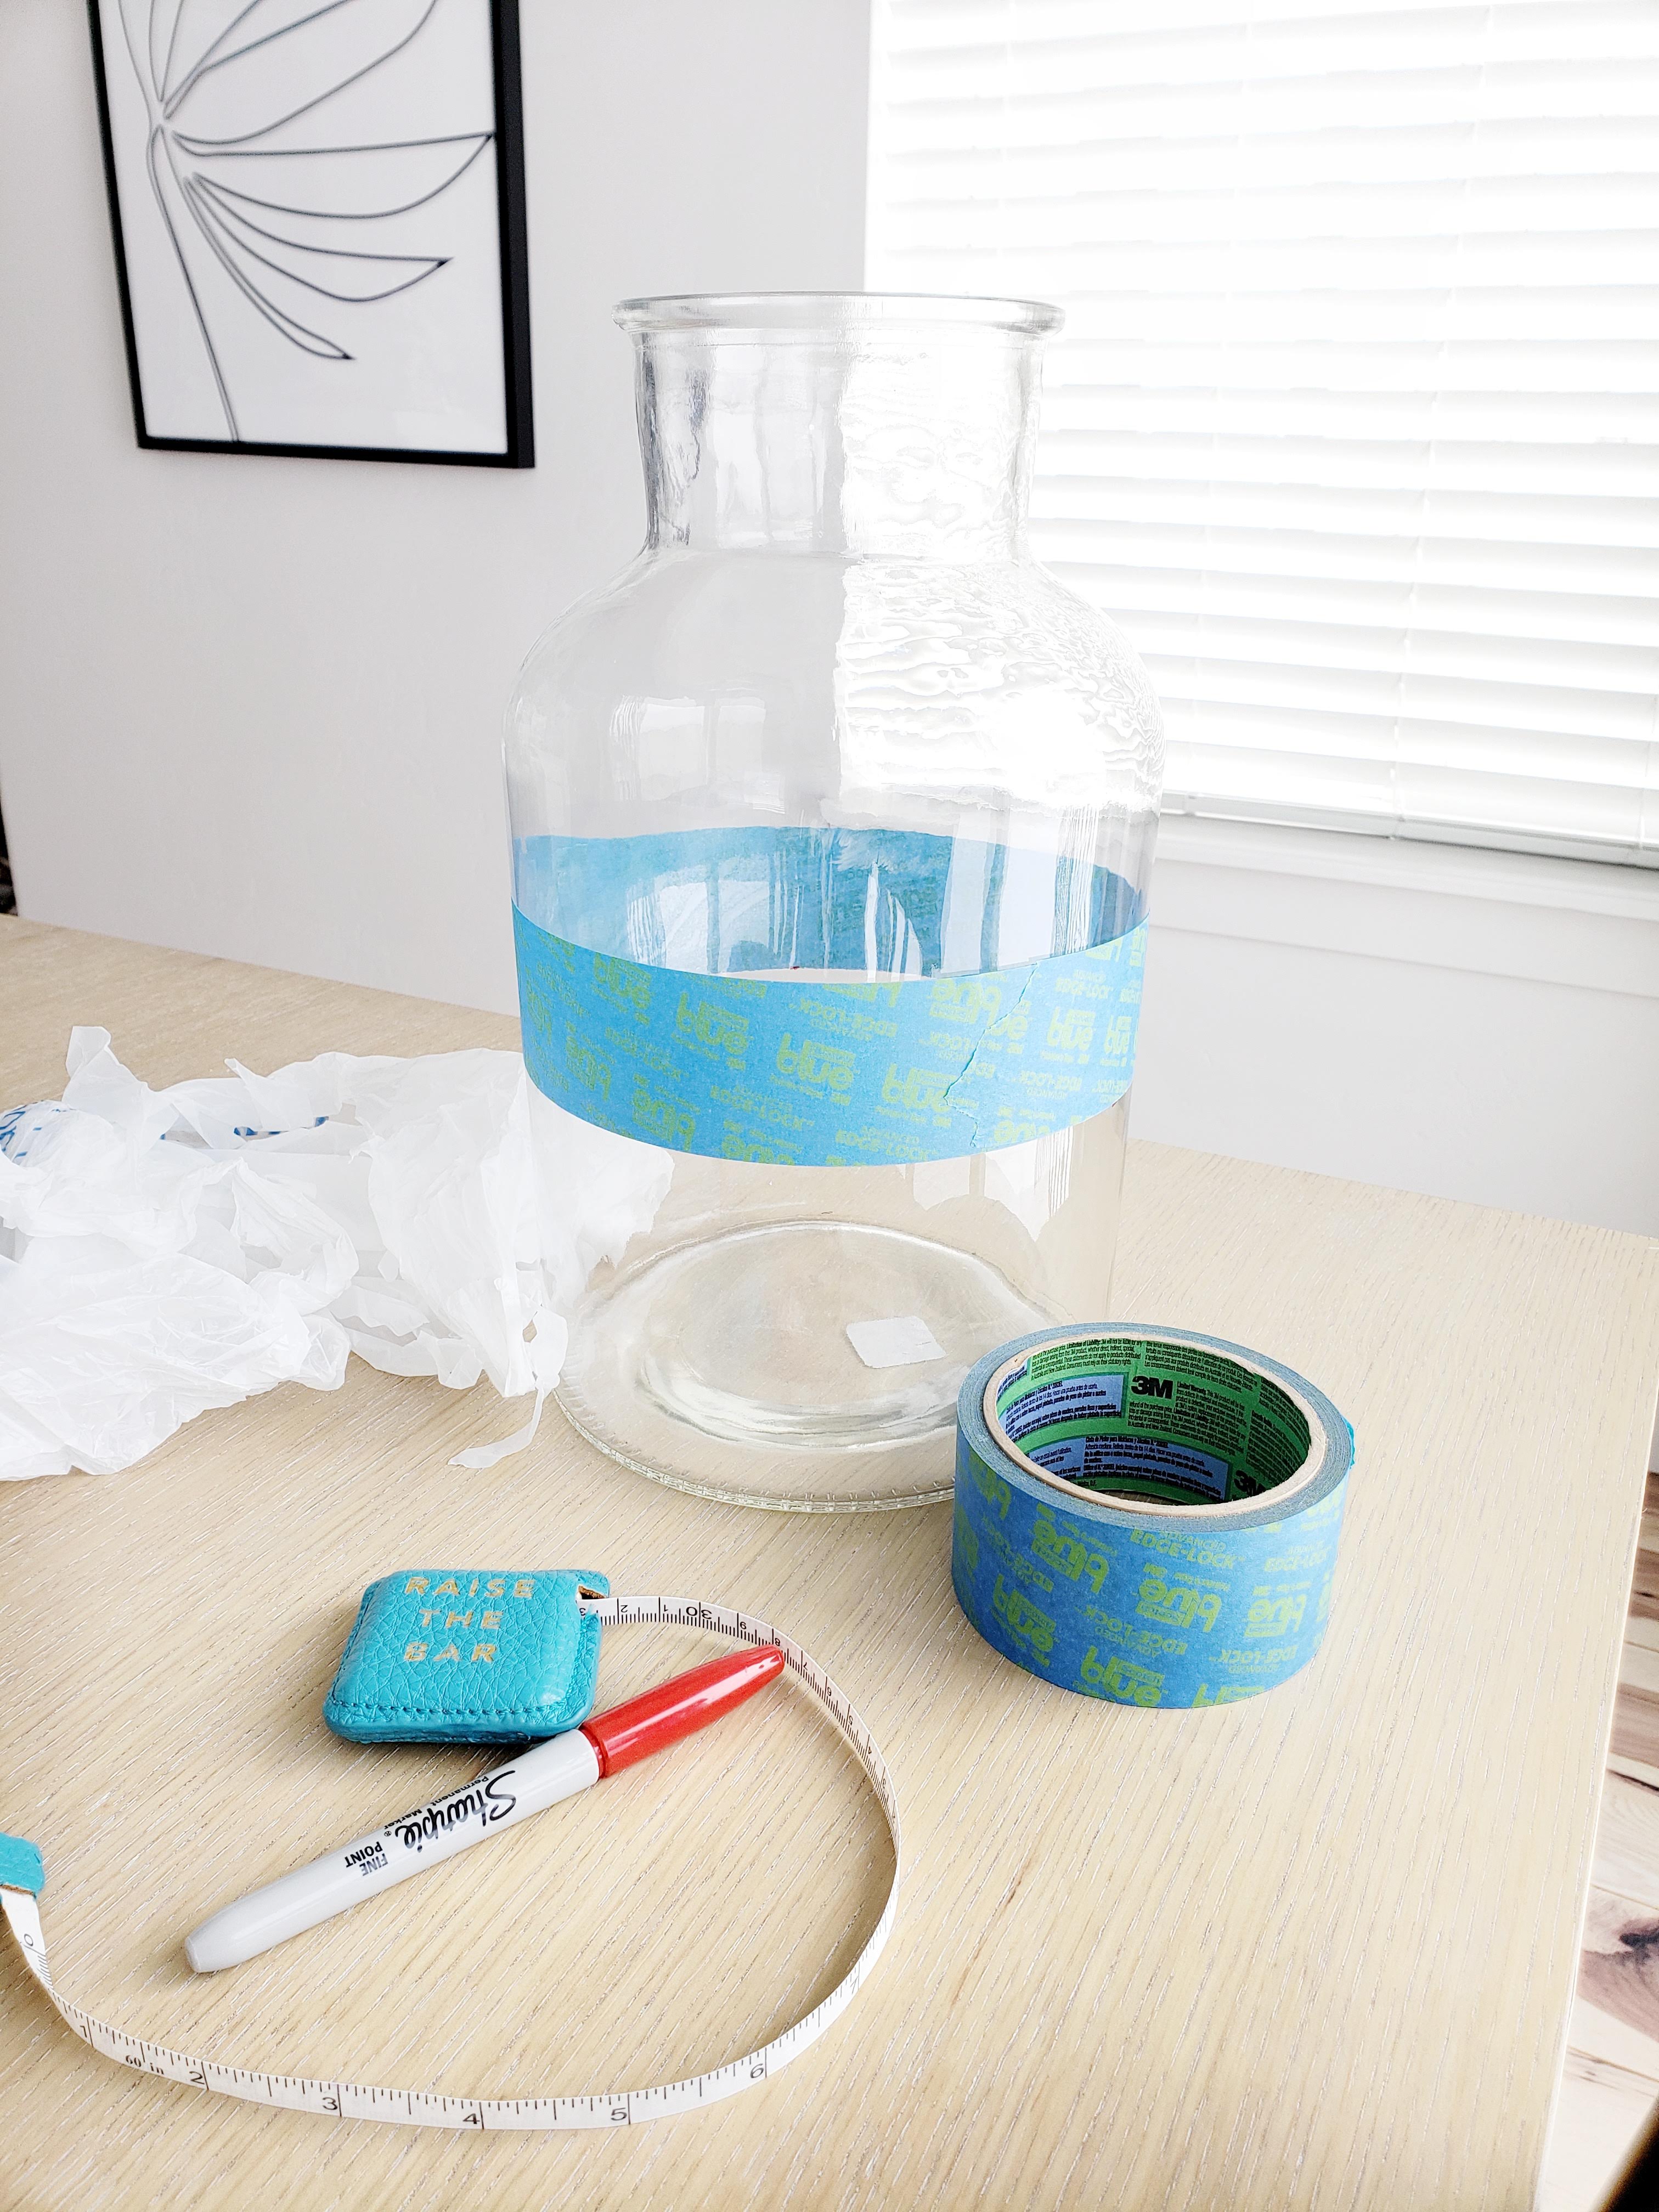
I pretty much followed Katie’s tutorial exactly. However, I did use a permanent marker to measure up three inches in a few spots around the vase. This gave me a guide to know where to put my tape line before painting. The permanent marker will wipe right off the glass vase with rubbing alcohol. I also used my favorite spray paint brand KILZ and Krylon. You can find my secret weapon for perfect spray painting technique in my YouTube video.
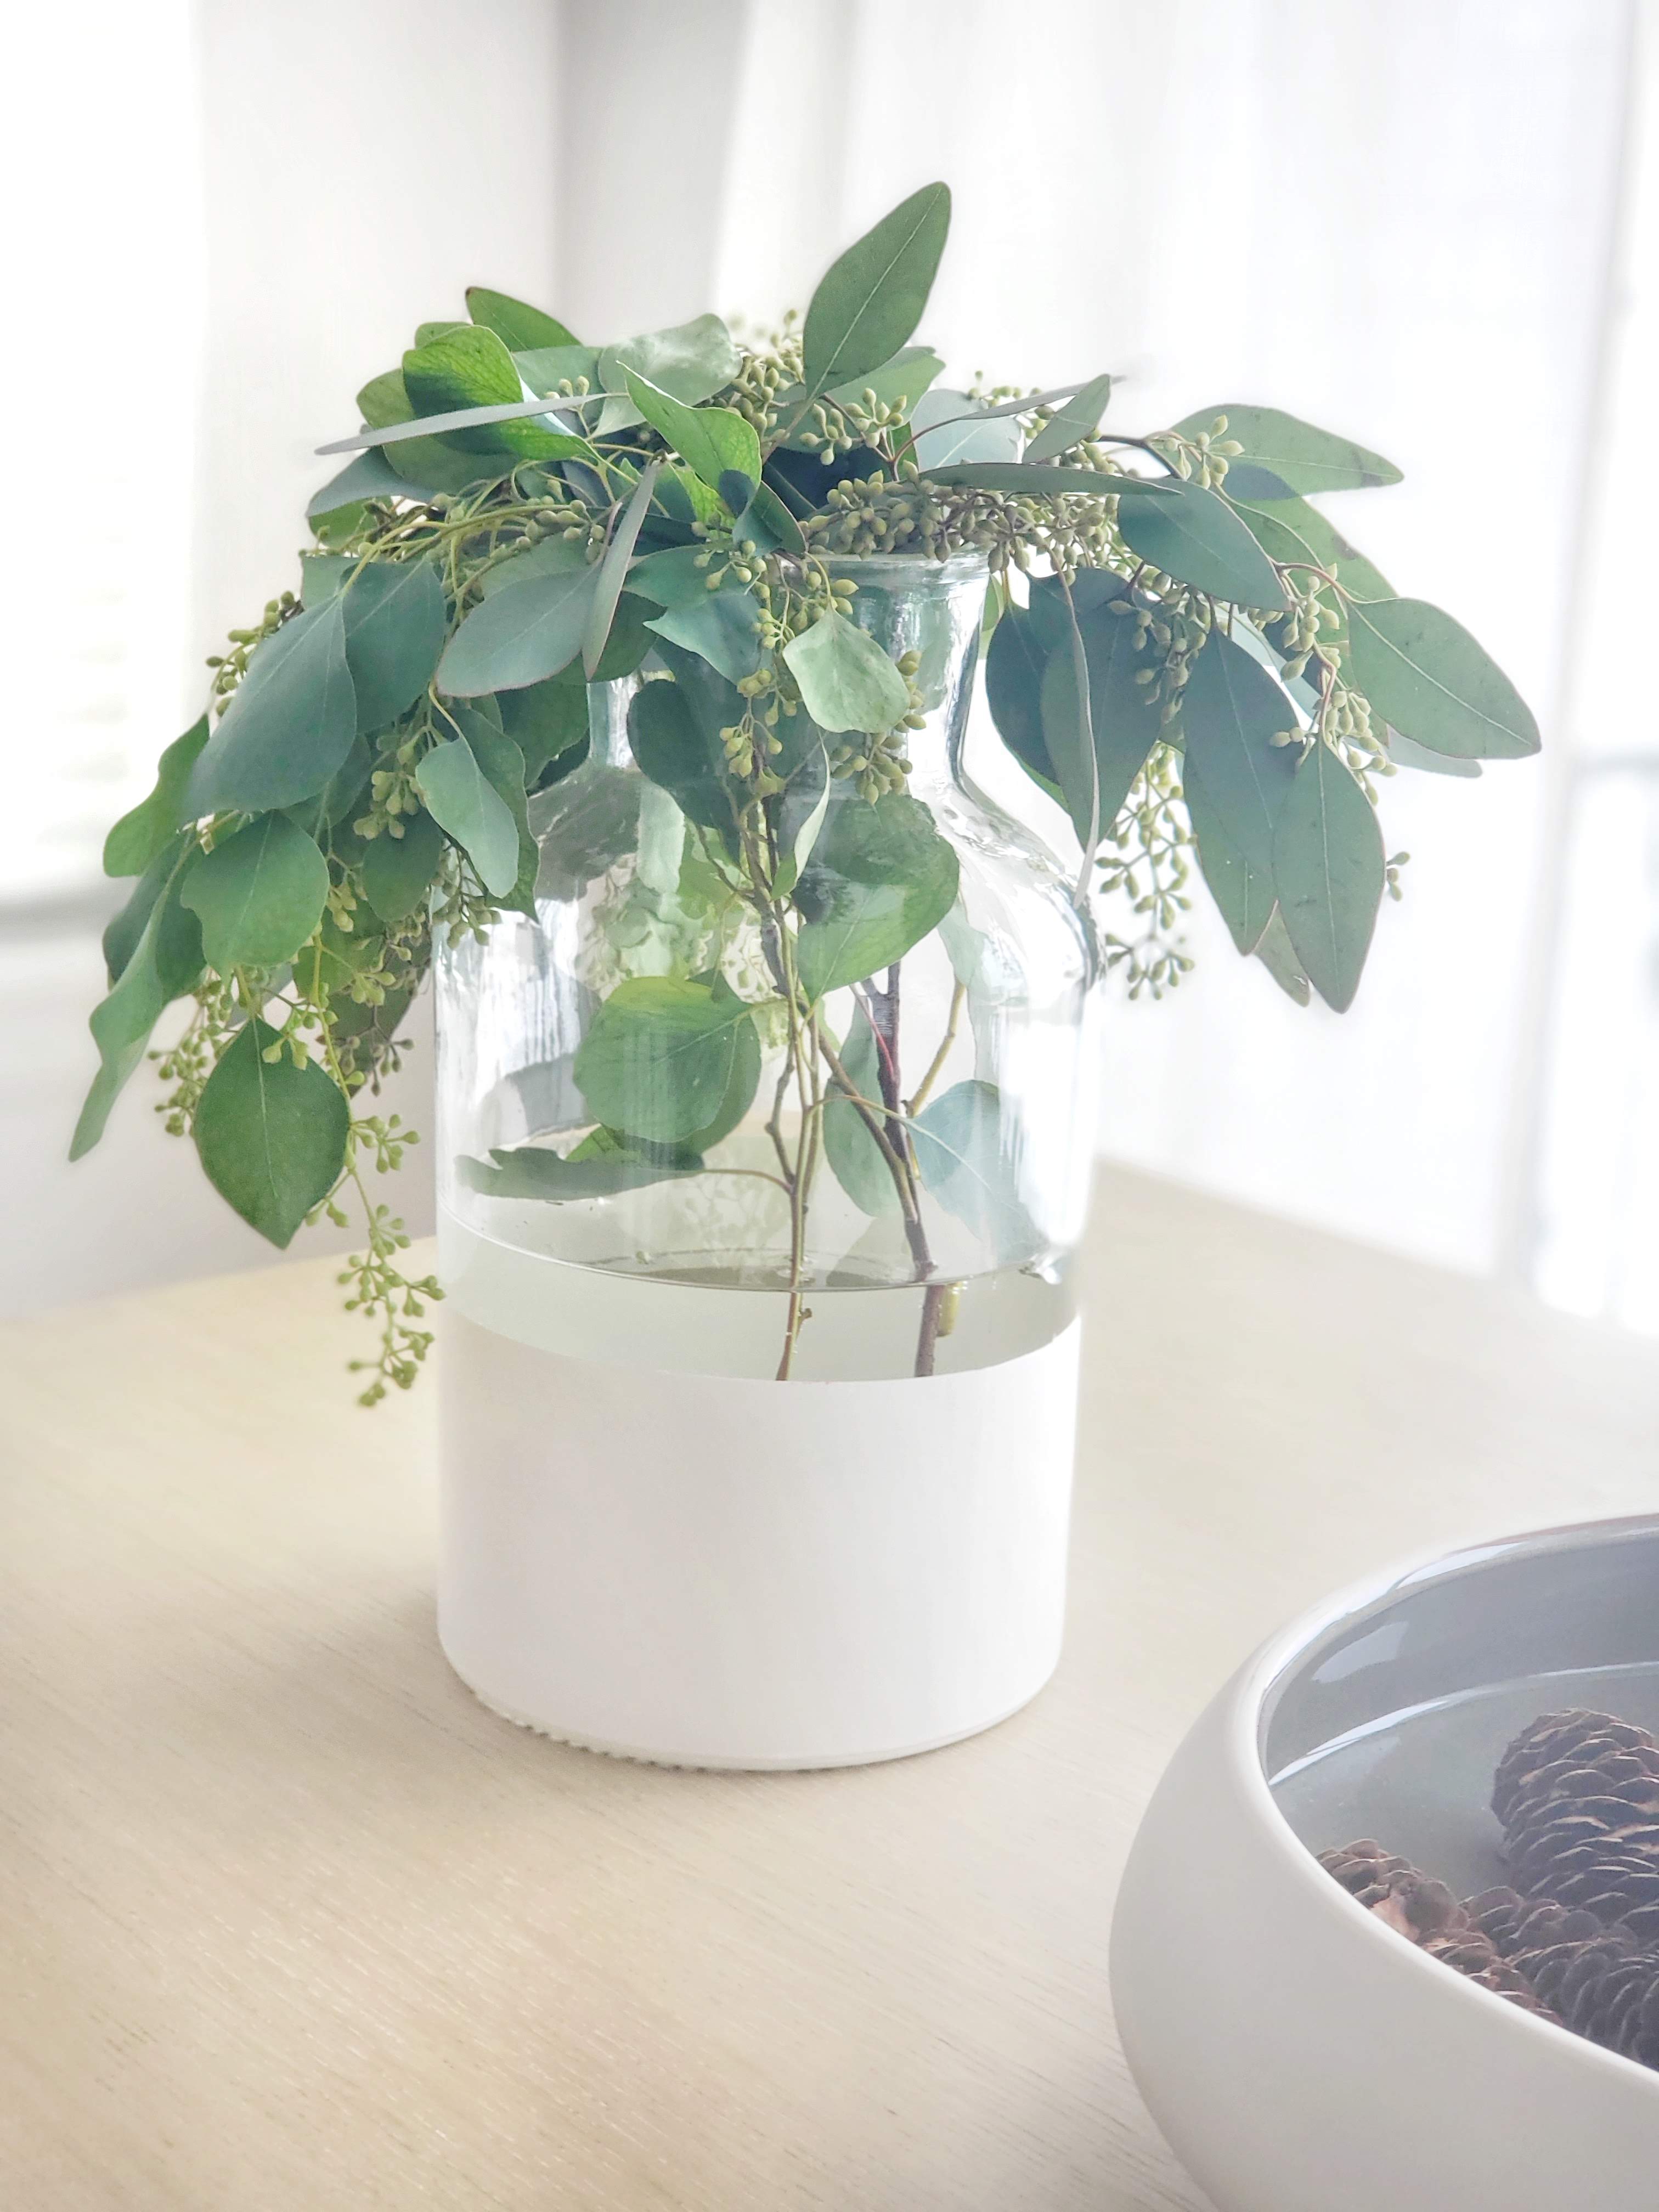
I grabbed some fresh greens from Trader Joe’s for the vase for only $2. I love that place! I usually go grab greenery from outside but I can’t pass up $2 greens. I am sure I will be moving this vaseall over the house. The white base is just what the vase needed. You can find the full tutorial on Halfway Wholeistic.
The following post contains affiliate links and is sponsored by Build.com. Read my full disclosure here.
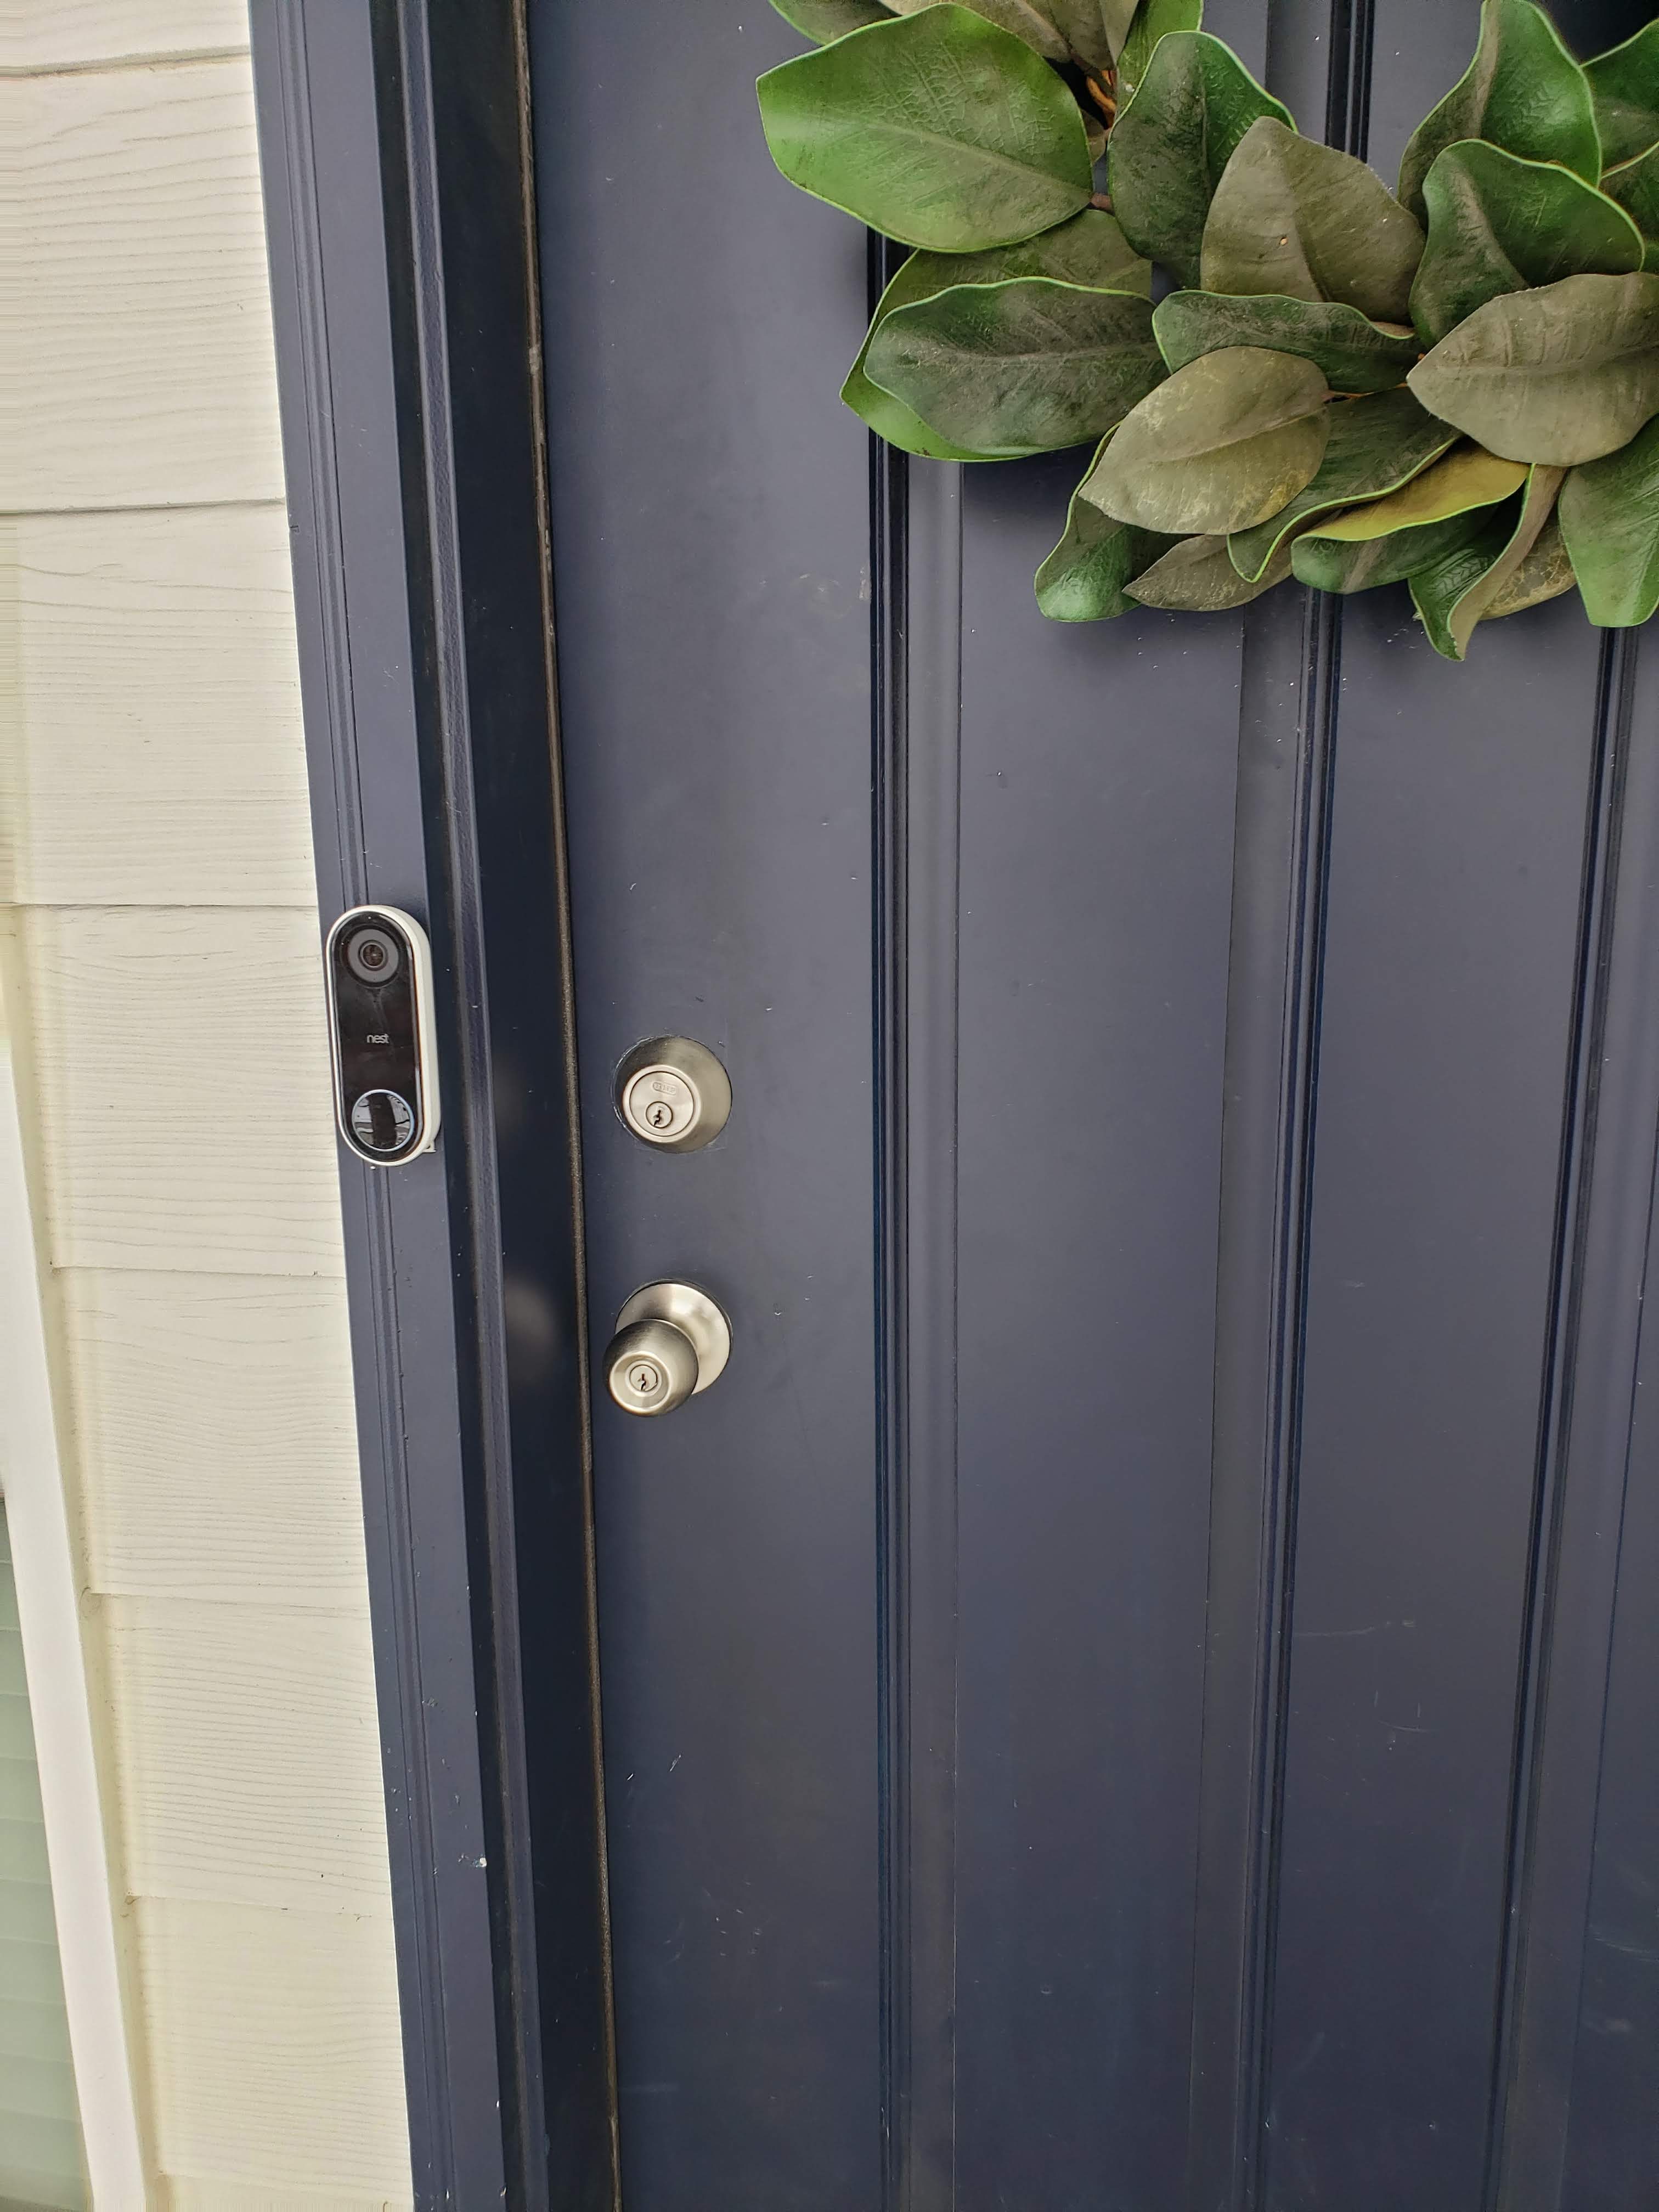
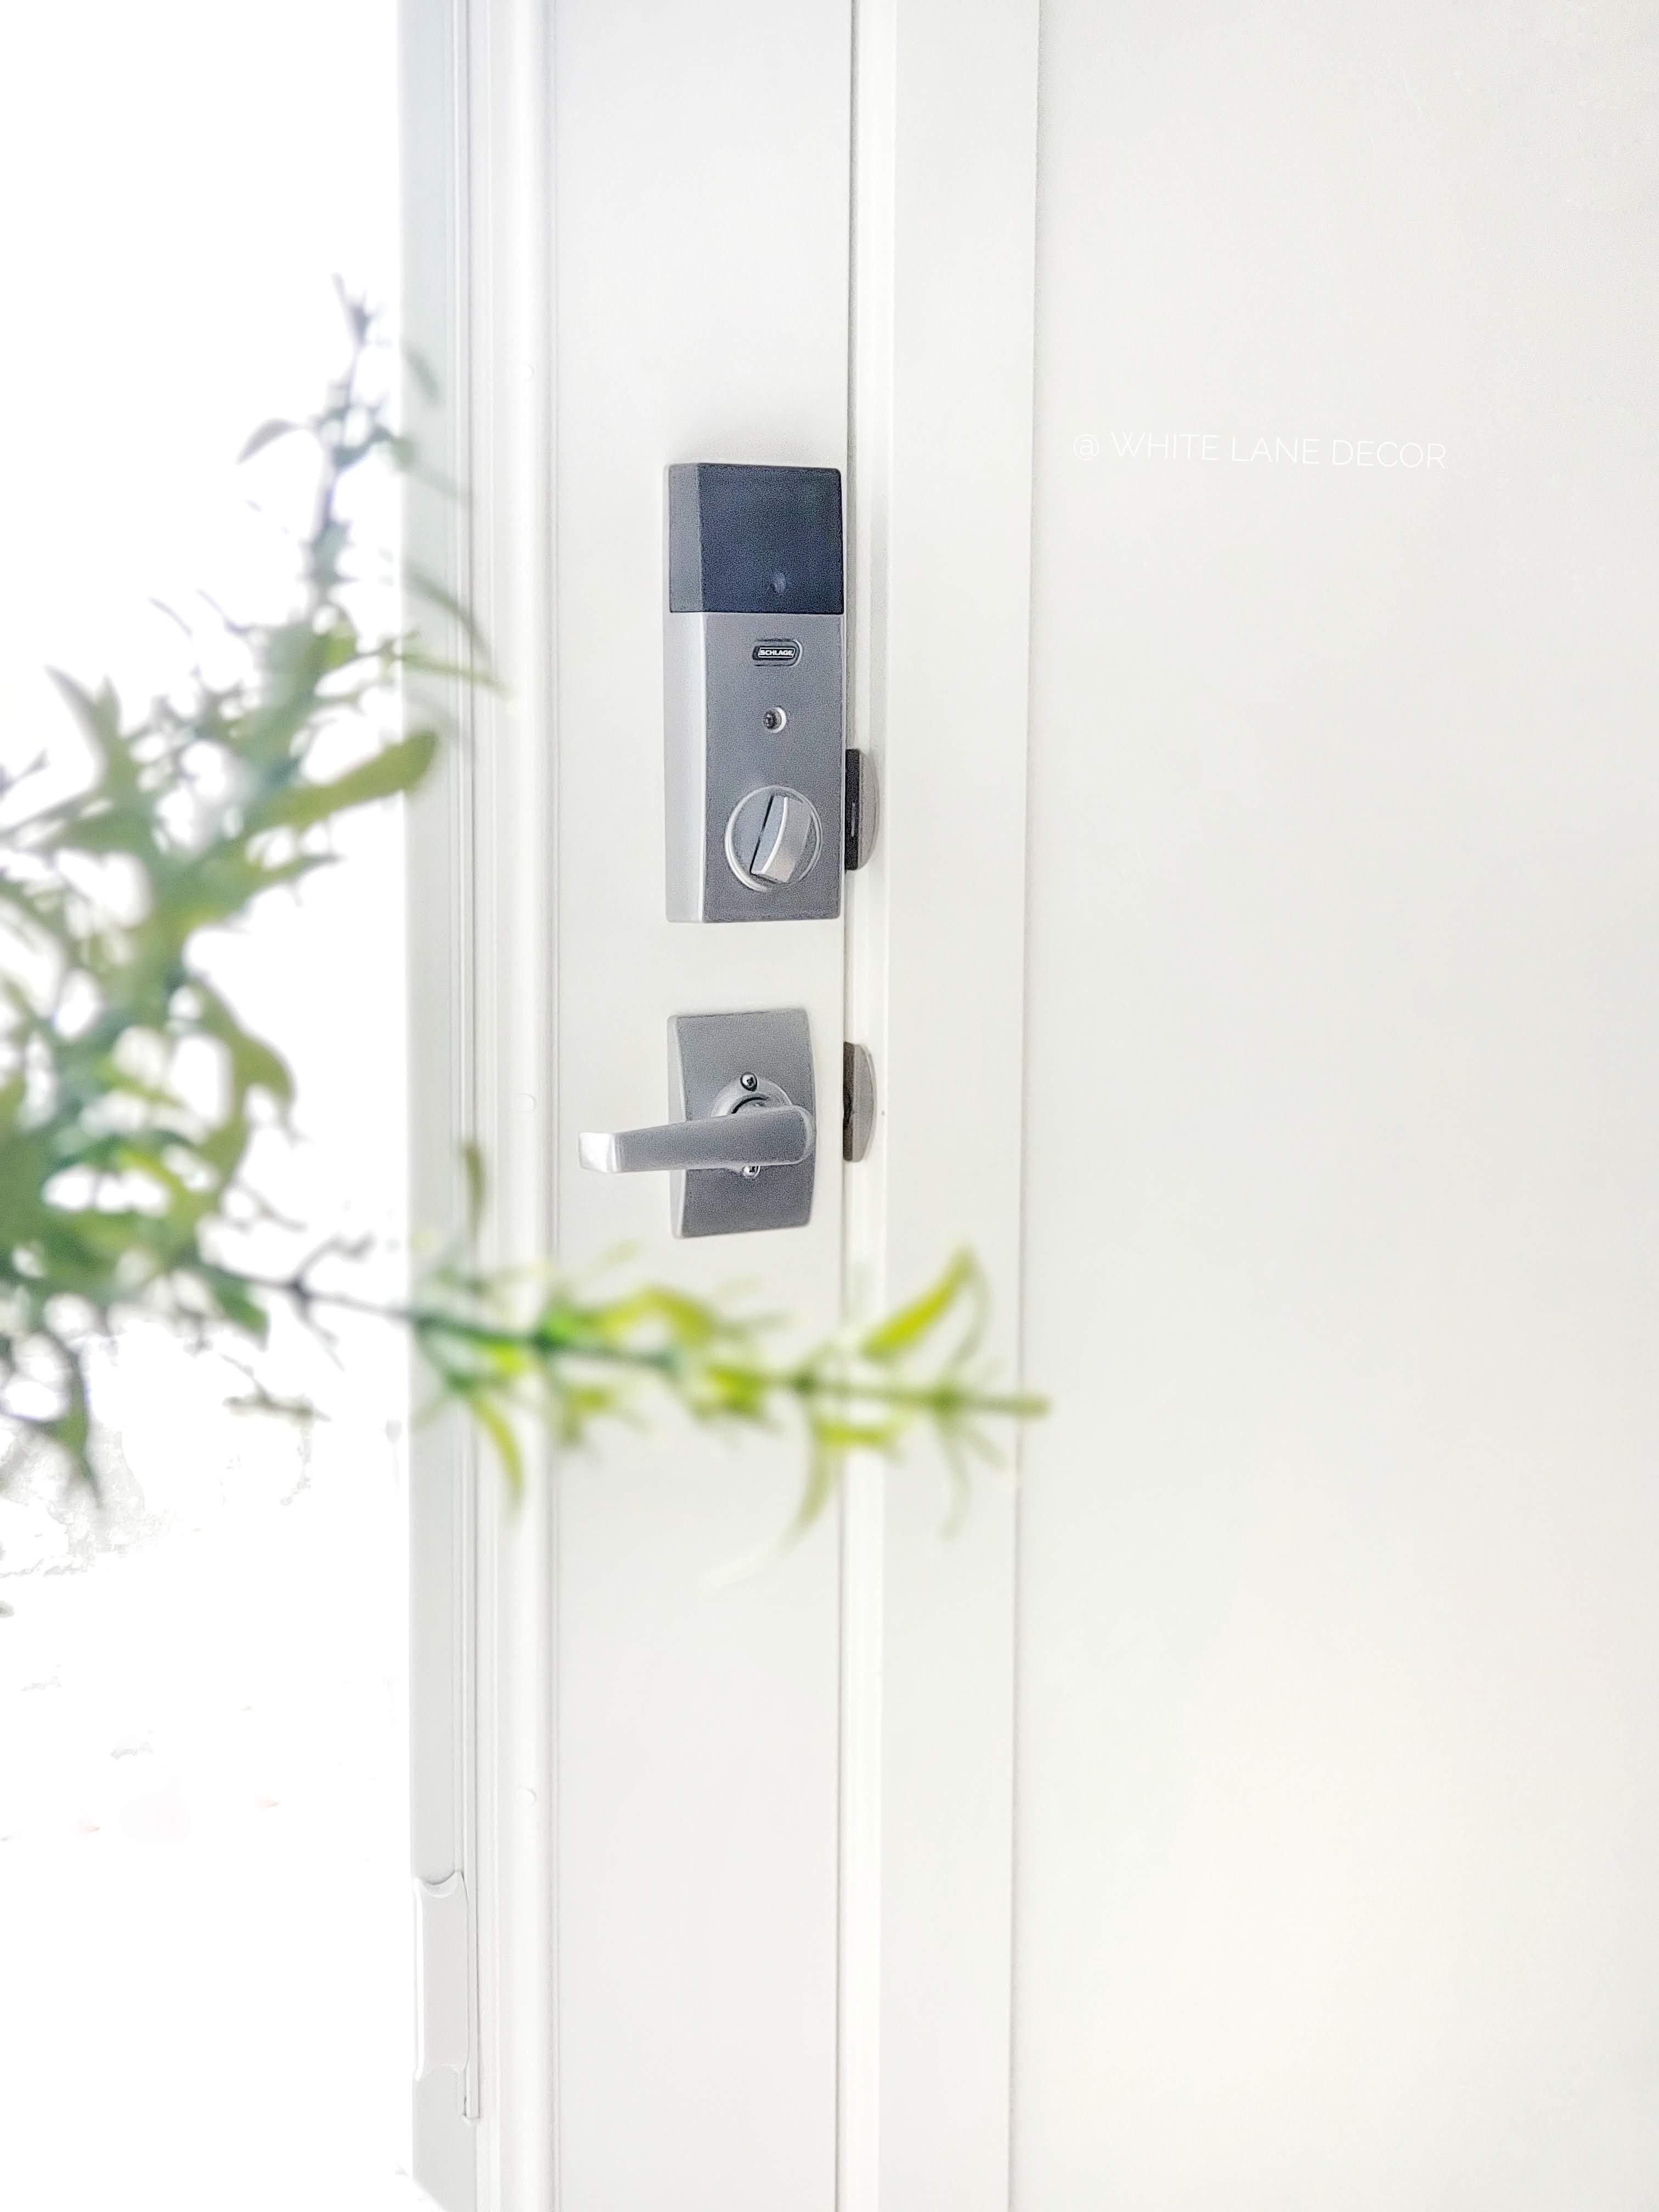
I have been looking forward to this day since we bought this house. Being able to have a keyless entry is a huge bonus for our family. We love not having to worry about keys for our kids or ourselves. The nice part about this DIY upgrade is how fast you can enhance your security and aesthetic.
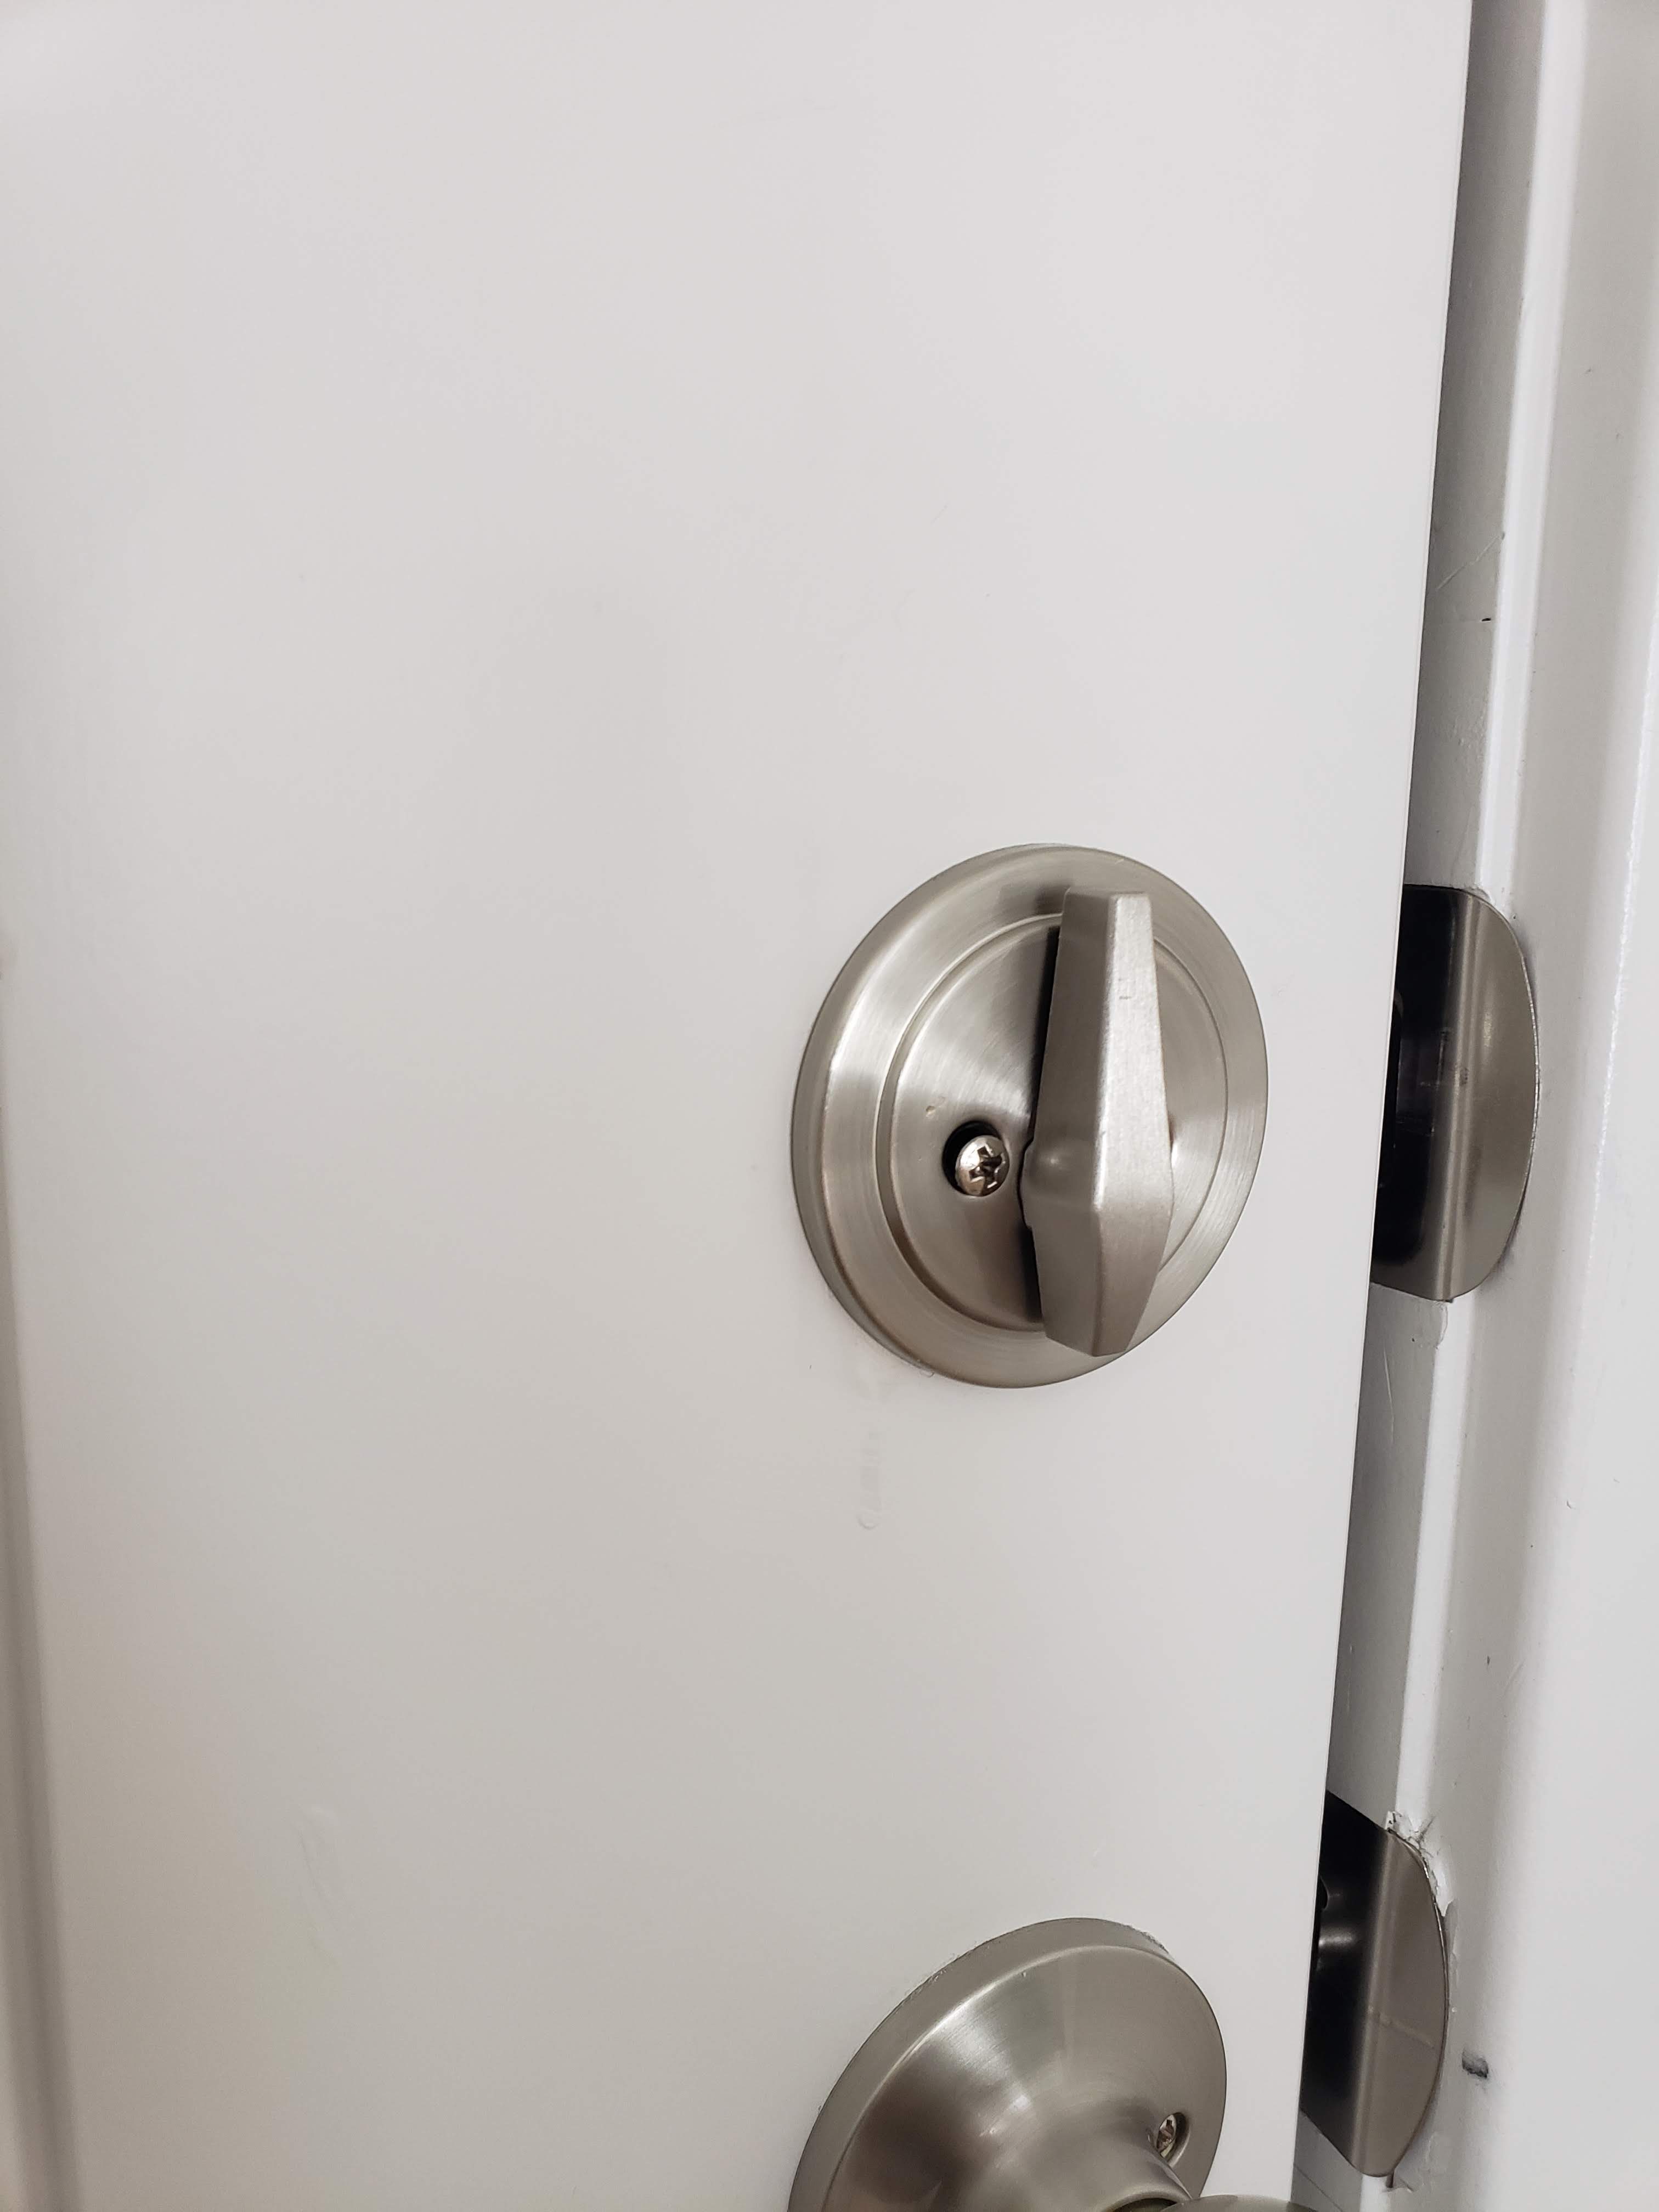
I probably shouldn’t tell you how bad our door locks were. The previous owners had removed them to install their security system and then put the original lock set back on. The front door deadbolt was hanging on by a screw that always would fall out. Not the safest setup for a lock. The knob was just basic brushed nickel that came standard on the house.
The basement was the exact same lock and knob as the front door. We finished the basement after buying the house. We chose the basic lock and knob because we knew we wanted to swap it out someday. We wanted the new lock sets to match for both doors.
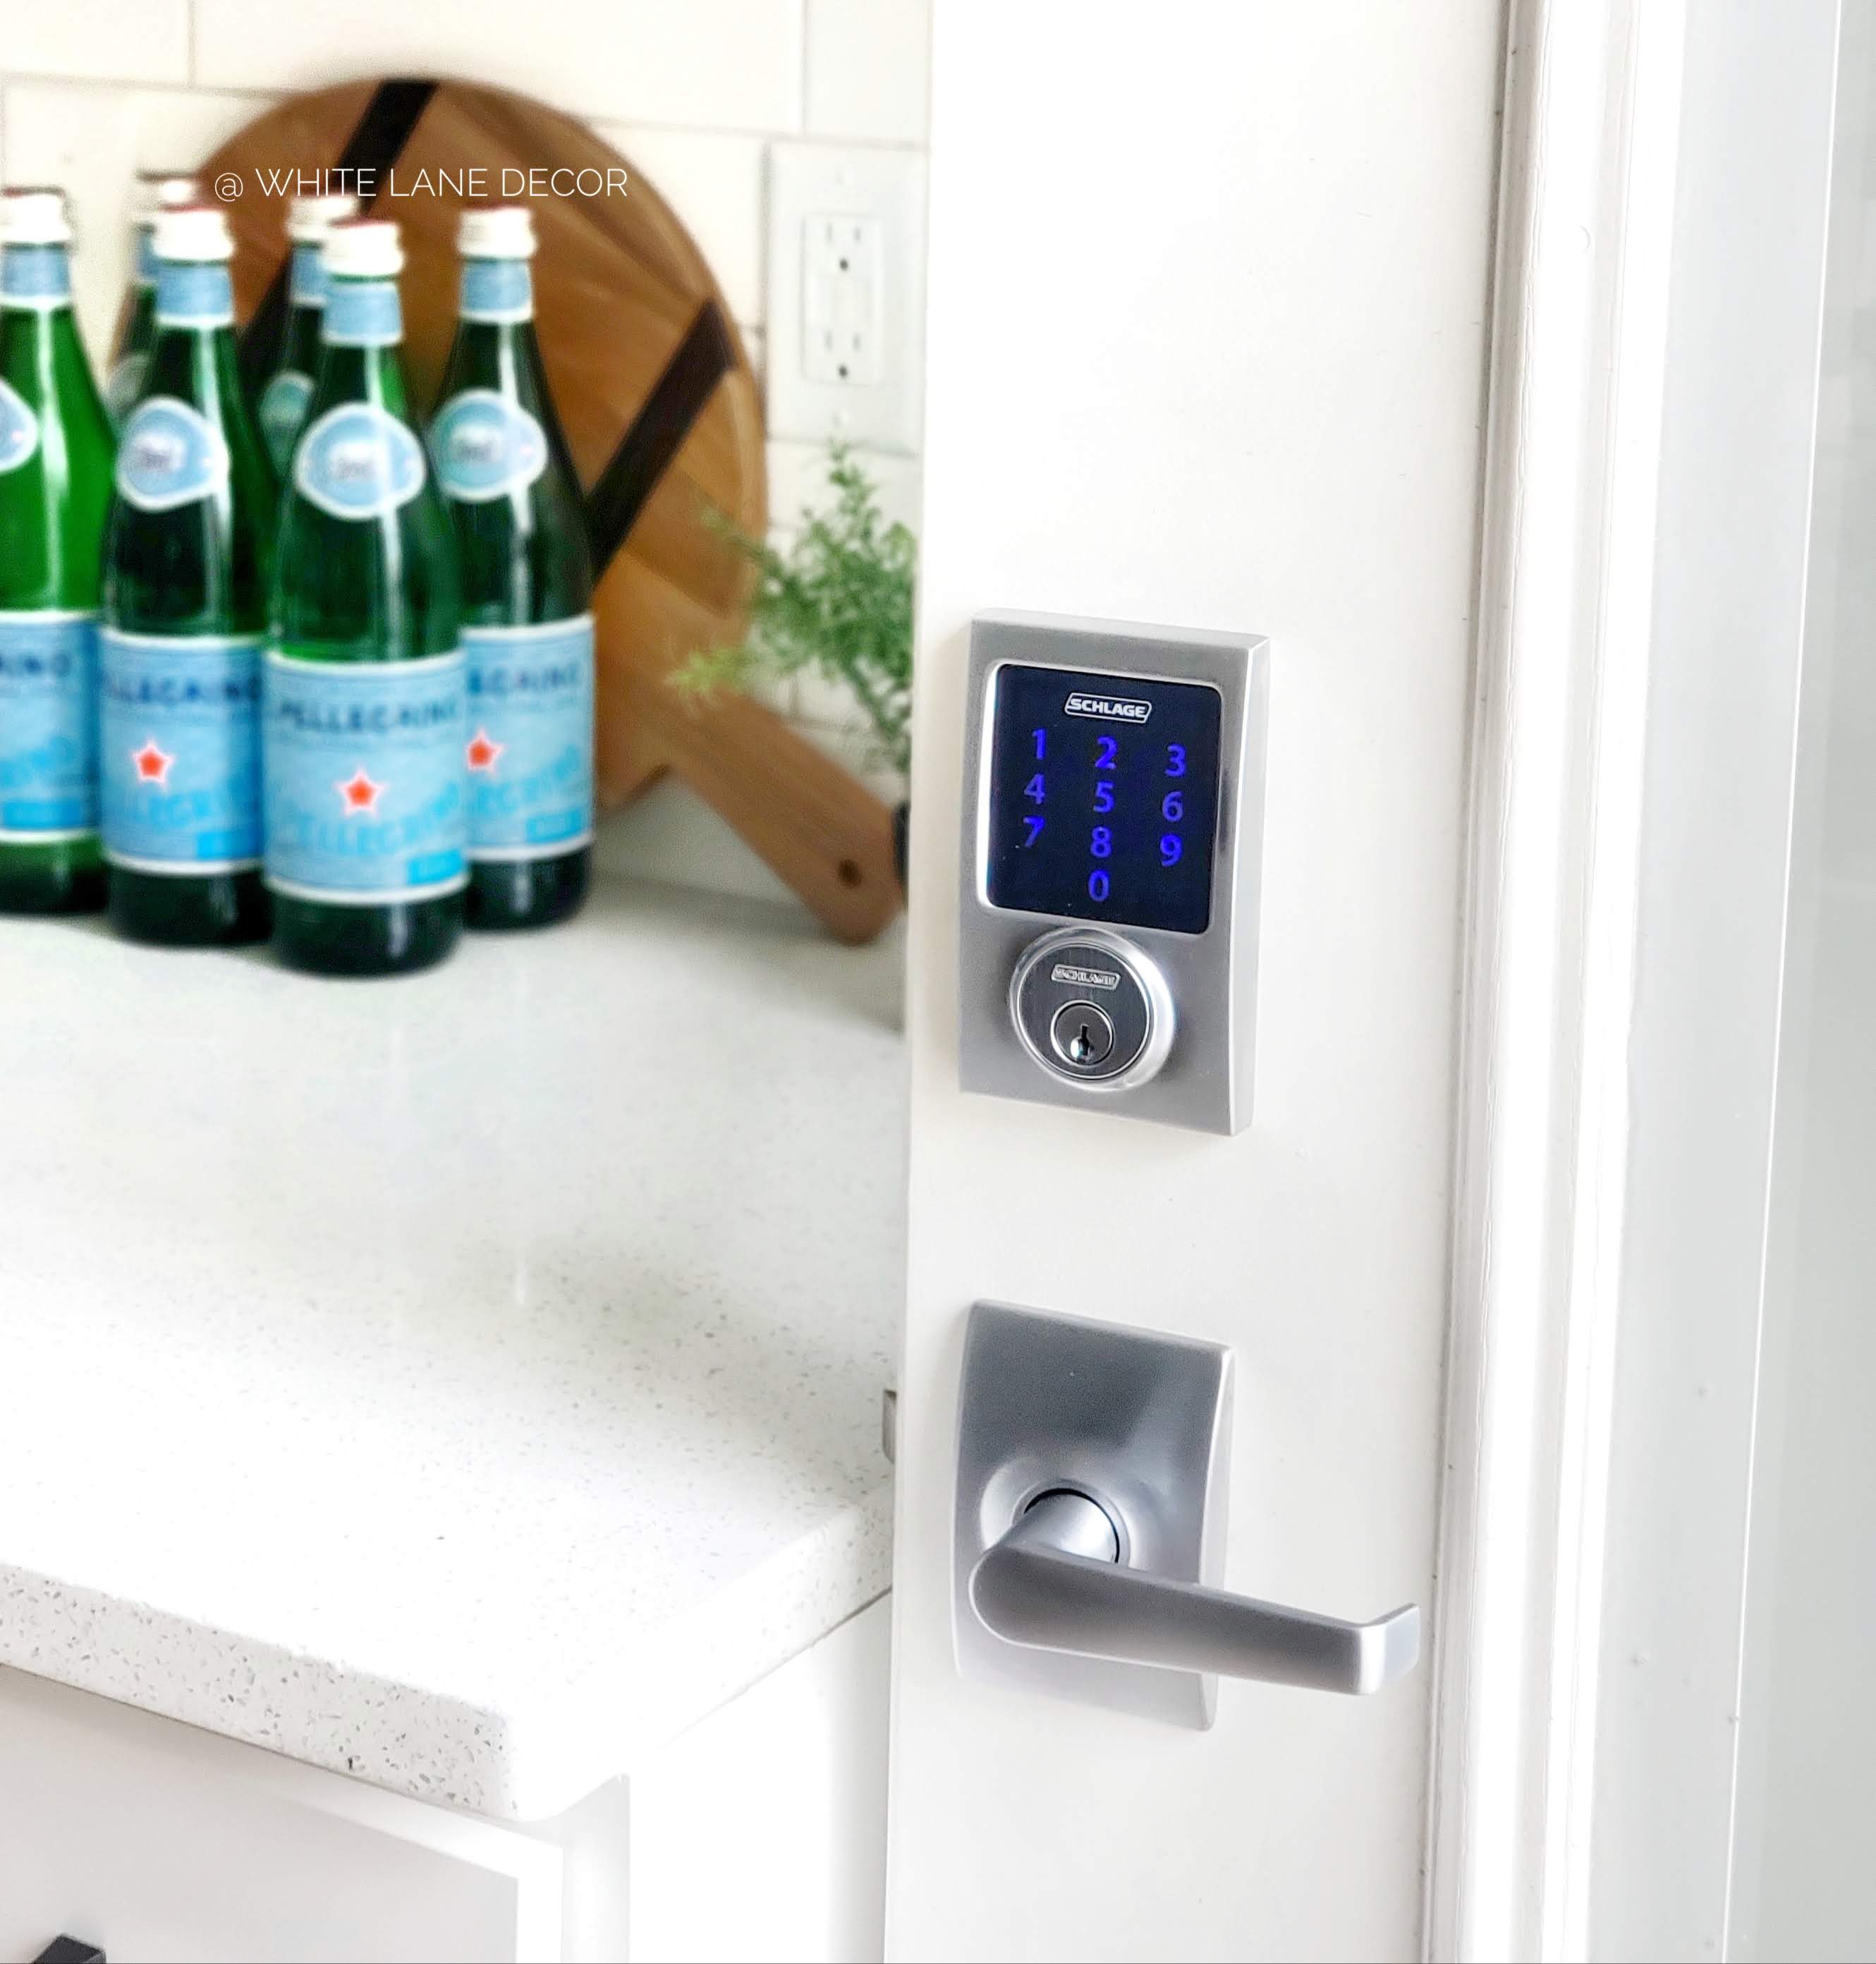
As I started looking into a smart lock system, I knew Build.com would have what I needed. I found this Schlage Connect Century Touchscreen Deadbolt with Built-in Alarm and Passage Elan Lever. There were a ton of options for smart locks. However, this met all of my strict criteria. It is affordable and the highest rated deadbolt for residential security. The lock comes with a deadbolt AND a lever. This set also uses Z-Wave technology. What does that even mean? Well, Z-Wave is the best technology a smart lock can offer allowing you to control the lock remotely by smartphone or computer through compatible home automation or security systems.
That is right! I can unlock/lock my doors from anywhere I have an internet connection. I can not tell you how many times I have forgotten to check the doors to make sure they are locked when we leave. With my new deadbolt and levers from Build.com, I can lock my doors anytime and anywhere. I have peace of mind no matter where I go. The built-in alarm is also a great feature for that added security. Did I mention there are no monthly monitoring fees? You buy the lock set and that is all you pay for this technology.
Build.comis one of the few retailers who actually offers this set. The keypad deadbolt is often sold separately from levers. However, this modern sleek lever and square rosette all come together for a great price with this Schlage Connect set. I love shopping on Build.com because they offer some of the best products at competitive prices. They also price match! My favorite is their new shopping App. I can browse and shop all from my phone. It is so easy to use and available for Android or iPhone.
This smart lock allows us to store up to thirty numeric codes. Don’t worry the durable resistive touchscreen is smudge and fingerprint free. The codes can easily be deleted and changed when necessary. You can also receive alerts on your phone when people come and go.
Okay, now the installation. It took us about 20 minutes each door. Not bad for a DIY upgrade that can do everything I mentioned above. We simply removed our old deadbolts and knobs. We followed the easy included instructions to install the smart locks. The locks run on 4 AA batteries (included) that have a one-year battery life.
I wish we would have ordered these sooner fromBuild.com. The levers look so much better than the boring basic knobs we had. Also, the keypad deadbolt has already become the most useful thing we own. Any homeowner can make this easy DIY upgrade to instantly enhance style and security. Hurry and go grab this Schlage Connect Century Touchscreen Deadbolt with Built-in Alarm and Passage Elan Leverfrom one of my favorite sources for all things home, Build.com.
The following post is sponsored by Globe Electric and contains affiliate links. Read my full disclosure here.
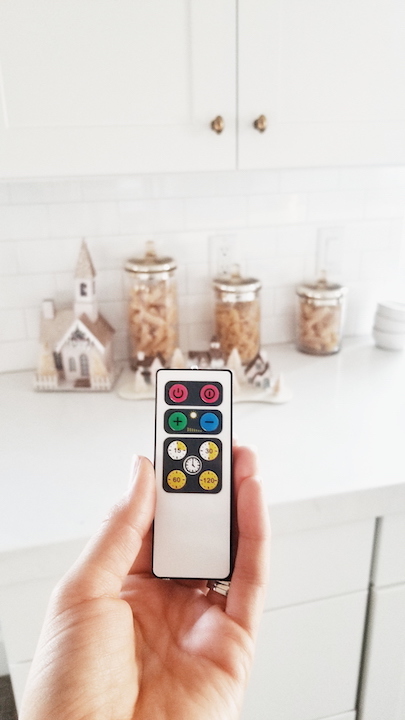
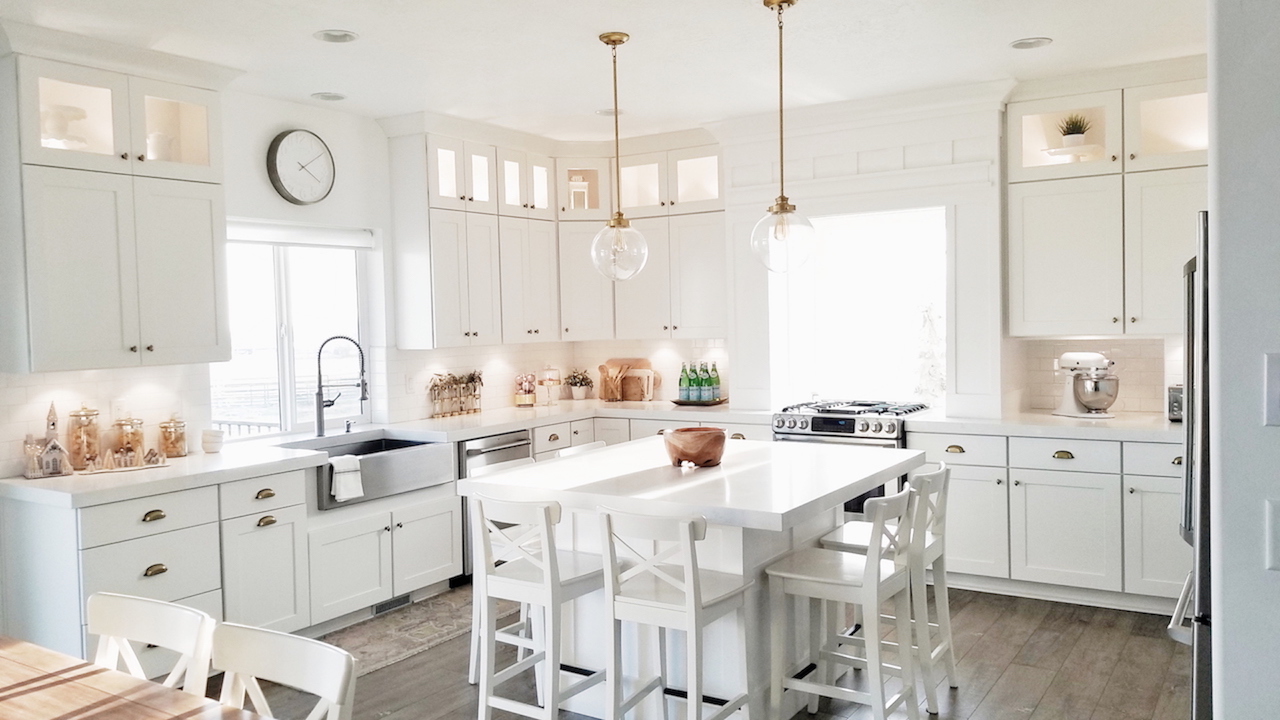
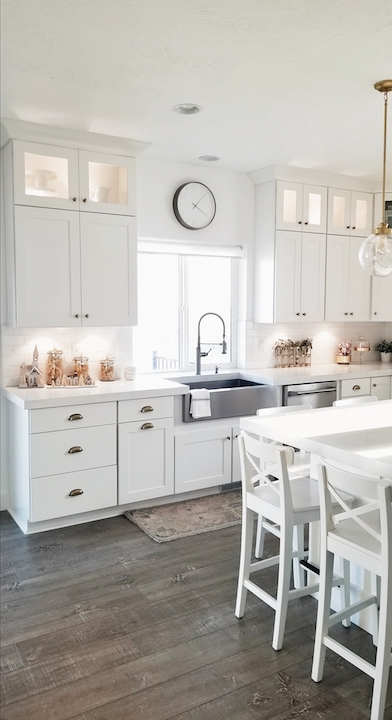
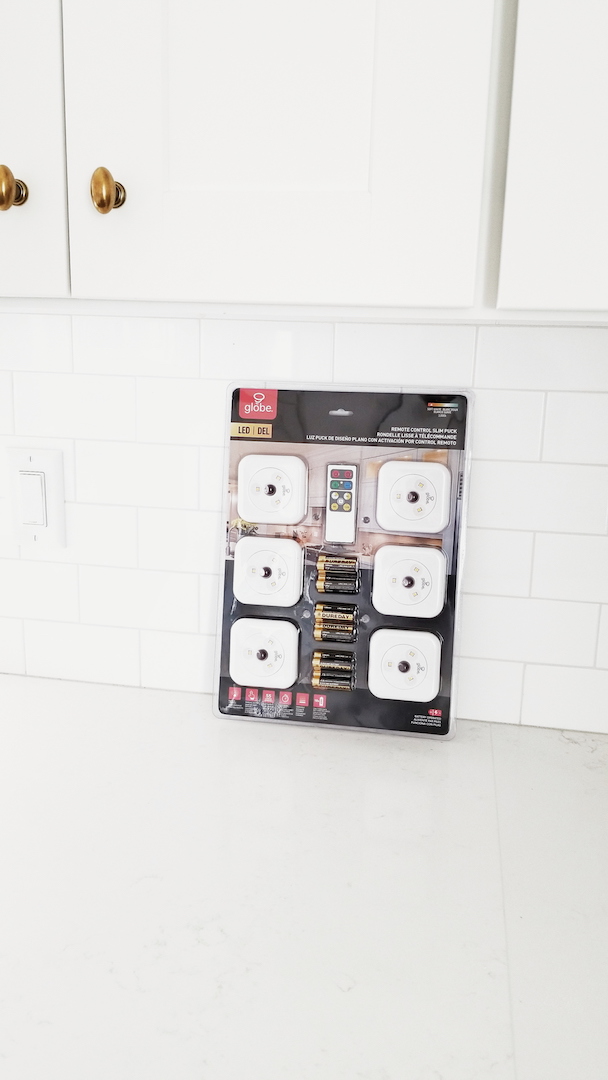
I just wanted to pop in and tell you about the new upgrade my kitchen got. One thing we left out when building this house was cabinet lighting. We opted to leave out lighting under the cabinets and in the upper glass cabinets. When I saw these remote control LED slim pucks from Globe Electric, I knew they would be the perfect solution.
These are really neat little LED lights that can be used anywhere you need light. Closets, pantries, shelving, cabinets, and really just about anywhere you wish you had put a light. They can be turned on by pressing the button or by using the remote. The remote even has a timer! I seriously love that feature. They were so easy to install too. They come with 3M stickers or screws to mount each light. I ended up just using the 3M stickers so I can move them around as I need. Best of all, the batteries come with the light. That is a huge savings right there.
I have to say this was the easiest DIY upgrade I have done in a while. I just popped the batteries in and stuck them where I wanted. It is fun having the added ambiance in our kitchen with the ease of a remote. It’s the simple things in life. 🙂
They come with six pucks in one pack with a remote and batteries. I ended up using four packs for a total of twenty- four pucks. Guess what? One remote can control all of them! I don’t have to use a different remote for each package. They all link up to one remote. It really makes things easy. I am so happy with how they look in our kitchen. I will definitely be using more of these for all the places I wish I had put a light!
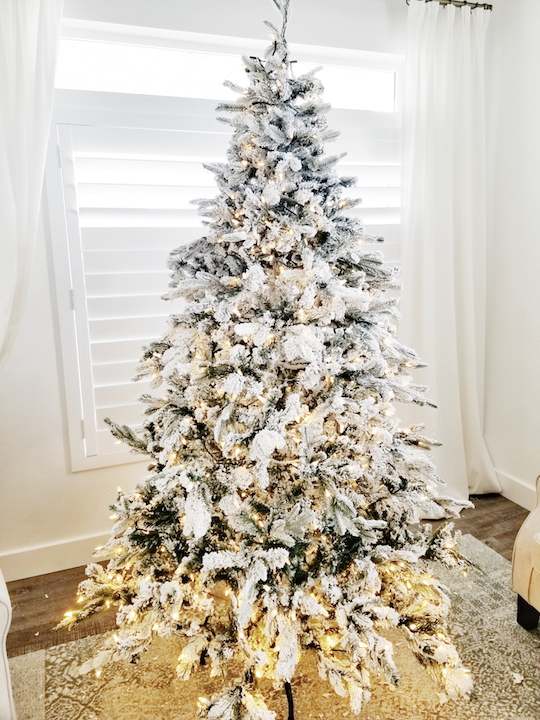
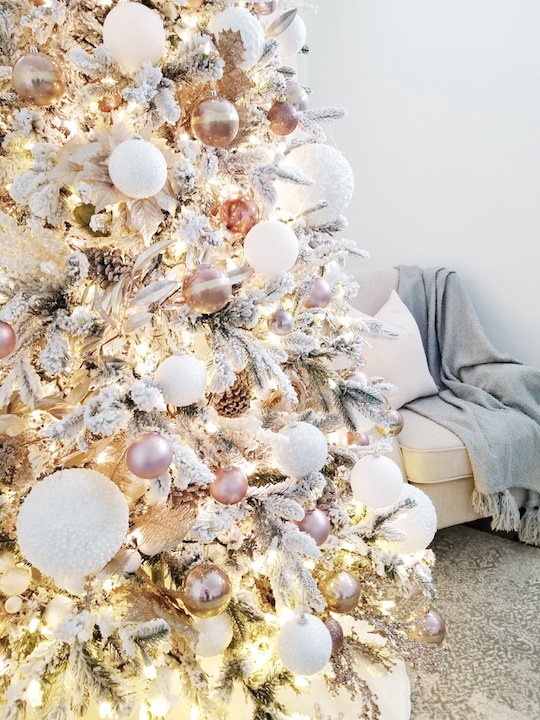
If you caught my segment on The Place yesterday, you may already know these tips for Christmas tree decorating. I am just going to recap those ideas. Decorating a Christmas tree can be overwhelming and daunting to think about. With so many holidays in a row, it can get exhausting trying to switch out all the decor. I wanted to share my five easy steps to decorating a Christmas tree.
Step 1- First, I always start to fluffing out the tree and branches. It is usually out of shape from being in a box or storage. I like to start from the bottom and work my way up all around the tree. I extend the branches out arrange them to fill as much space a possible.
Before the extra strands of lights, I added.
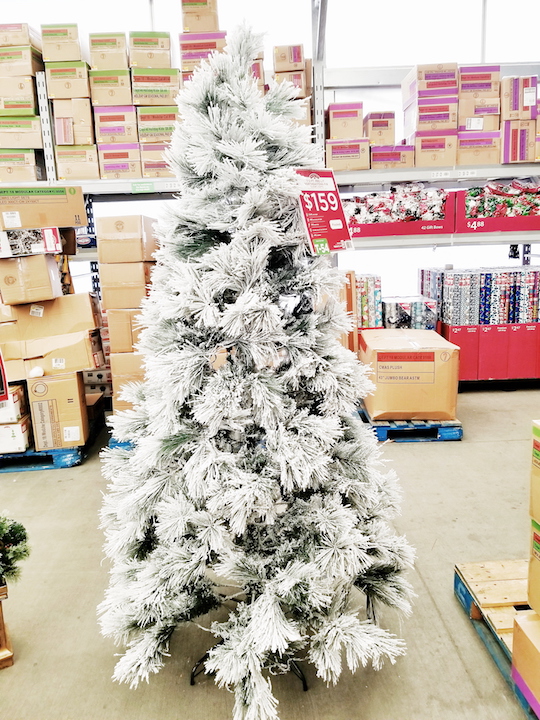
Designer Tip: If your tree is very sparse after fluffing, you can add in extra pieces of garland or greenery that match your tree in empty areas. This gives a false allusion of fullness to your tree and will make it seem like your tree came that way. You can also find a lot of really inexpensive Christmas tree options that look high-end at Wal-Mart.
Great option at Wal-Mart
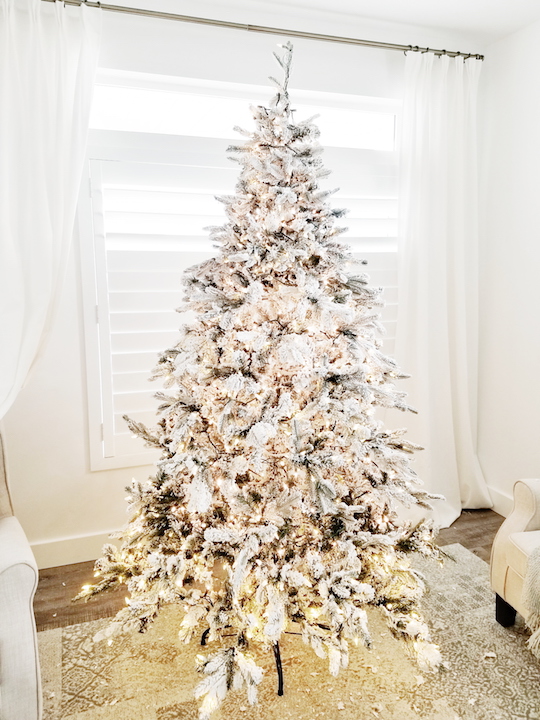
Step 2- Next, I take any garland or ribbon the I want to drape around the tree. This is assuming you have a pre-lit tree. If not, you will want to wrap your lights before you do this step. I like things as easy as possible. So, I always choose a pre-lit tree. Also, if our tree is in a corner or area where only part of the tree is visible, only decorate the visible parts. The wall doesn’t care if the back side of your tree is decorated. 🙂 It will save time and ornaments. Even if the back of your tree faces a window, you can go “light” on the decor for that window side. People driving by will not be able to tell that you didn’t put as much decor on that side. They probably will not be able to see much of anything except a pretty tree all lit up.
Designer Tip: Wrap a few extra strands of lights around your pre-lit tree. The extra lights on the tree make it glow more and seem more vibrant.
After the extra strands of lights.
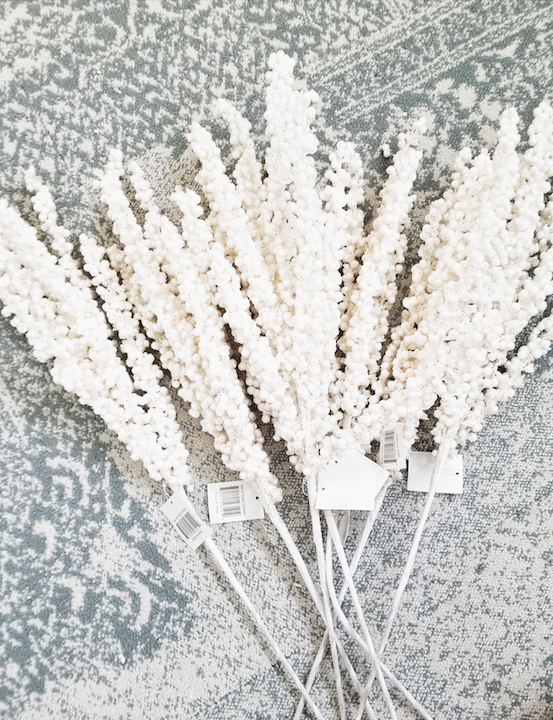
Step 3- Now, I take my fillers and spread them through the tree. I use decorated sprigs, flowers, and twigs. I sometimes bend the end or just stick it straight into the tree. Super easy and it can fill the empty spaces on a sparse tree making it look fuller.
Designer Tip: Cut pieces of ribbon layered together and pinch the center into emptier spots with the long ends draping down. It will look like the end of a bow coming out of that spot without making an actual bow.
Step 4- Then I start putting on my Christmas ornaments. I like to start with my largest ones first. I spread them out to my liking. Then I fill in with my medium and small ornaments. The tree should start looking pretty good by this point.
Designer Tip: Add a new color to your tree for a whole new look. Choose a color of ornaments that coordinate with what you already have. You don’t have to buy everything new by just adding a new accent color that matches your old decor. A whole new look for just a new pop of a few different colored ornaments.
Step 5- The final touch is adding a topper and tree skirt. The topper can be a bow, star, decorative sprigs, angel wings, or anything you want. Don’t be afraid to think outside the box when it comes to this. The same goes for your tree skirt. If you can’t find a traditional tree skirt you like, use a blanket, scarf, tablecloth, or fabric. Anything can be draped around the base to give it the finished look. You can even use a large basket or galvanized bucket for your base.
Designer Tip- Leave up a tree for Valentines and just take down the Christmas ornaments. Add some valentines garland and decor to the tree instead. An easy decoration that can transition to a new holiday. You could even put up your tree earlier and add Halloween or Fall decor before you put on the Christmas decorations.
That is all! Five easy steps and you are done. Now got get started on that tree and have fun. Keep it simple and enjoy!
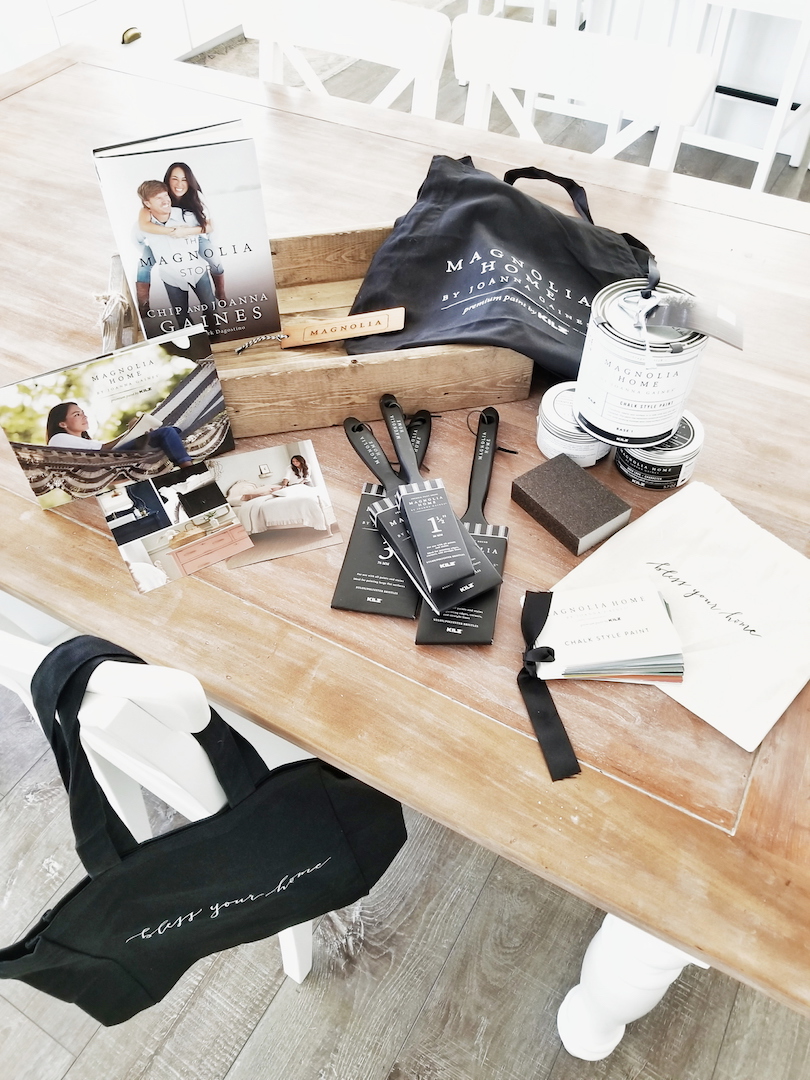
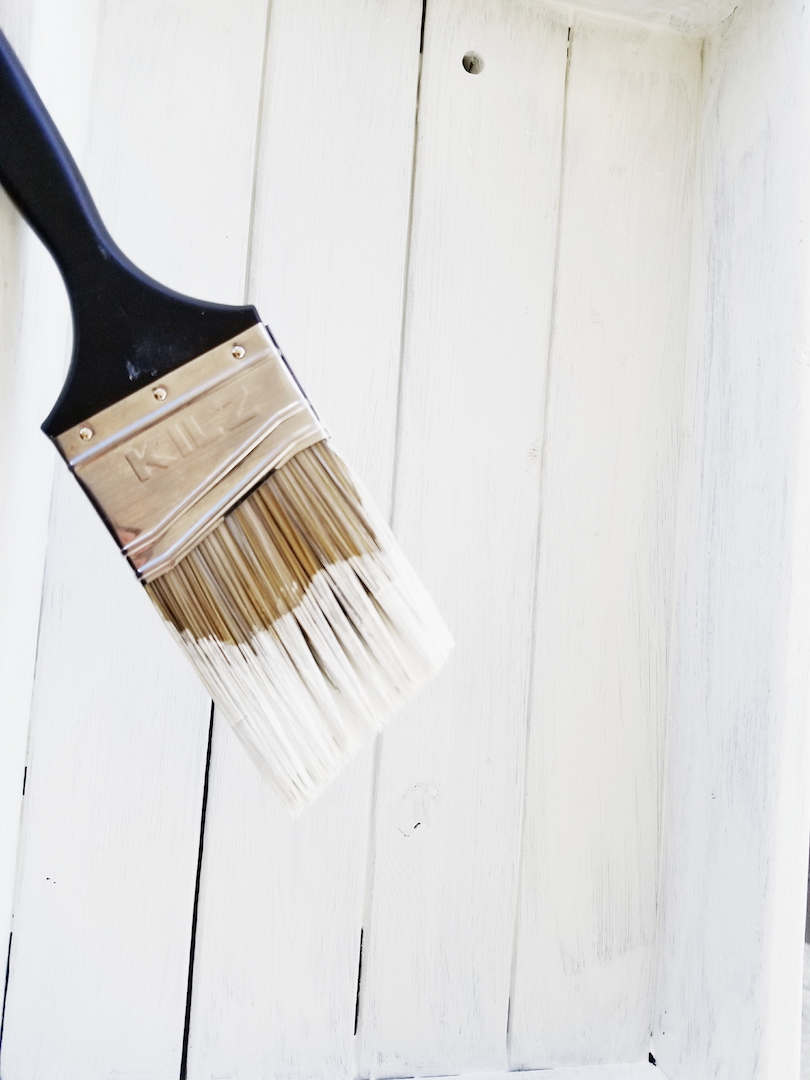
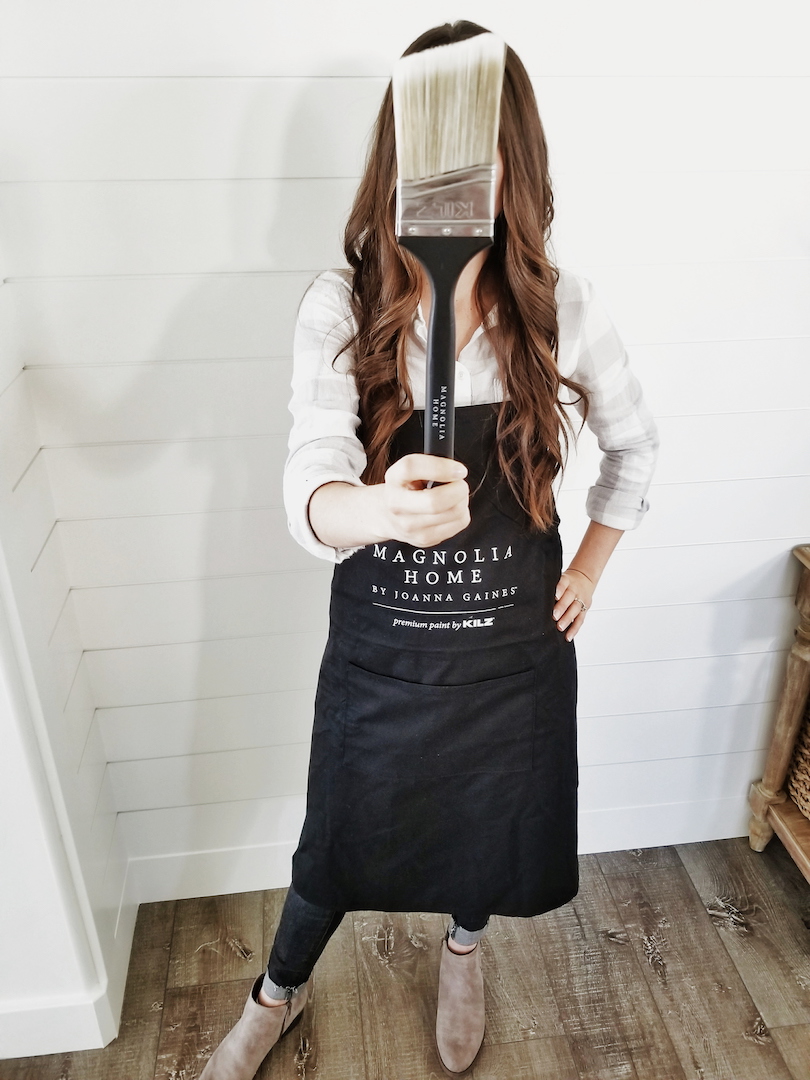
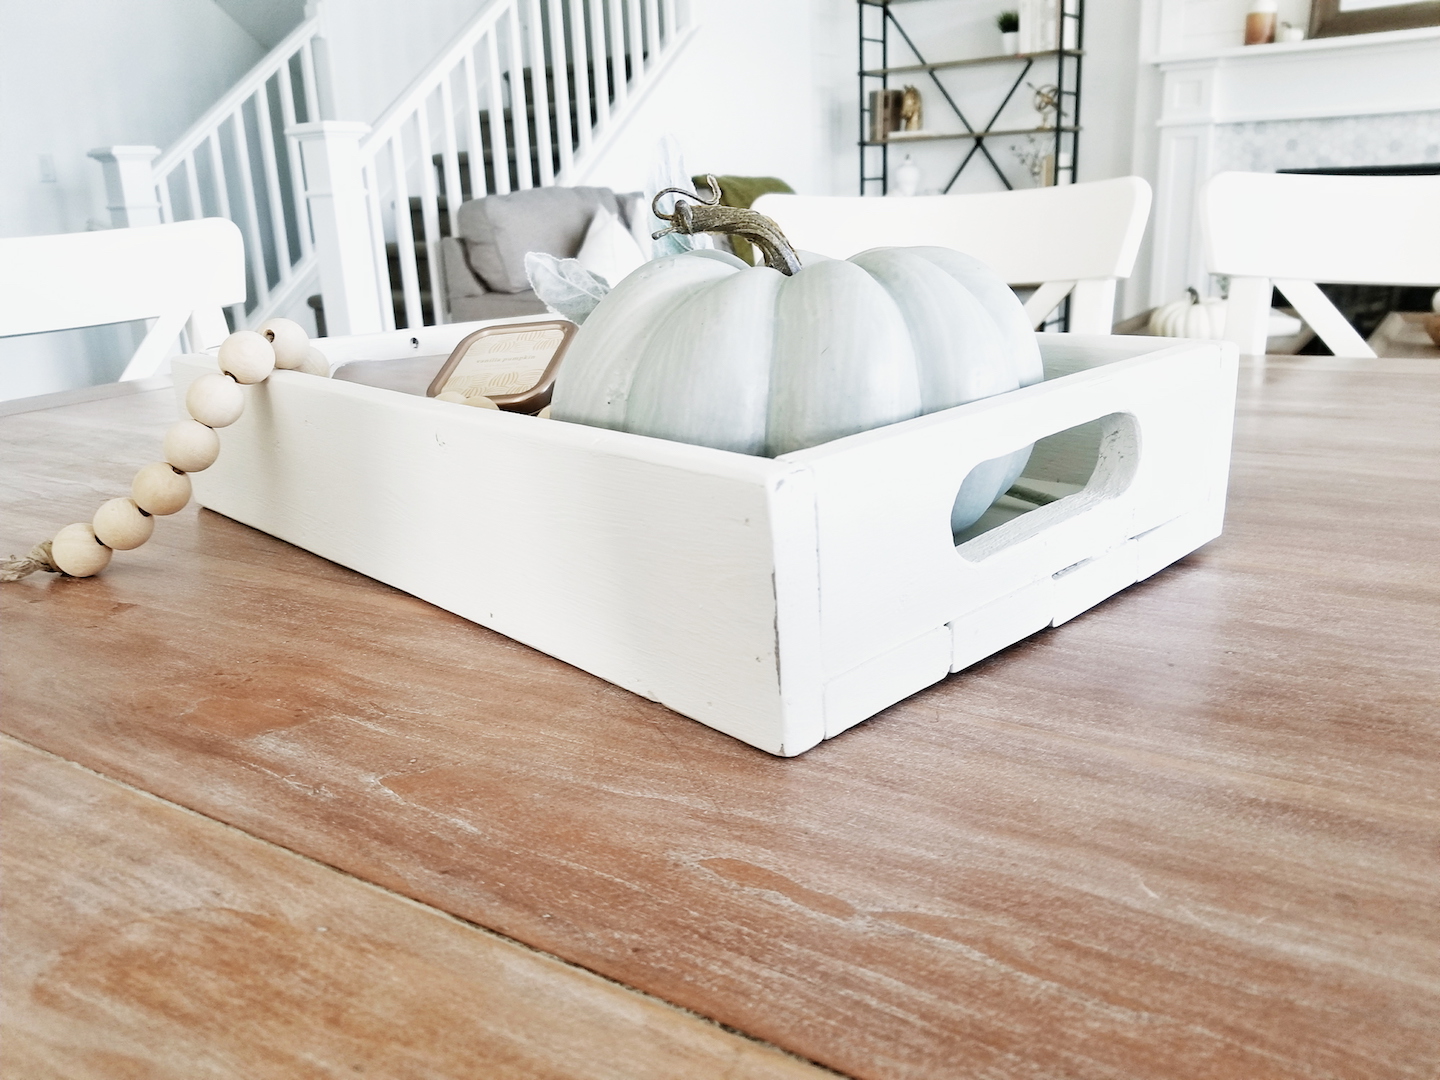
The following post is sponsored by Magnolia Home and KILZ. Read my full disclosure here.
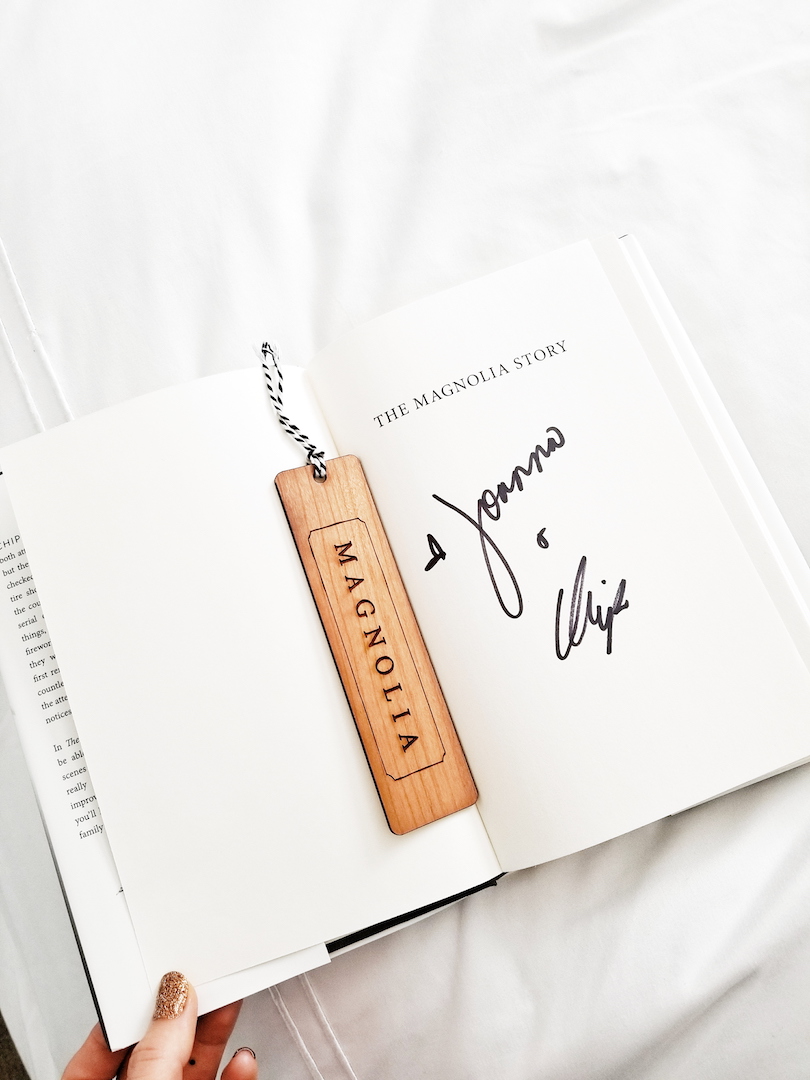
I was beyond excited when I received this happy mail! KILZ and Magnolia Home sent me this box full of goodies to try. KILZ recently partnered with Joanna Gaines to make a line of chalk style paint, wax, and brushes. As part of the goodie box, they were so kind to also send me an autographed book, bookmark, apron, cute bag, wooden crate, and a sanding block.
I have been wanting to read The Magnolia Story since it came out. When I saw that Chip and Joanna had autographed my book, I did a little (or extremely big) happy dance. As I took the next few days to read their story, I loved every minute of it. Chip and Joanna share the trials and success that lead them to Fixer Upper. It really is a genuine and honest account that I thoroughly enjoyed reading.
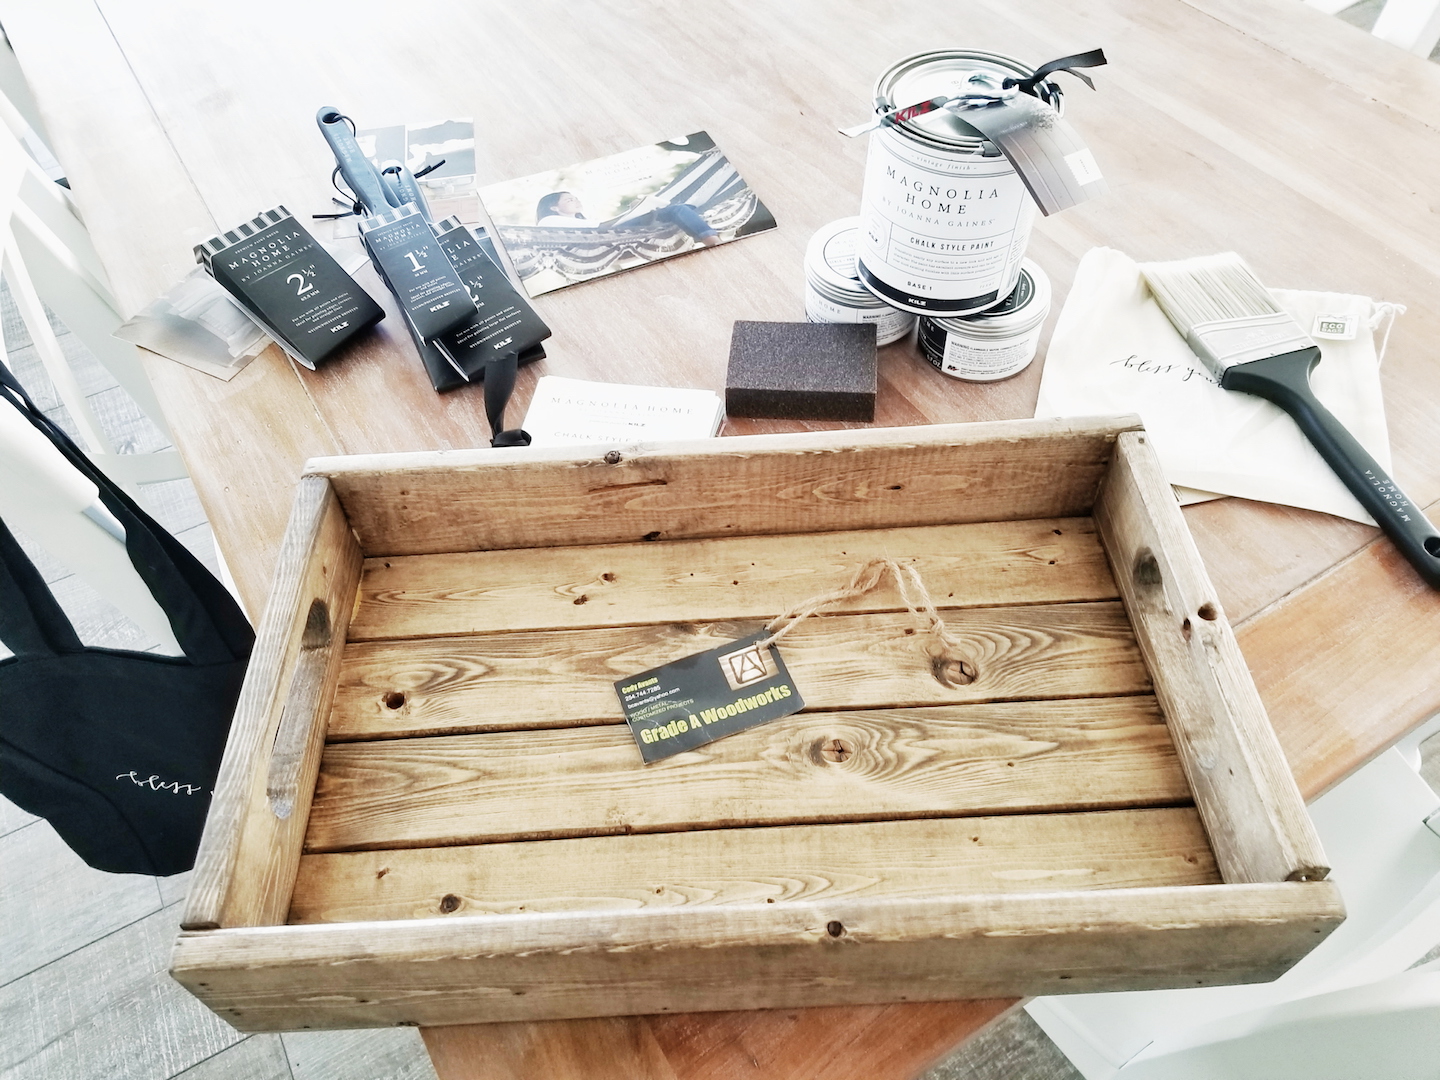
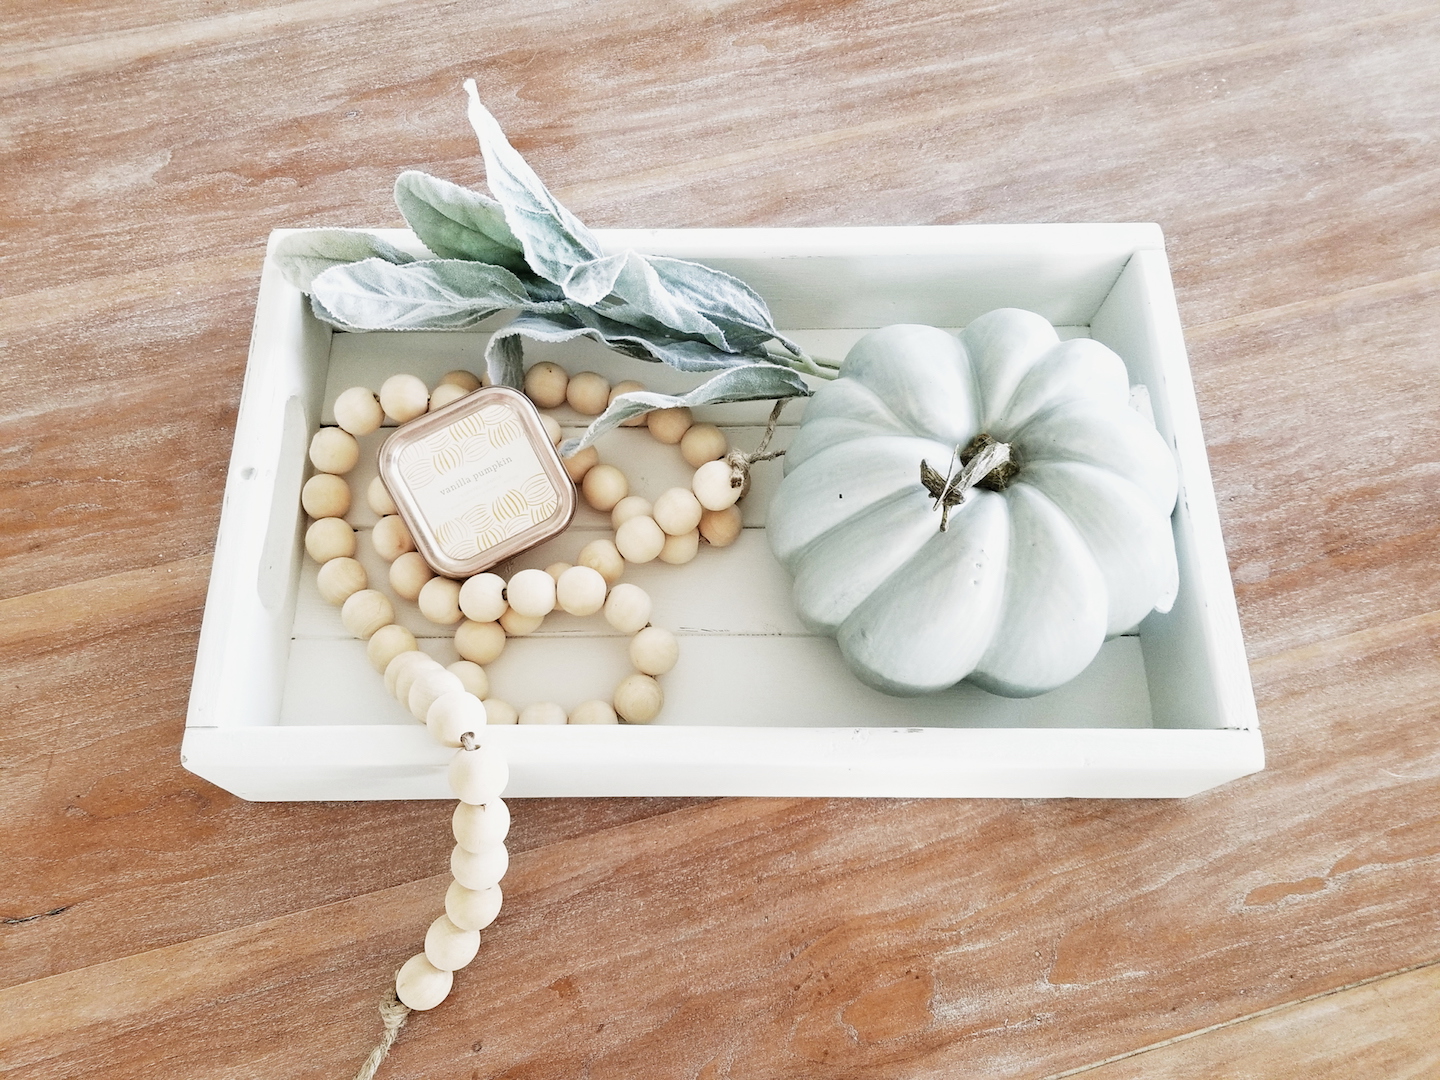
Ok, back to the chalk paint. I was so excited that KILZ was working with Magnolia Home to make this paint. We all know how much I love my KILZ spray primer. It is my one and only go-to primer for all my projects. I just love their products. I knew that this would have to be a good paint if it came from KILZ. I was excited to dive in and test it out. The color they sent me is called Shiplap. It is a beautiful white color. Not too gray or yellow. A really soft and true white in my opinion. I received this cute wooden crate that was made from a local Waco Texas artisan. The crate came stained and I honestly had a hard time bringing myself to paint that beautiful wood. I love white and I knew I would love it painted just as much. I have done a lot of chalk paint projects in my DIY years. Including my piano that I ended up using my own homemade chalk paint to finish.
As you can see, the first coat gave really awesome coverage. It didn’t give off hardly any odor. My nose was a little stuffy from some sinuses though. I am not sure if that had anything to do with it. However, chalk style paint is usually pretty low in odor anyways. After the second coat, the crate looked really good. That was all it took. Two quick coats of this chalk style paint. The coverage was really good. The brushes were like butter. I have been needing new paint brushes and these were top notch quality. I love the black handle and the bristles were silky smooth creating a really clean finish.
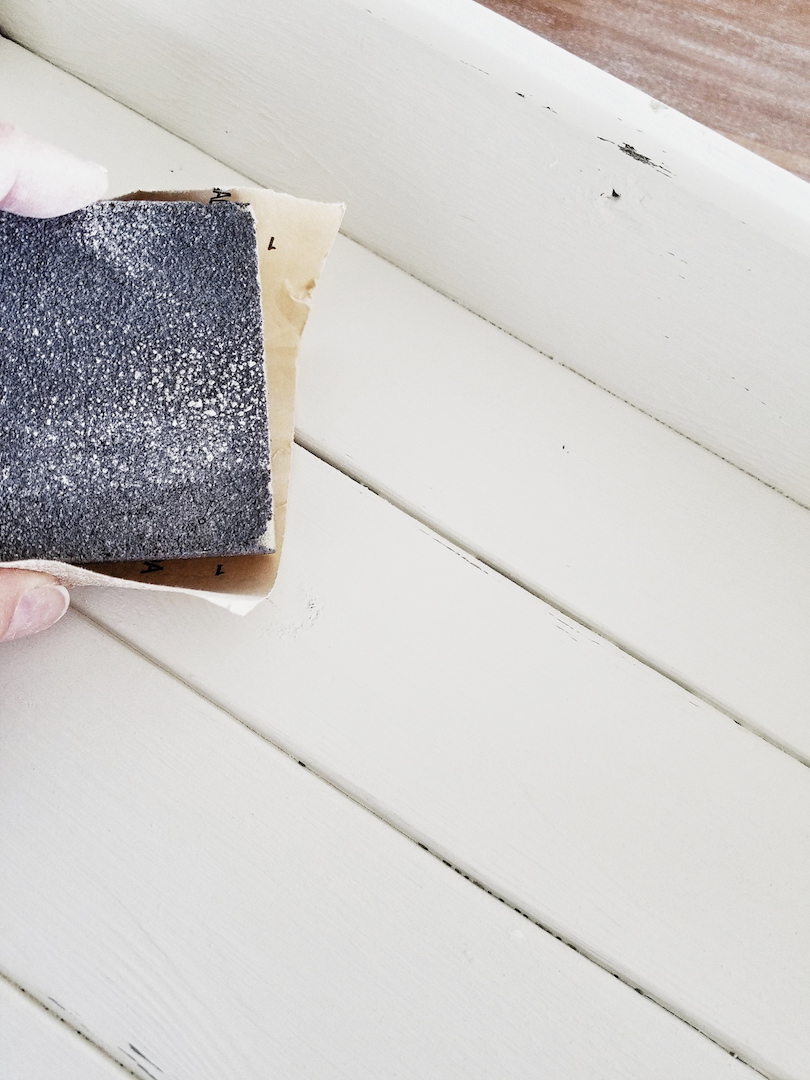
I decided to lightly distress some of the edges. The stained wood showing through gives it some fun character. I didn’t want too much distressing. So, I lightly sanded a few spots with the sanding block to get this look. I decided to use the clear wax to seal it all in. I wiped it on with a clean lint-free rag. I buffed it out and it gave the crate a velvety smooth finish. The wax was really easy to work with. I used a different brand with my piano that was a lot harder to work with. It was an orange finishing wax that ended up turning some spots orange. I am happy to report the Magnolia clear wax worked a lot better.
This was such an easy product to work with. I was able to finish the crate from beginning to end in just 2 hours. It really took only about 20 minutes to actually apply and the rest was dry time. It all comes down to whether or not I would buy this or recommend Magnolia Chalk Style Paint. Is it worth the money? Does it work? Yes, yes, and yes! It isn’t as cheap as some other brands but you get what you pay for. This is quality chalk style paint that gives great coverage. They have so many other colors to choose from. The brushes are fantastic and I would definitely use this again.
A big thank you to Joanna and Chip at Magnolia Home as well as KILZ Paint for sending me such a fun box of products to try. I am excited to paint more projects and use this amazing chalk style paint!
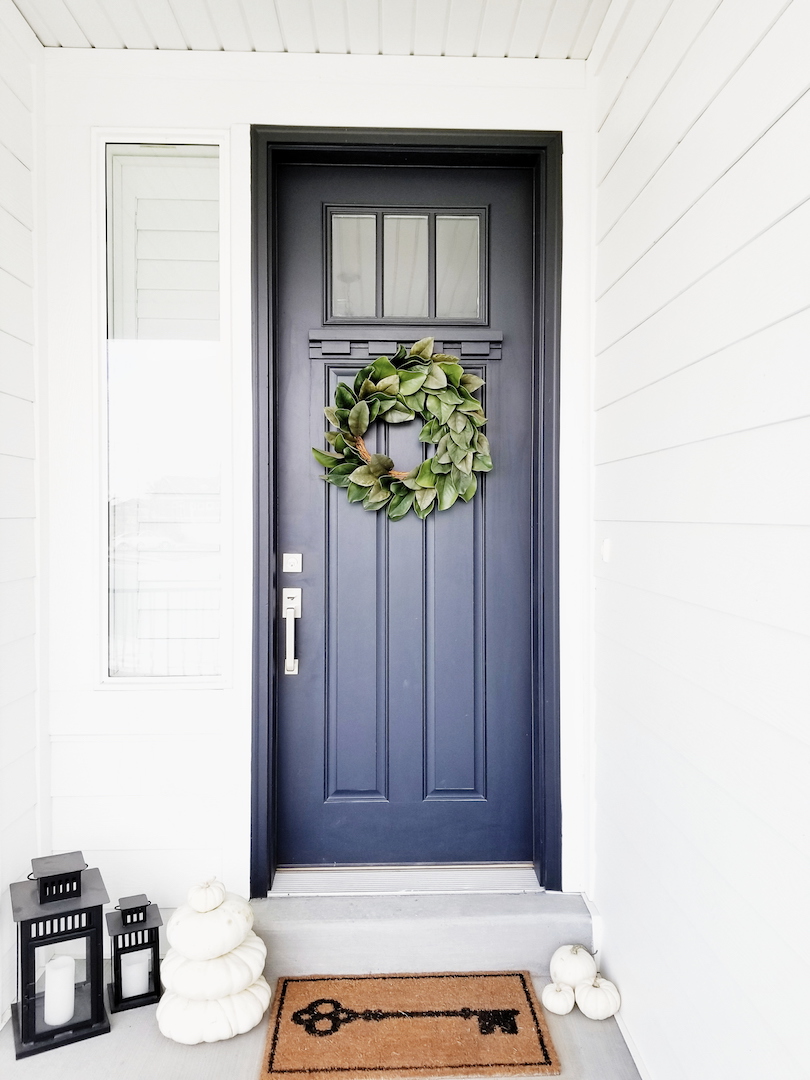
The following post is sponsored by Emtek and contains affiliate links. Read my full disclosure here.
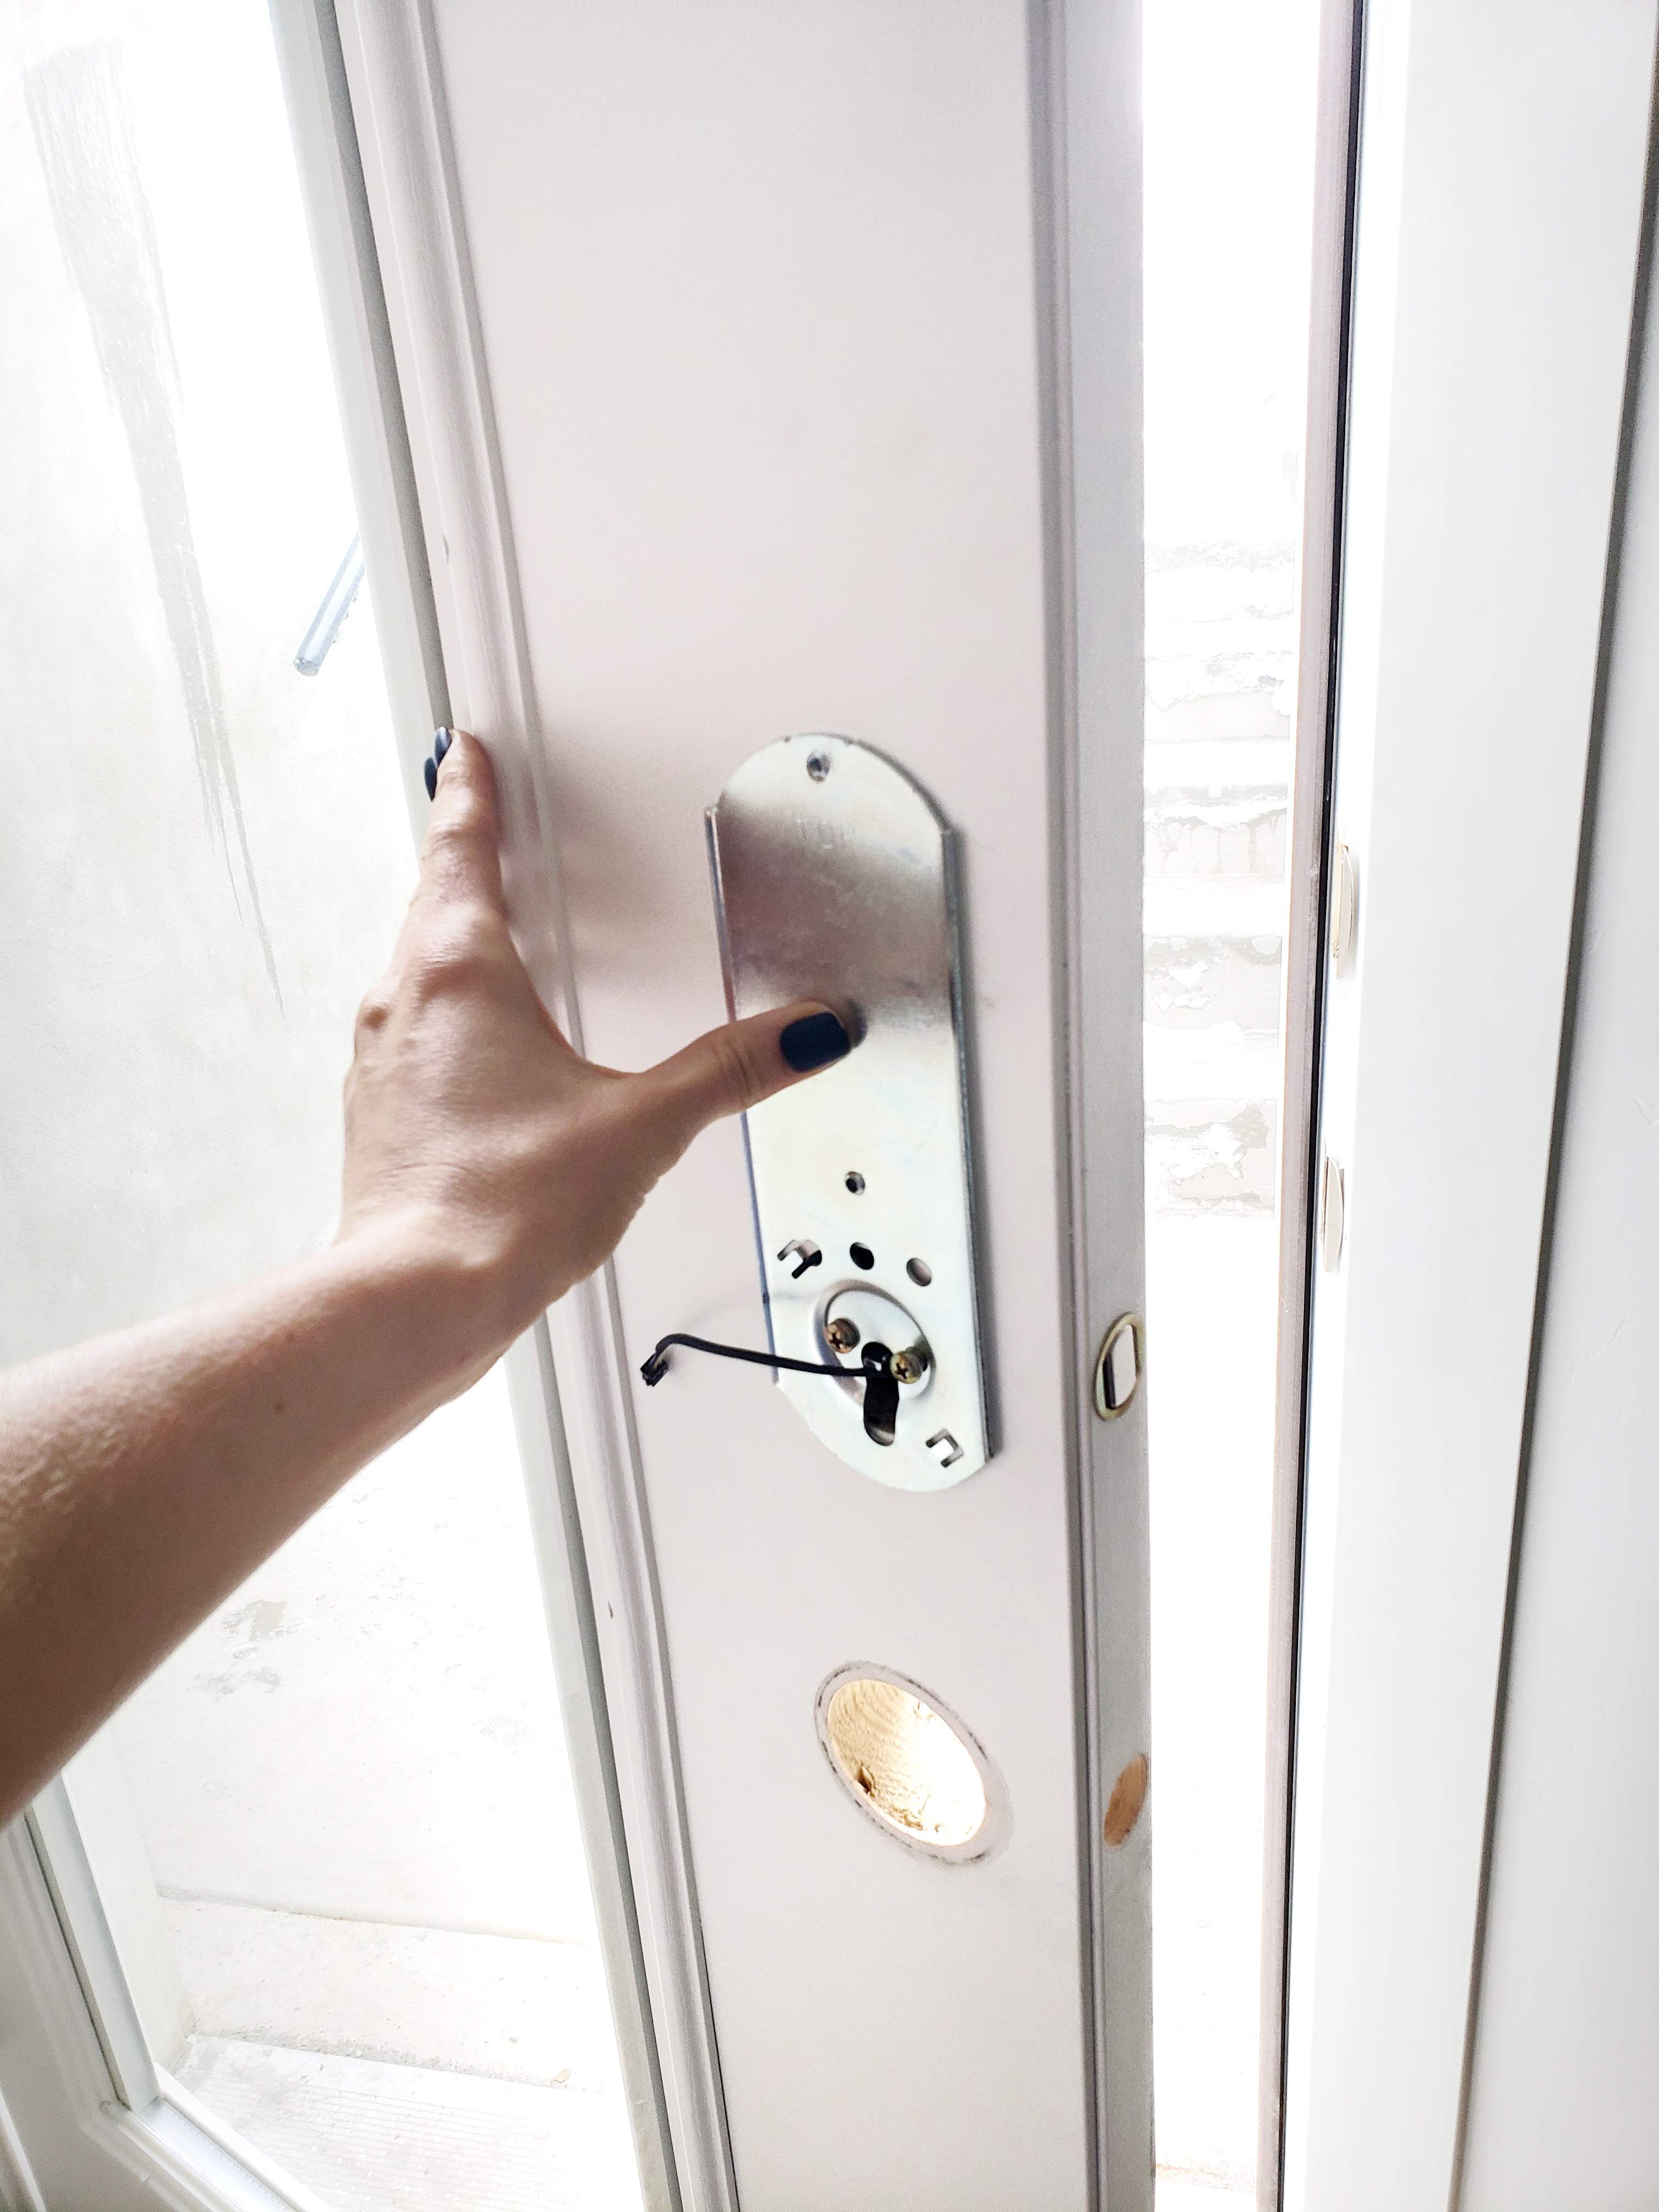
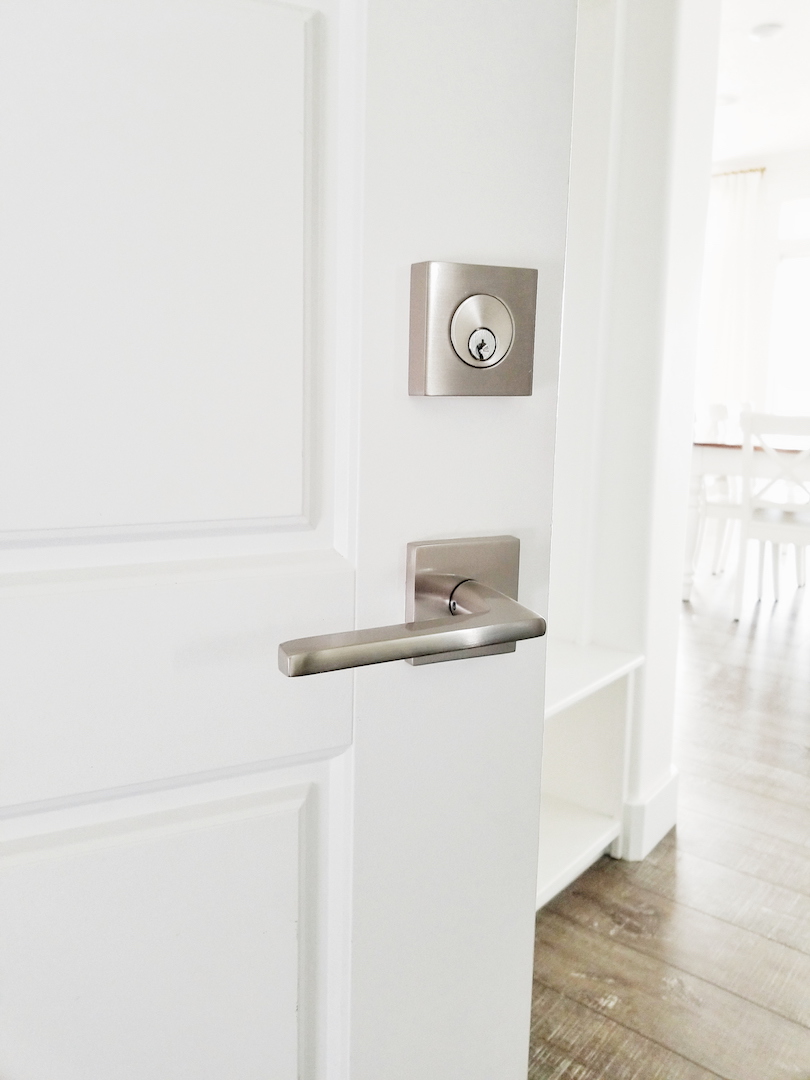
When we built this house, the budget only allowed a certain amount of items. We wanted to put our money into upgrades that made the most bang for our buck. We also wanted to do upgrades with the builder that couldn’t be done ourselves, after the house was finished. Mr. Whitelane and I both knew that we could add little changes to make it our own once we moved in. A lot of items made sense to upgrade with the builder. However, smaller things like doorknobs, we chose to do builder basic. Meaning we got whatever was the cheapest or free option with the intent to swap it out later.
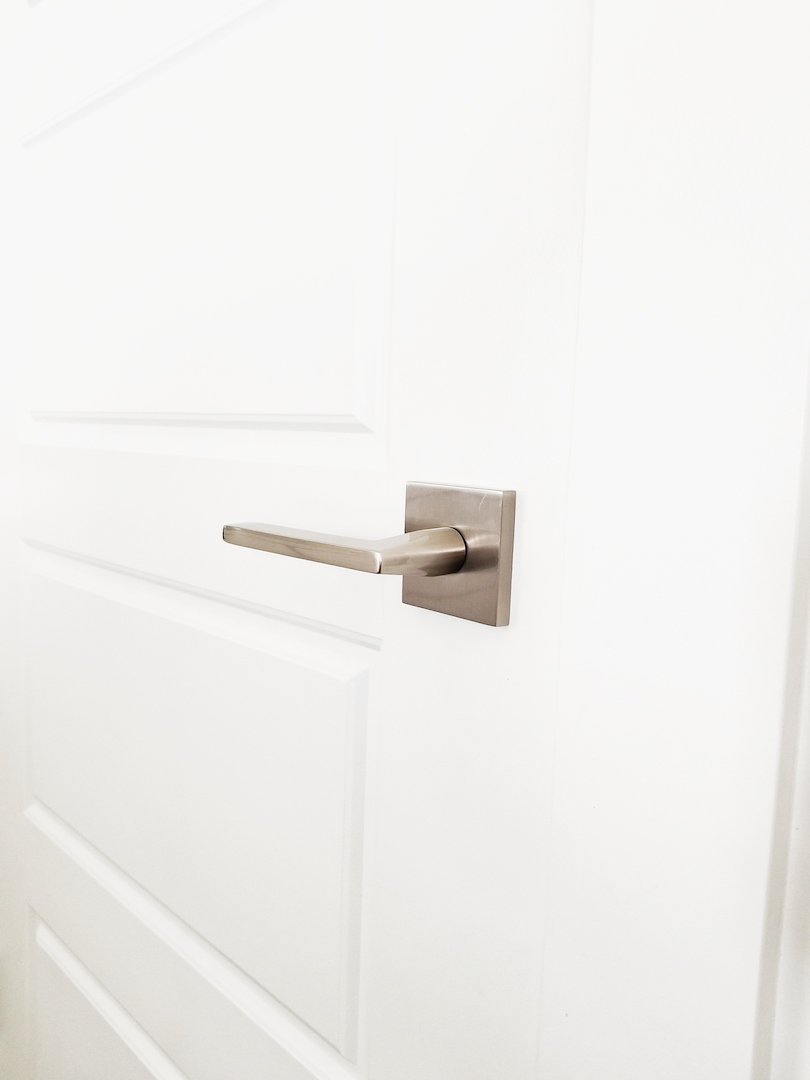
You may be thinking that handles for a door are not even a noticeable thing. That is what my husband thought too. After we moved in, he quickly realized that we have a lot of doors and the knobs are definitely noticeable. I feel they can either be boring basic and blend in or really make a statement. I knew I wanted to do levers for our doors. When I saw the Helios lever and square rosette, it was love at first sight. The modern and sleek look matches our faucet handles in the bathrooms. I was beyond excited to partner with Emtek on this project. They have an amazing selection of knobs, levers, and exterior sets. The finish options are everything you could want. From brass to satin nickel, chrome, and even black. Emtek has it all covered. Did I mention they also have cabinet hardware too? I could have spent all day looking at all their products and finishes. I may have to upgrade my kitchen cabinet hardware at some point too. 🙂
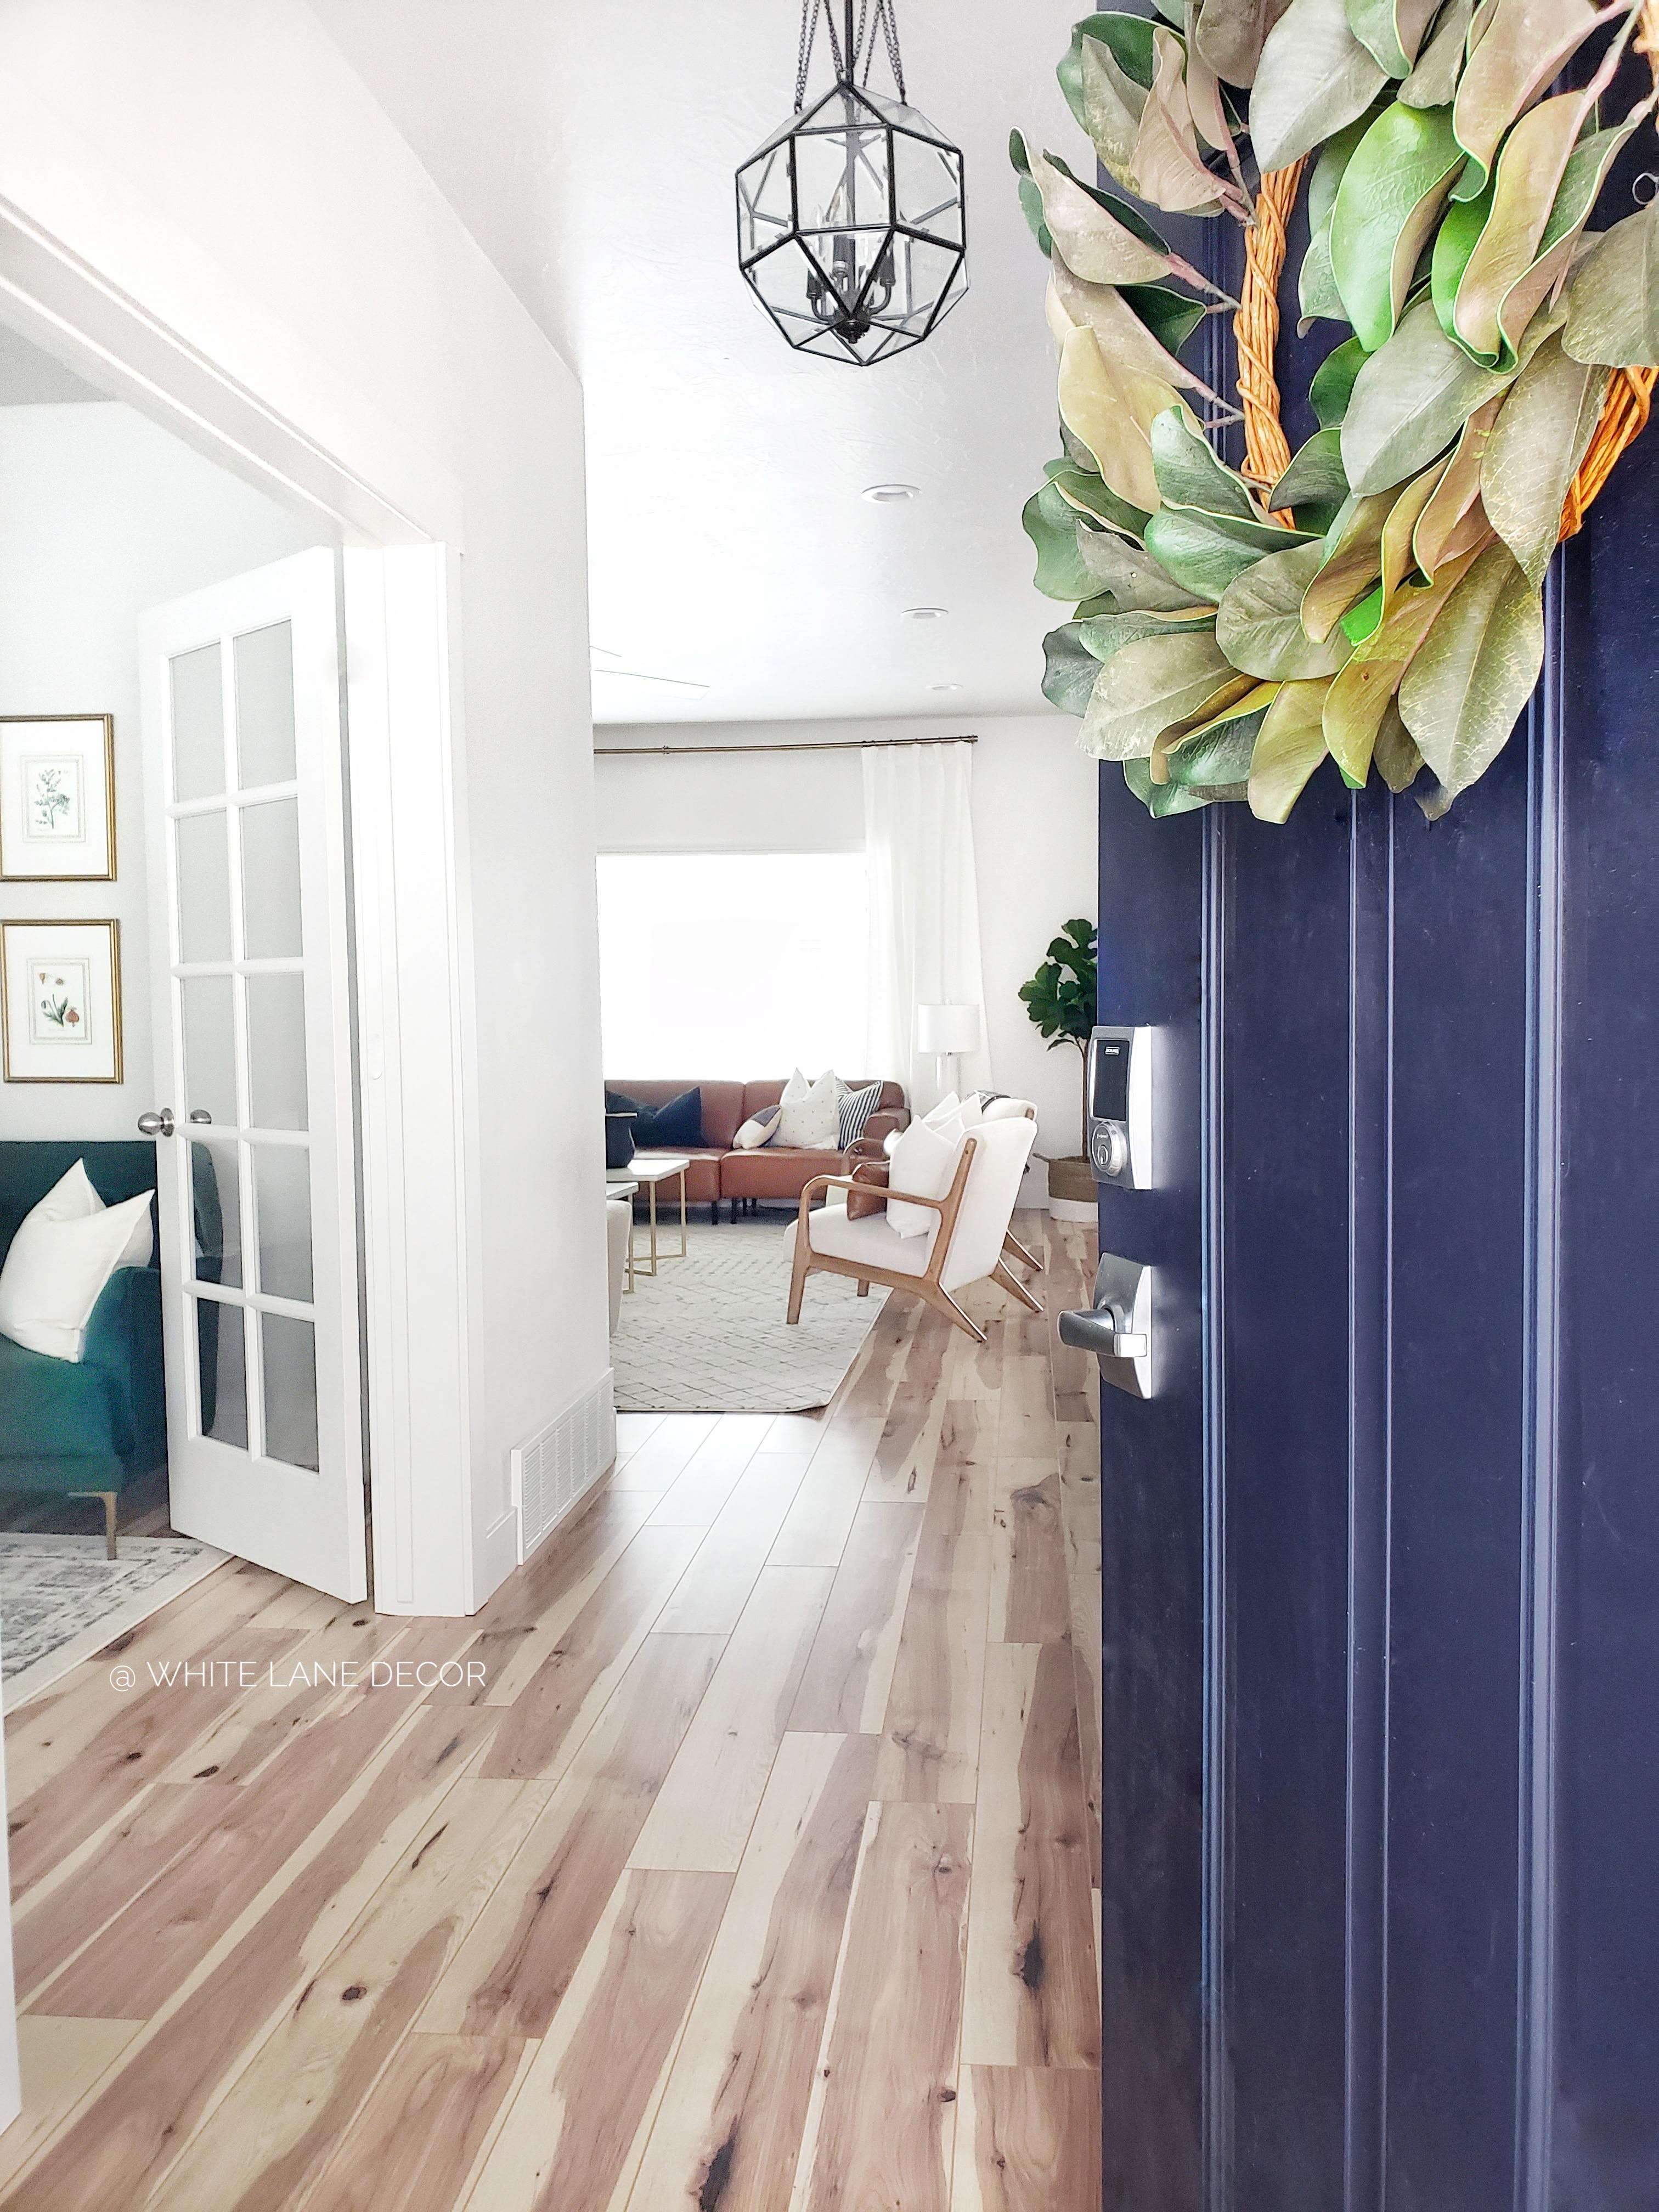
Swapping out doorknobs is such an easy upgrade that can be done anytime for a big impact. Can levers be sexy? Because I sure do feel like our new Helios lever in satin nickel makes our doors sexy. 🙂 The square rosette with the lever just makes such a pop against the door. I have to say that my favorite is the front door Baden Set. I love how stately it makes the front door look. The square deadbolt is really a showstopper too. It combines class and modern design all in one. The perfect look we wanted for our doorknobs.
This was such an easy DIY. Mr. Whitelane and I started with the front door. We did one door at a time. We would remove the old knob and put the new levers on before moving to the next door. This just made it simple to keep everything organized and not confuse any of the handles. We also thought if we had to take a break or finish later, we wouldn’t be left with a bunch of non-functioning doors. You never know how long you will get to work on a project when you have three little kids running around. Luckily, we got this whole project knocked out in one afternoon. Anyone can do this.
I really love the look of our new levers and exterior sets. A huge thank you to Emtek for making this possible. They have such quality products. I know we will be enjoying these levers for years to come. They have even passed the kid test and seem very durable. What do you think? Such a great DIY upgrade that makes a big statement.
Hi there, I’m Kate. Welcome to White Lane Decor. Thanks for stopping by. I love neutral, bright, and airy spaces. I’m always looking for new ways to turn our house into a home. Have a look around and find inspiration for your next project.
Search
Disclosure
Some of my blog posts, ads, and banners contain "affiliate links." This means if you click on the link and purchase the item, I will receive an affiliate compensation. However, I only recommend products or services I use personally and truly feel you will enjoy too! I am disclosing this in accordance with the Federal Trade Commission's 16 CFR, Part 255: "Guides Concerning the Use of Endorsements and Testimonials in Advertising.” White Lane Decor is a participant in the Amazon Services LLC Associates Program, an affiliate advertising program designed to provide a means for sites to earn advertising fees by advertising and linking to amazon.com.