Stay Connected With The Latest Posts

  • This field is for validation purposes and should be left unchanged.

Stay Connected With The Latest Posts

Front Porch Rocking Chairs

The following post contains affiliate links. Read my full disclosure here.

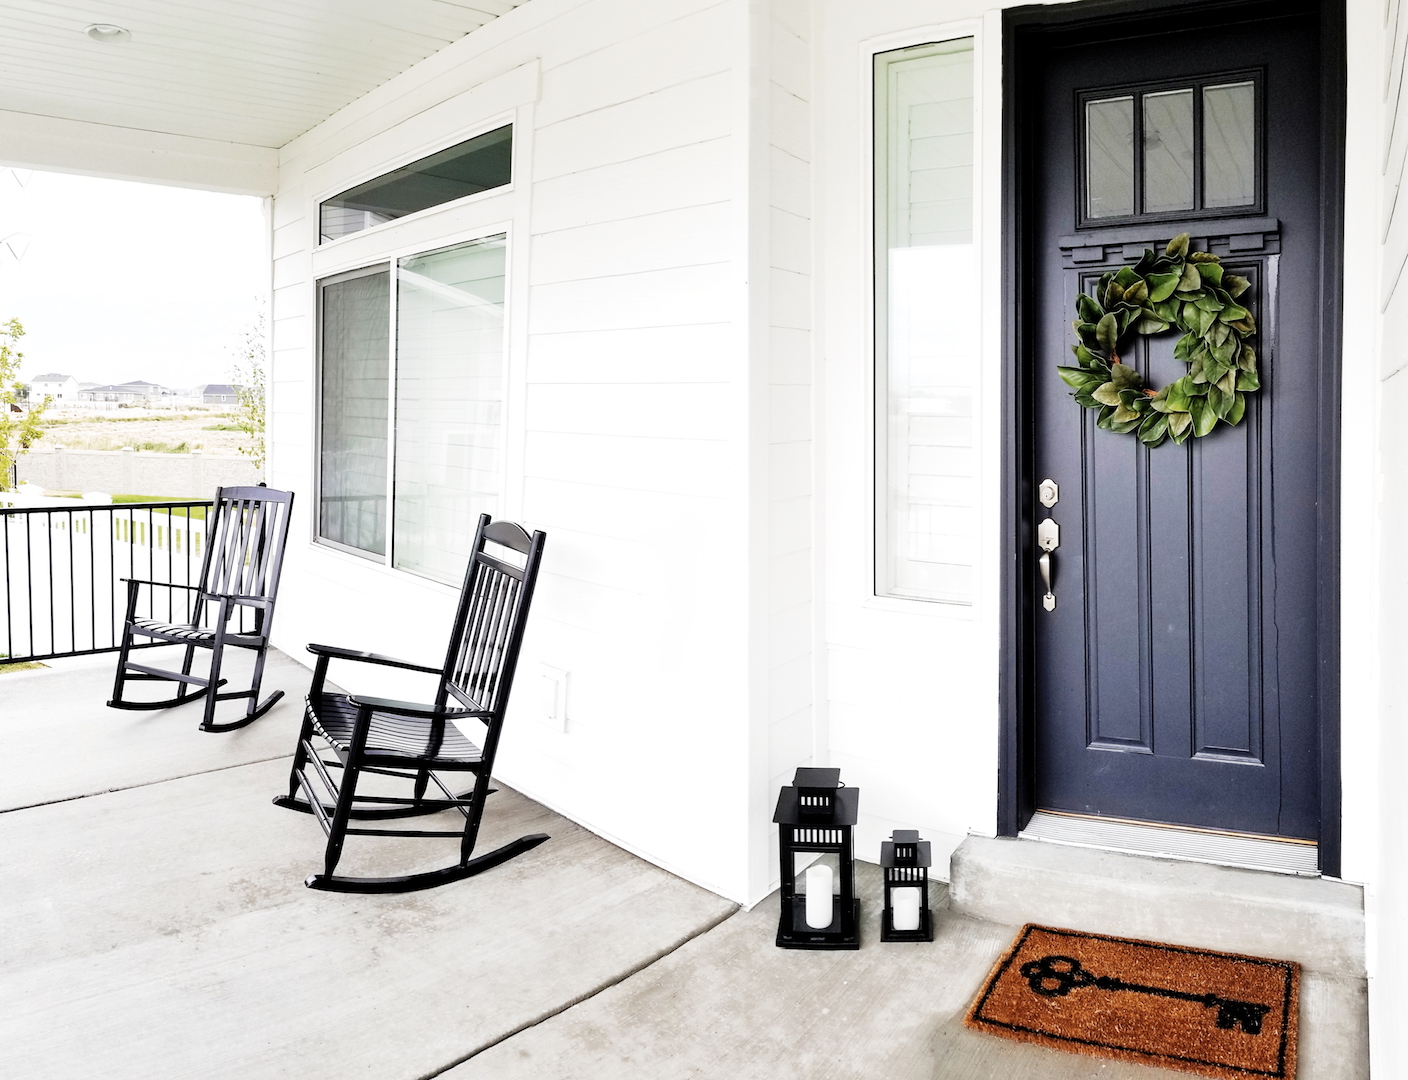
Everybody is getting out all their fall decor and I am over here just getting my outdoor spaces ready. I feel so behind the game this year. Our yard was put in the beginning of July and it has been amazing to have grass. The dirt was such a mess and made our whole house dirty. Now that the yard is in I feel like I can finally enjoy being outside. So, I am just now getting around to making our porch cute for what is left of summer.

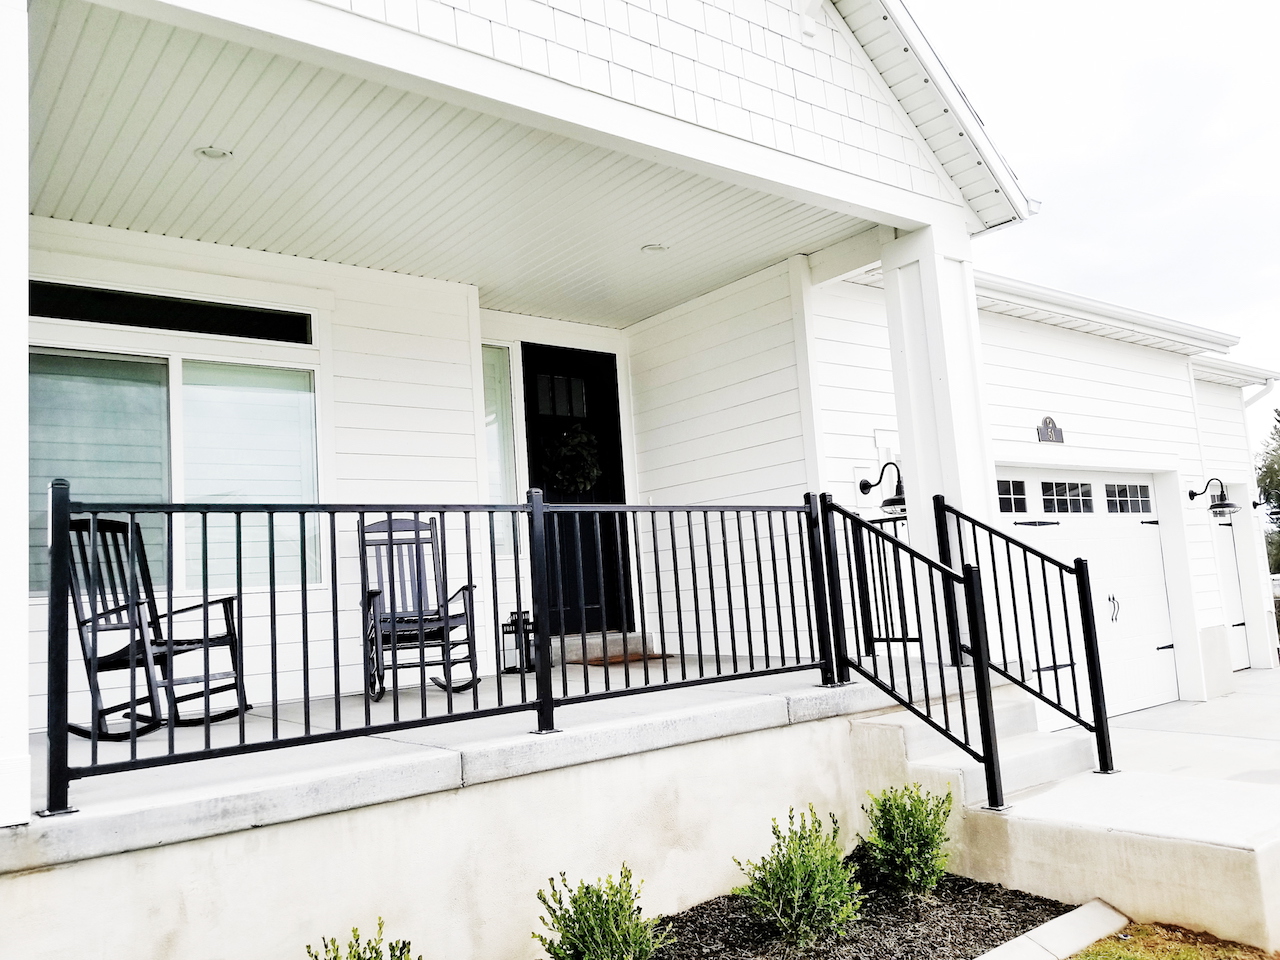
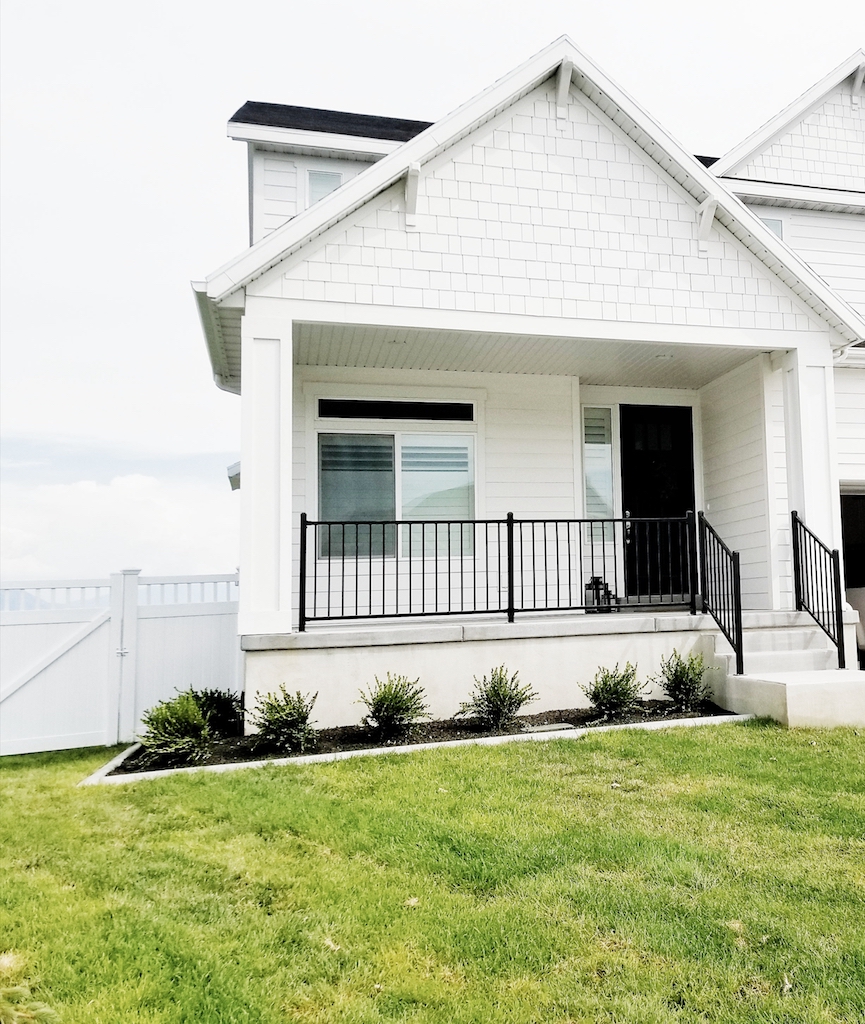
The best part of trying to find outdoor decor at the end of summer is CLEARANCE sales. That is exactly how I found this black rocking chair for only $50 at Home Depot. I was casually checking out what they had on sale in the garden department when I came across this hidden gem. It was stacked under a bunch of other random boxes of stuff. The words on the box “black rocker” immediately caught my eye. I quickly called Mr. Whitelane over to do the heavy lifting and got this big black rocking chair in my cart a.s.a.p.

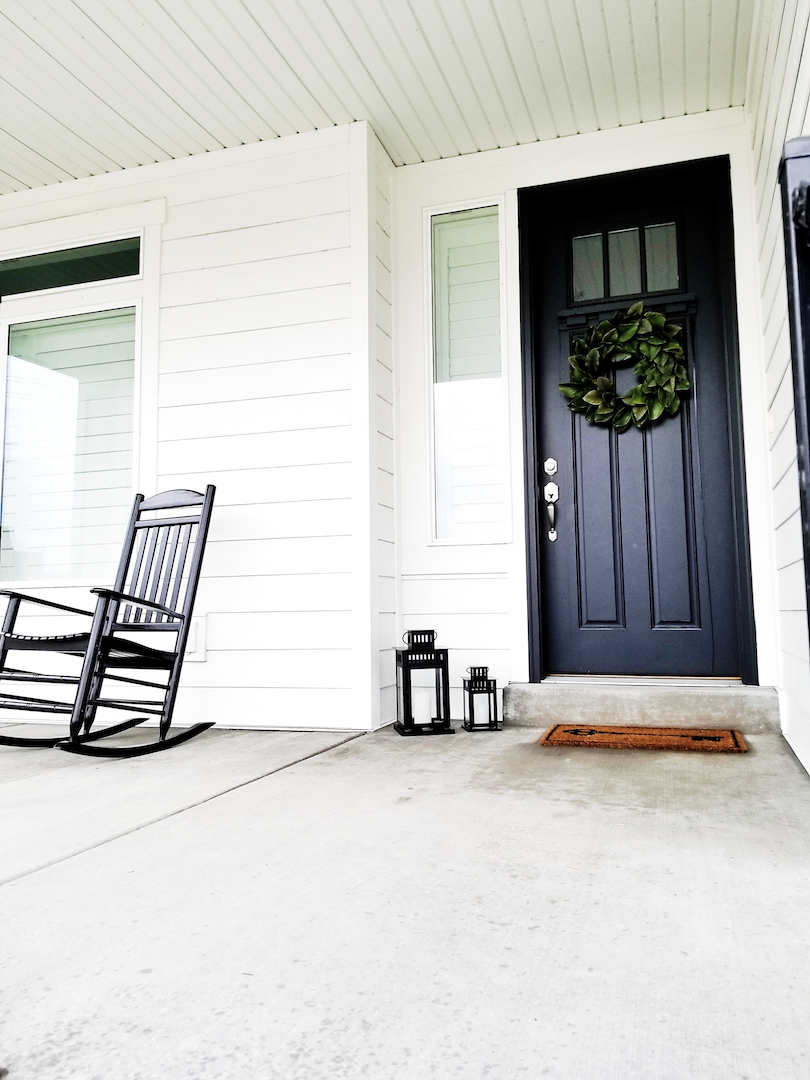
When we got to the register I had the cashier check to see if there were any more at another store. Sadly, they were sold out everywhere. It makes sense because these rocking chairs usually sell for at least $90 or more. I took the one chair home and came up with a plan B. I wanted two black rocking chairs to sit on my front porch. Preferably matching. However, when you can’t find another chair anywhere in your state, you use spray paint.

I know what you’re thinking, spray paint? That’s right, I decided to spray paint a white rocking chair I already had. It is not the same chair but it is wood, it’s free, and that is good enough for me. Once it got a good coat of primer and black spray paint, you don’t really notice that they are not the exact same chair.


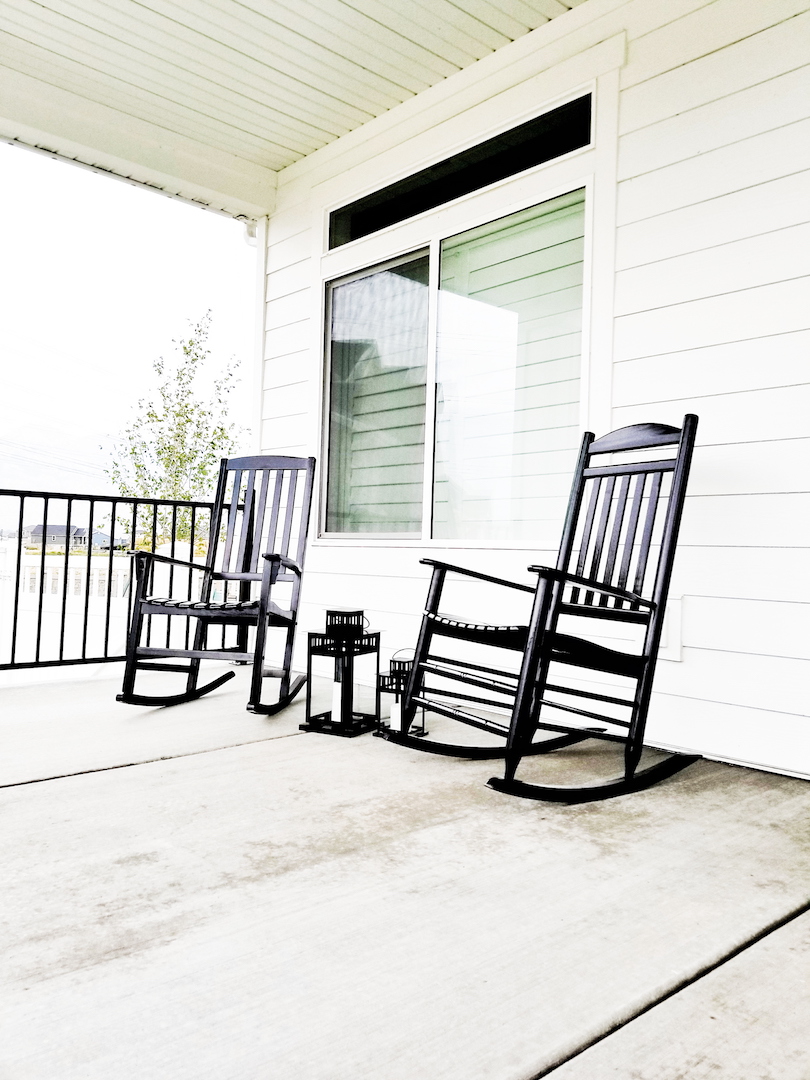
I used my usual method for spray painting that you can find on my video tutorial here. The only thing I added was an additional coat of an outdoor sealer since the chair will be outside. I also used Rustoleum Lacquer in high gloss so that the finish would match the other chair I got on clearance. I typically only use Krylon spray paint but this was an exception. The chair was a little weathered from being outside in previous years and this makeover gave it some new life. I am loving how the black pops against our white house.

I am happy to have one space put together outside. Now I just need to get my deck and backyard put together. I plan to enjoy a lot of fall nights out here before the snow comes.

Designer Hacks

If you caught the segment onFox 13’s The Place today, then you already saw some of these high-end looks for less. I wanted to take a minute to show a few of my favorite designer hacks in detail.

  1. Pleated Curtains. These can be very pricey, especially for longer lengths. They create a custom and classy feel. I was able to create this look with Ikea Ritva Curtains and pleater hooks. See my video tutorial here.
  2. Spray paint. Everyone loves to stay on trend with the latest color styles. It can get expensive trying to keep your decor up to date. Instead of buying new, spray paint your existing decor to match the trend. I took all of my silver decor and sprayed it a fun brassy gold. Gold is all the talk right now in decorating. I got my gold accents with a few cans of spray paint. You can watch my video tutorial here to see the products I like to use for spray painting.
  3. Thrift store books. I visited my local Desert Industries and scoured the book section for all the white, cream, and neutral hardcover books (search for any color that fits your style). Be sure to look under the paper book covers to check the actual hardcover color. You can make a great custom monochromatic look on your open shelving or bookshelves. Stack the books together in sections until you like the groupings. Some can stack upright and others can lay flat with decor placed on top. Thrift store books usually range from $.50 to $2. A very easy and affordable way to fill bookcases and create a luxurious look without the price tag.
  4. Wooden Bead Garland. These wooden garlands have been a big hit as of late. They have warped into a mini version for napkin ring holders and key chains too. They can be customized by adding stain to the beads or tassels to each end. I tend to like the simple, clean look of the raw unfinished wood beads. I took hemp cord (or jute) and bought three packages of wooden beads from the craft store. I was able to create my own DIY version for a fraction of what these garlands sell for online. The beads can be draped across coffee tables, pictures, centerpieces, and just about anywhere you want. It adds a fun trendy texture to any decor. Find my detailed tutorial here.

All of these design hacks are easy, inexpensive, and add that high-end look for less. Hopefully, you can add some custom looks to your home with these ideas.

Top Three White Paint Colors

The following post contains affiliate links. Read my full disclosure here.

I love the color white and I am not afraid to use it. Say it with me! It is no secret what my favorite color is these days. White is a staple in my decorating and design. I think it is the perfect backdrop to any space. It can allow so many options for pairing other pieces. I love the crisp neutrality of a good white paint. My house is painted white inside and out. Everyone told me not to do it. Do I have any regrets? NOT ONE!

So you want to join me on the light side too? There are so many shades of white. I have tried and tested at least half a million. 🙂 I am going to spill the paint (see what I did there) on my favorites. All white paint is not the same and can give you very different looks.

First, let me tell you the best way to test a paint sample. Paint it directly on the wall. No really, just paint a huge 2′ by 2′ square or blob on the wall of the room. This will give the most accurate color of the paint in the lighting of the room. Maybe you can’t bring yourself to do this for some reason. The next best thing is to buy paint sample paper. I don’t waste my money on fancy sample paper. You can pretty much get the same result on poster board. The poster board will get a little warped from absorbing the paint. That is okay because you can use painters tape to hold it down on the wall. Just use a regular paint brush and put a coat or two of paint on the poster board. Tape it to the wall of the room where you are wanting to paint. I did this same method when we finished the basement in our previous home. It worked like a charm!

The exterior of our home is painted with Sherwin Williams Pure White. I can’t say enough good things about this color. It is just the right amount of bright and warmth. It really is my go-to for white paint. It is great for people who are trying to go white but do not want it to be too stark or cold. This looks great on interior walls and trim as well as exteriors. So, why didn’t I paint my interior Pure White?

Don’t mind the grass. We just had sod installed. I will be sharing a full landscape reveal soon!

I chose to paint my interior walls and trim High Reflective White by Sherwin Williams. This white is not for everyone. It is a not as warm as Pure White. However, It is not stark or cold either. It is a really bright white without any gray or yellow tones. A really crisp and bright white. I decided on this brighter white on the inside because I really liked the sharper tone for inside. I knew it would fade a bit in certain rooms over time. Also, when I added my furniture and decor, it really toned down.  I did a satin finish on the walls and semi-gloss on the trim. Now, I do have three little kids running around. I get a lot of fingerprints and footprints on the wall (along with a bunch of other stuff). I simply take wet wipes, Clorox wipes, or Simple Green wipes to clean off the walls, doors, and trim.

Benjamin Moore White Dove is also a favorite white paint of mine. I think it is similar to Pure White by Sherwin Williams. A nice rich and warm white. Perfect for those just easing into white paint. I am somewhat partial to Sherwin Williams because I just love their quality. However, I think Bejamine Moore is also a great option.

You really can not go wrong with any of these white paint colors. I am a really picky and have tried so many shades of white. These three have been the top favorites out of all of the many samples I have tested and used. Don’t be afraid to take the color out of your wall and use white! You can add the color back into the room with your decor and furniture. The possibilities are endless with a neutral and bright canvas like white.

Nursery Reveal

Looking for nursery decorating ideas? Don't miss these inspiring nurseries, full of diy projects, incredible nursery sources, and beautiful nursery decor ideas.

The following post contains affiliate links. Read my full disclosure here.

The time has finally come to show you the nursery. I feel like it has been a long time in the making. Just over a week ago we welcomed a baby girl to our family. It has been a whirlwind of a week and a roller coaster of emotions. Mr. Whitelane and I couldn’t be happier to have this bundle of joy here with her other siblings. It is so fun watching her become part of our little family.

I have partnered with a few other blogger mommies to show you an amazing group of nursery reveals. There are some girl reveals and a boy reveal that you won’t want to miss. Be sure to follow the links at the bottom of this post to check out all the cuteness!

Pink has always been a favorite of mine. Even though my other little girl’s room has a lot of pink, I couldn’t resist having pink in the nursery as well. My older girl’s room is shabby chic and a lot more vintage feel. In order to give the nursery its own style, I went a little more modern. Although they both have pink, the styles are completely different.

I centered the room around the crib. When I found this crib, I knew it was the one. I love the simple clean lines with the side details. It is a 3-in-1 convertible crib that will last a while. The crib comes in multiple colors and the price was amazing too! After I found the crib, I knew the wall behind it needed some sort of trim. I decided to stick with a simple clean look by doing vertical boards. You can read more about the wall here. I found the cute basket and blanket at T.J. Maxx. The crib bedding was an easy decision. My mother-in-law usually makes my kid’s crib bedding. It is phenomenal when she is done! However, I came across Carousel Designs when they were having a sale. The prices were too good to be true. You can design your own custom bedding and see it in a virtual nursery. It is really fun and they send you free fabric swatches. I found the perfect shade of pink in a simple design that I really liked. I decided to buy the crib bedding this time around and I was pleasantly surprised.

The dresser is also simple. I needed it to fit in the room on this small wall. I ended up changing out the white knobs for some brass ones. It made the mirror above the dresser and other brass accents pop.  I was able to use a few things from my other little girl’s nursery. The changing pad and cover were hand-me-downs. Luckily they were a neutral color that fit in perfectly.

I was little concerned about getting the rocking chair out of my toddler girl’s room. We eased her into the idea of sharing the chair with the new baby. She eventually was ready to get it out of her room and let the baby have the chair. Again, I love getting major pieces in neutral colors. You can always reuse them in other areas. Let the small decor be your color that can be easily swapped. Stick to neutrality for big furniture pieces. I found the brass and marble side table on clearance at Target. It was a steal of a deal and fit perfectly in the room. SCORE! It looks all clean and cute in the picture. Trust me, it is currently cluttered with baby bottles and all kinds of baby necessities. I love this brass lamp I also fount at Target. All you have to do is touch it to turn it off or on. It is so convenient when you are holding a baby. I don’t have to try to find a button or switch to turn, just touch any part of the base of the lamp.

The pink rug was a Wal-Mart find. When it arrived I was so happy it was the right color pink to match everything else. The white fur rug came from Ross. I love the look of layered rugs. This soft fluffy one is like walking on marshmallows. Perfect for the nursery. I am sure you remember my DIY abstract art  from a previous post. I wasn’t in love with it when I first got it hung above the crib. It is growing on me. I think I will keep it in here.

Nap time is just about over and the baby needs some more cuddles. Hope you have enjoyed this girly nursery reveal. Be sure to hop on over and see all the other nurseries at the links below. So much baby nursery goodness for you to be inspired.

Delightfully Noted | Lemons to Lovelys | White Lane Decor

Maison de Pax | A Blue Nest | A House With Books

DIY Shiplap Tutorial

The following post contains affiliate links. Read my full disclosure here.

We just finished the shiplap in the upstairs hallway. Mr. Whitelane and I usually do our shiplap by having underlayment ripped into six-inch strips. We used this type of shiplap above our bathroom vanity. However, I am going to let you in on a big secret. Mr. Whitelane found an even easier and better looking DIY way to shiplap. I almost hesitate to share because I want to finish up a few more shiplap walls before all the stores sell out. 🙂

I am totally joking. I wouldn’t do that…well, maybe. We went to Home Depot to get boards for the upstairs hallway. Mr. Whitelane had gone to find a worker for help getting wood down. I get a phone call a few minutes later from him telling me to come look at what he found. Mr. Whitelane told me he found primed shiplap boards. I reluctantly said they were probably just the cedar tongue and groove boards and wouldn’t work. He convinced me to walk over and find him.

I was giddy with excitement to behold what he found. HOME DEPOT now carried primed MDF shiplap boards. NO WAY! There were 12 foot and 8-foot shiplap boards. HALLELUJAH! This was going to look so much better and match our entry shiplap at a fraction of the cost. The boards in our entry were customed ordered from a wood mill. Way to go Mr. Whitelane, way to go! I was thinking its about time Home Depot carried shiplap. It is all the rage these days.

We quickly snatched up all the shiplap boards they had left and hit up another local Home Depot for a few more. We got home and got started. Since the wall is open on each end in the hallway, we used 3.5″ MDF casing on each end. Otherwise, there would be all the ends of shiplap showing. It wouldn’t be a finished look. We put those end caps up first. Then we added the shiplap boards starting at the ceiling.

The ceiling is never level and there will be bigger gaps in certain areas. This is what caulk and paint are for. We continued putting up the boards down the wall until we reached an outlet. We then used our jigsaw to cut out around that area. I give Mr. Whitelane all the props for that tedious job. His measurements were spot on with the square cuts for the outlets. Did I mention, we used our Ryobi Airstrike cordless nail gun? We were able to do this project while our kids slept at night. Literally a few feet away from their bedrooms. It was so much quieter than a compressor nail gun!

After we got all the boards up, I used caulk and spackle to fill all the gaps and holes. It sat that way for a good two weeks. I really was not sure about painting this beast wall. I knew spraying the wall would be best. Also, it would be more expensive to have someone come spray it (my paint sprayer is not made for indoors). That is also on the account that I could even find a decent painter that is not crazy busy right now. After looking at the wall unpainted for weeks, I decided to just go for it.

I used a foam roller and very small art paint brush. I used the small brush to get in all the open grooves and then smoothed it over with the foam roller. I will be honest, the first coat was a long nightmare. I wanted to quit halfway through. It didn’t look very good and it was soooo time-consuming. I actually did quit for about a week. I then decided to give it a second coat. It started looking way better. In fact, the second coat went way faster and smoother. I even did a third coat of paint the same day in less than 30 minutes. Each coat got easier and quicker. It was not as smooth of a finish as spraying. However, it was DONE! I plan on hanging three large frames across the wall. I don’t think you will notice all the little imperfections of my paint job once they are hung.

Sadly, we haven’t got family pictures done in two years! WHAT? I know it’s crazy. I haven’t hung the frames because I am waiting until the new baby arrives, to get updated family pictures. I will be sure to share the finished wall, with frames, when that all happens. I just wanted to share my top secret source for the best DIY shiplap. Who knew, Home Depot?

Summer…

I feel like the last two weeks of school are chaos. Every single activity you can think of is jam-packed into the last two weeks of school. WHY!? I guess you have to go out with a bang, right? Well, we are surviving and school is almost out! Somehow, I think that is when the real chaos will begins. 🙂

Amongst all the programs, dances, competitions, soccer games, and performances, the nursery is almost done. I have the full reveal coming up July 10th. I know it is a little bit of a wait BUT it is for a good reason. I am teaming up with some other cute blogger moms to bring you a handful of nursery reveals. That is right, baby room mania for your viewing pleasure. Get ready for some of the cutest rooms you have ever seen!

While you wait for all the baby cuteness, you can check out the Joyful Summer Home Tour starting May 31st. Myself along with eight other bloggers are letting you inside our homes to see our summer style.  You don’t want to miss this!

In the meantime (like there is any left), Mr. Whitelane and I have been designing our yard (phase 1) and finishing up a few projects. We got the hallway shiplap finished and decided not to stop there. We kept going in our master bedroom. We got a whopping two boards up before the landscape planning took over. Who knows? Maybe I am starting a new trend. The barely started, unfinished, shiplap wall look. It’s going to be a thing….you just wait and see. 🙂   I will have a full tutorial up about both shiplap walls soon. I just have to finish our master bedroom first. I also have a secret about my new favorite place to buy shiplap. It is so affordable and looks amazing!

Hopefully your last weeks before summer are not as crazy town as ours. I am so ready for the summer to be here. Off to another end of school activity, I go….