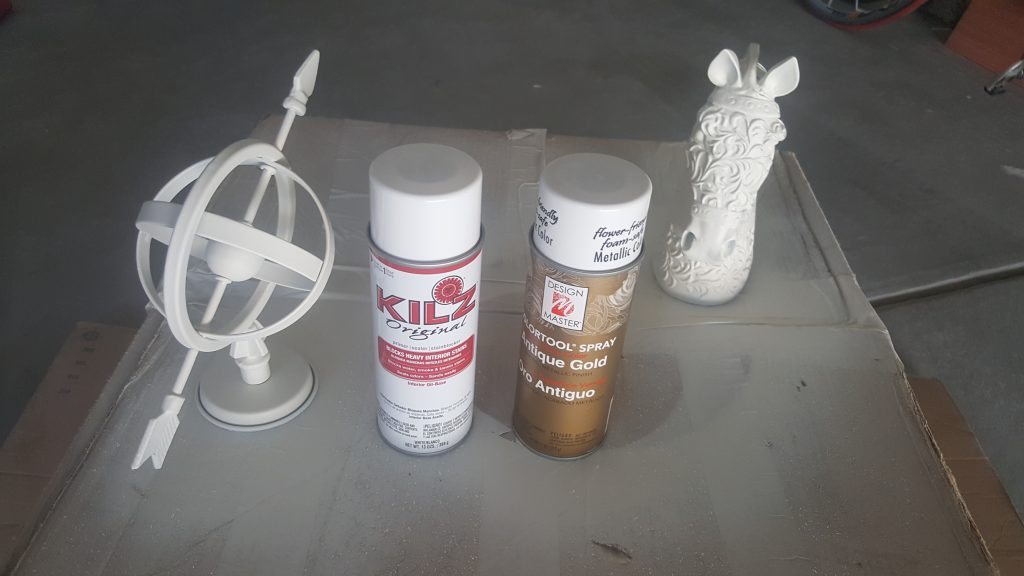
Brushed brass is all the rage right now. However, finding the right color brass is really hard. I am all about spray painting. I like to use things I have and bring them back to life with spray paint. When I decided to use brass as an accent color, I was on the hunt for the perfect brass spray paint. I tried dozens of colors before I found THE ONE. It is almost a perfect match to the brass knobs in my kitchen.
I found this perfect brass spray paint at Michael’s Stores. Be careful to get the right one. The can of a similar color looks exactly the same except the color name.Design Master Antique Gold is the right color. Don’t worry, it is not gold. It really is more brass than anything else. I just love this color and I have spray painted so many styling accessories. If you want to know the best method for spray painting, check out my video tutorial.
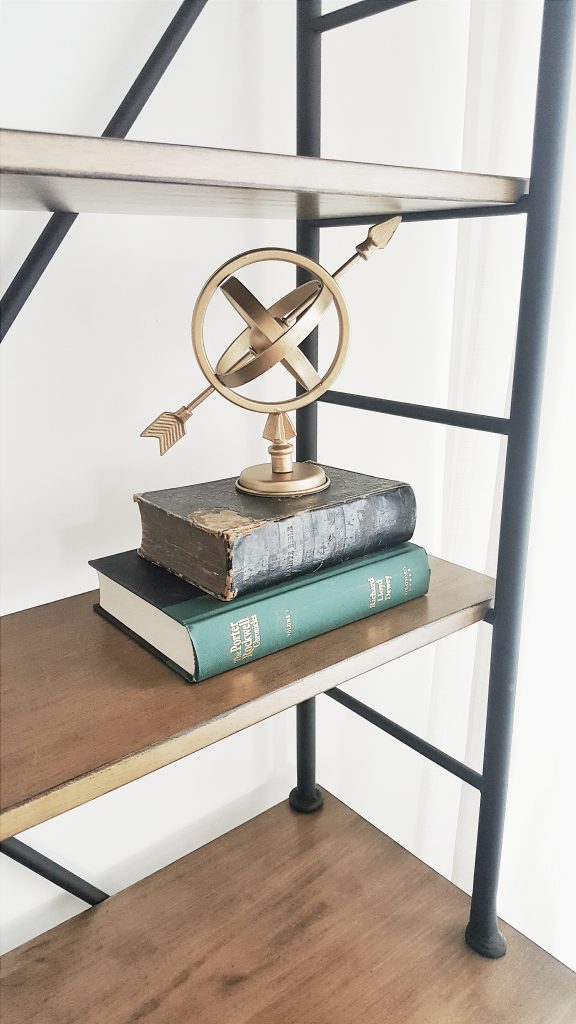
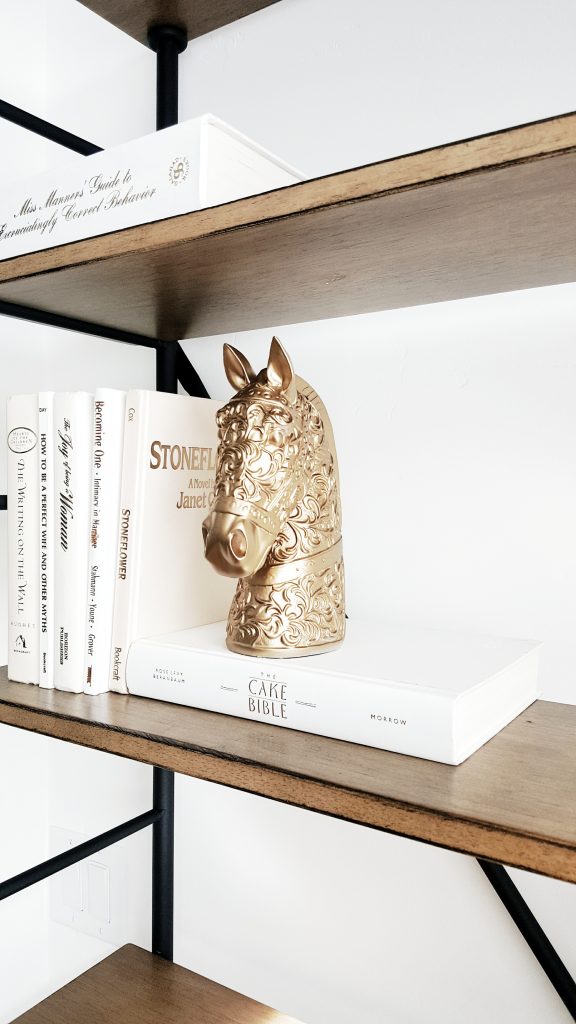
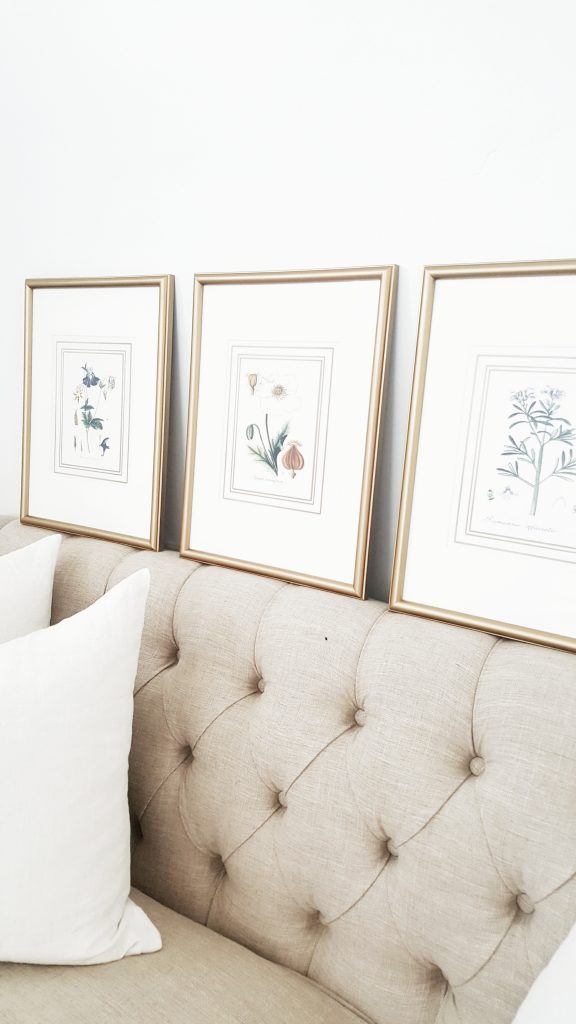
I am so glad I have spray paint that matches my hardware. I love adding pops of brass around the house. I am currently working on the half bathroom and living room bookshelves. It will have some brass touches too. Here are some sneaks of the decor going in there (spray painted with my new fav color, of course).
I am putting together a collage for the front room with these botanical prints. I used this brass spray paint on these frames too. There will be a post coming about that soon.
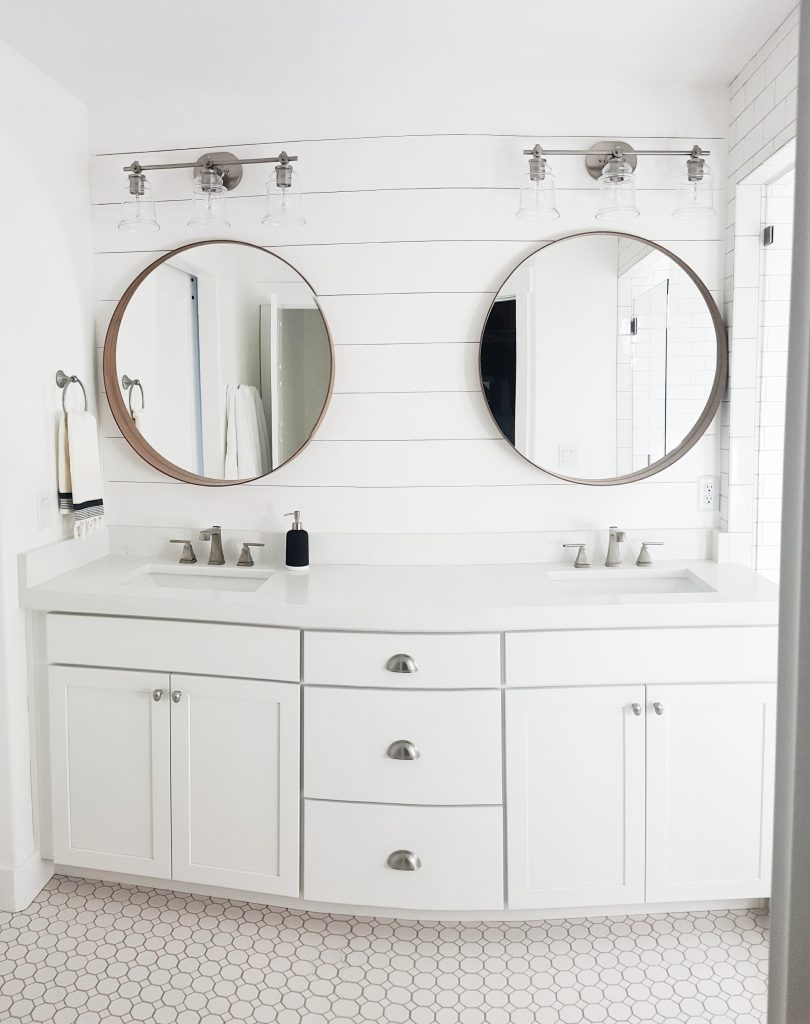
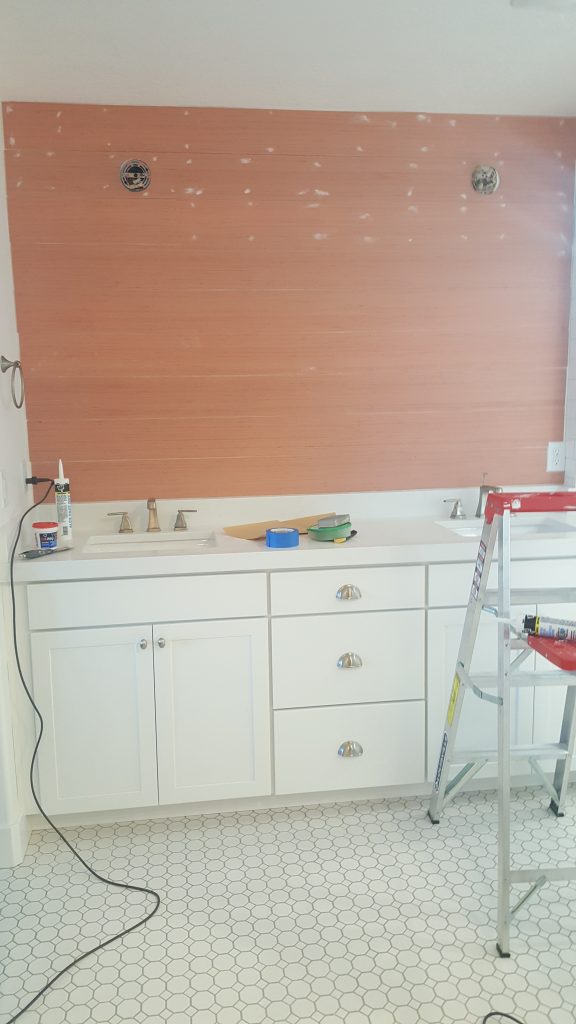
I finally got the shiplap put up above our vanity and I am in L.O.V.E. I have been trying to get it done for about a month. We have only lived in our new house two months but the projects have been planned for a loooooong time! From the second we picked our floor plan, the project list started. This was really an easy weekend project that made a big impact. We did this same type of “shiplap” in our townhouse going to the basement. The method we use is way cheaper than traditional shiplap. I think it looks just as good too!
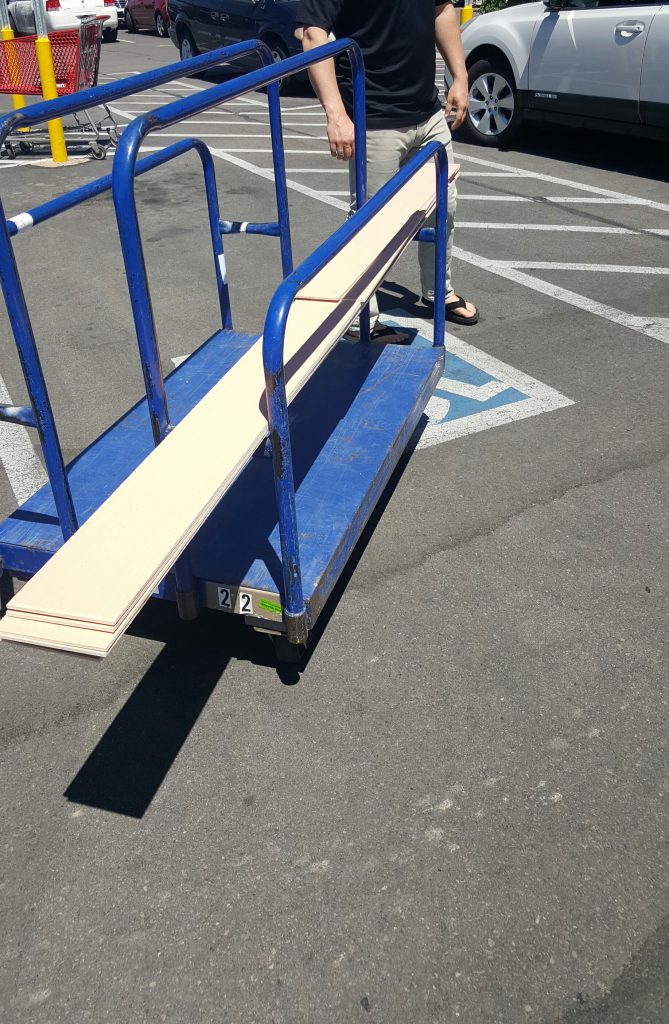
Mr. Whitelane and I started out by going to Lowe’s to get some plywood underlayment board. It comes in 4’ by 8’ sheets for $14.48. Then we had Lowe’s cut the board into six-inch strips. They will do straight cuts for free. So, take advantage of that! I was able to get five stripes that were six inches. There was one more strip that came out of the sheet but it was a little less than six inches because of the saw blade. When you make cuts, you lose a little of your board each time due to the width of the blade. After I had my six-inch stripes, I had them cut the boards to the length I need to go across my vanity.
Now that we had our strips, we loaded them up and got to work. NOT! We went home, unloaded them to the garage, and that is where the boards sat for a month. Each weekend we had something come up and it did not get done. I finally got tired of looking at those boards. I decided that we would get it done this past weekend, no matter what! It is a miracle! It actually got done between our kid’s football and soccer games.
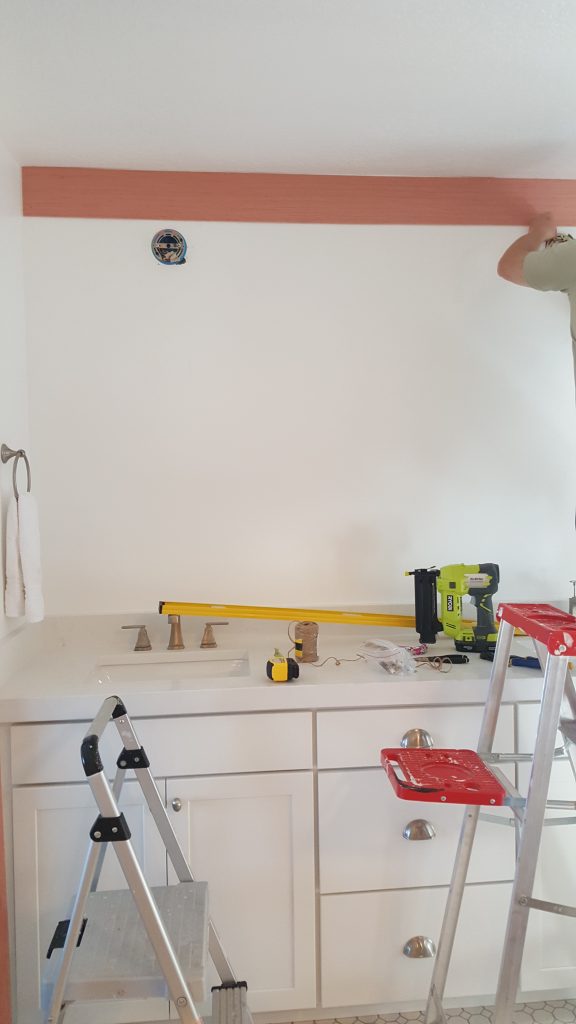
Before we started, I took a sander to the all the edges of the six-inch strips. The edges can be a little rough after they are cut. Just to be sure, I like to sand all around the boards to make it smooth. Mr. Whitelane got our little one down for a nap, while I quickly gave the boards a sanding. Now we were ready to nail them up. In most cases, your ceiling is not level. Make sure the first board you put at the top of your wall is level. There may be a gap between certain spots of the board and your ceiling. That’s okay because caulk will hide any gaps.
After the first board is level, things go pretty quick. I used nickels to space between each board to give that small line. I love using my Ryobi Power Strikecordless nail gun. It is so simple and no cords get in the way. We used a jigsaw to cut around our electrical boxes and outlet. It is not perfect but caulk is a lifesaver!
When we got all our boards up, I went back and filled the nail holes with spackle. I then used a lot of caulk to fill and smooth all my gaps. I used to hate caulking because of how messy it got. Mr. Whitelane then introduced me to the best invention ever. A caulk toolmakes the perfect smooth lines with half the mess. I love how perfect and easy it is to use. You really need to try one for your next project. It’s a game changer!
Now that everything was spackled and caulked, I let it dry overnight. I then used a foam roller to put on four coats of Sherwin Williams “High Reflective White.” Another great trick I like to use in between painting is to put your roller in a plastic bag in the fridge. Keeping the roller in the fridge stops the paint from drying out. You also don’t have to rinse it out each time. Just grab it out of the fridge and start painting again. When you are done with all your coats, you can trash it or rinse it out.
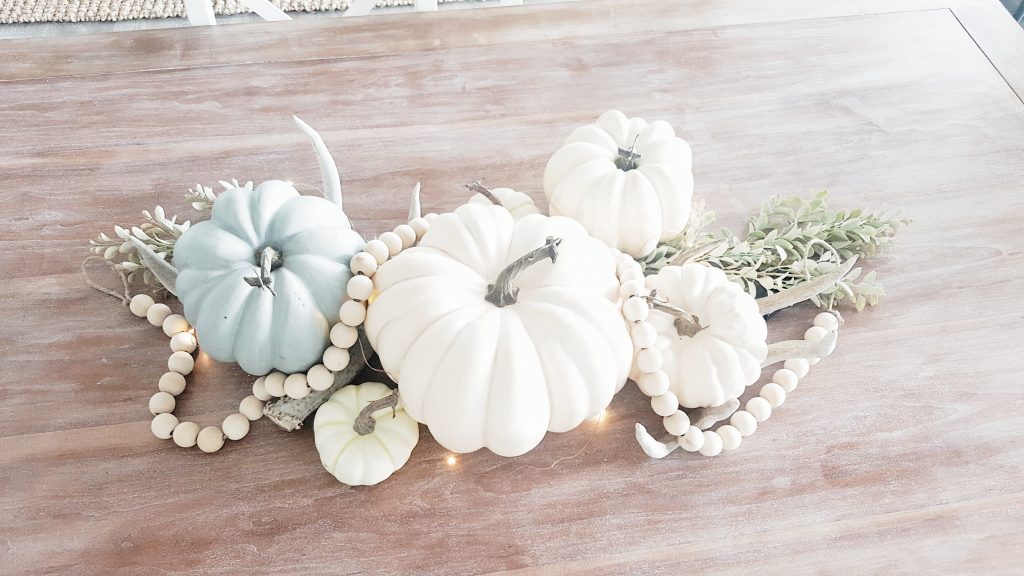
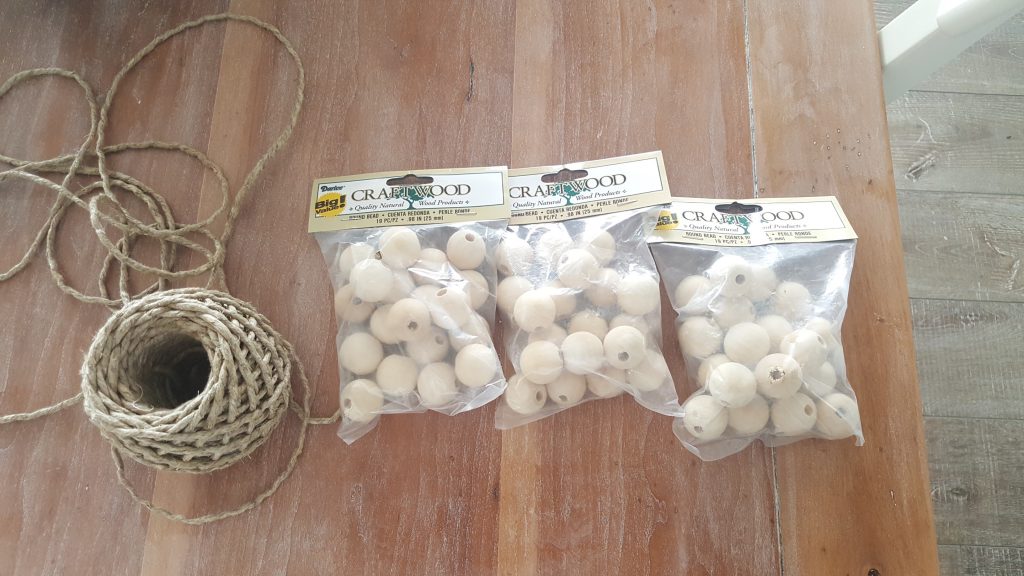
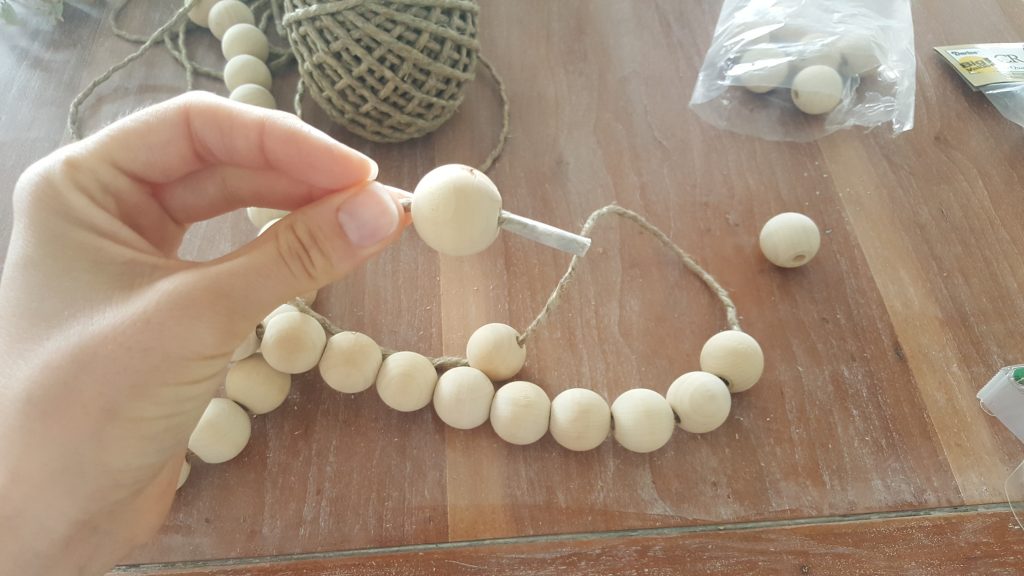
You have probably seen these wood bead garlands around. I just love how neutral and fun they look. I started shopping around and found some really cute bead garlands. However, I knew they were so simple and couldn’t cost very much to make. I decided to just go for it. This is probably the easiest DIY I have EVER done.
I went to Jo-Ann’s craft store and bought three bags of wood beads. They come pre-drilled with holes through each round wood bead. You know I love my coupons. Jo-Ann’s was having a killer sale. I had two 50% off coupons and one 40% off coupon. I got all three bags for $11.69. I used some hemp/jute twine that I already had on hand. All I did was wrap tape around the end of the jute twine. This made it easy to pass through the wood beads. My three year old could have done this. Just put all three packages of beads on the twine.
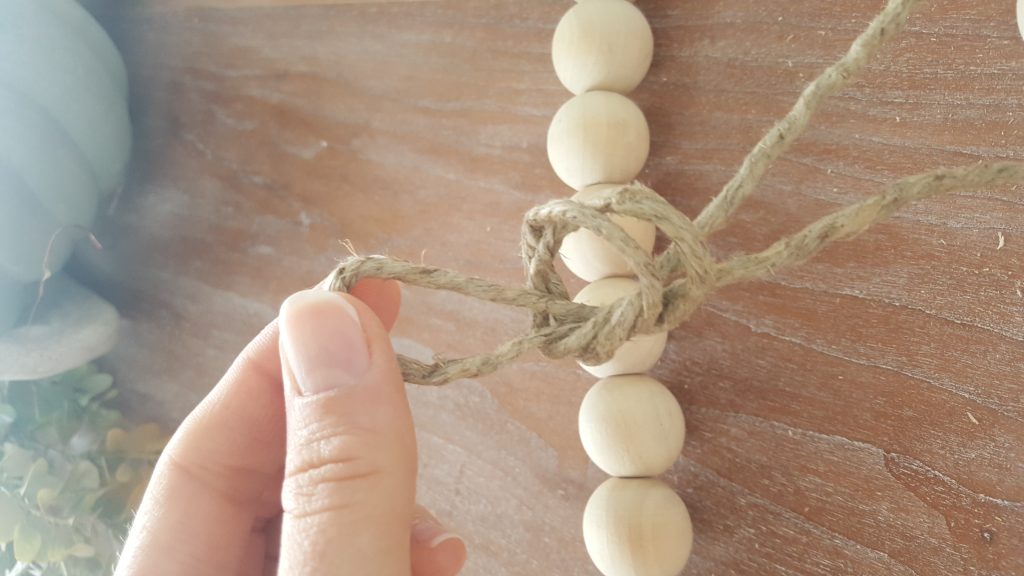
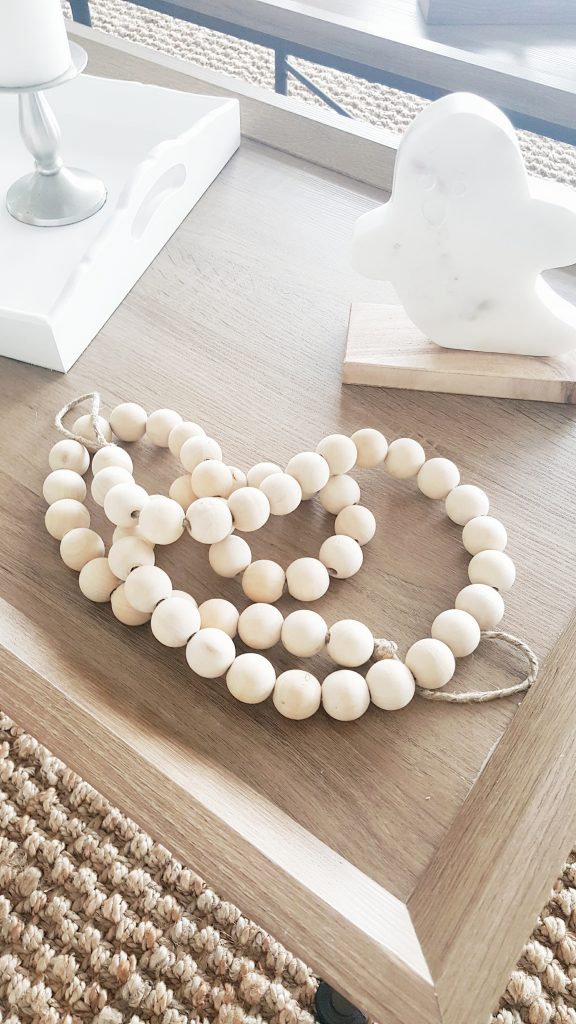
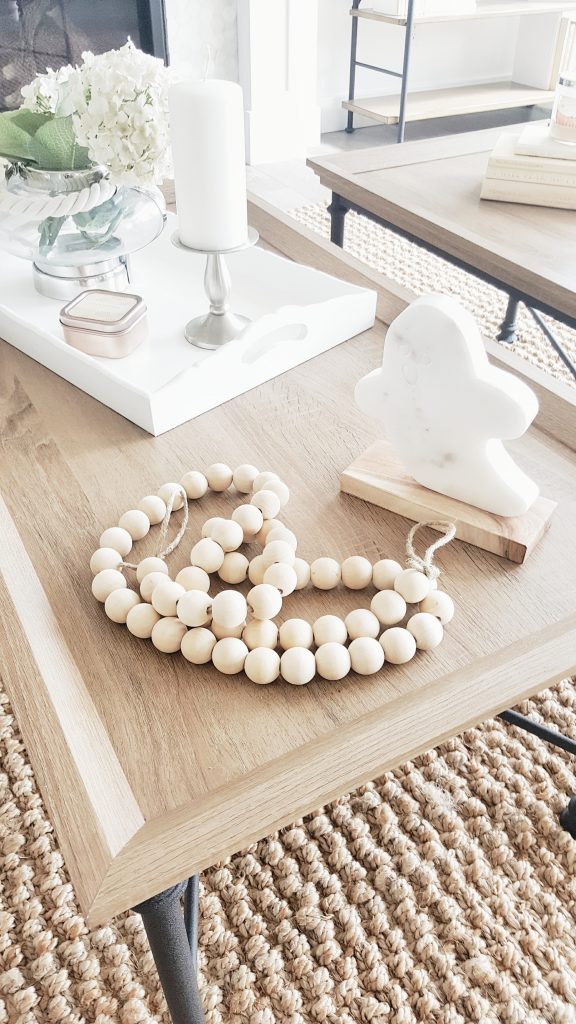
After all the beads were on, I tied loops on each end. That is it! Super easy and so cute. I will probably move this all over the house. It even looks cute on my pumpkins. For now, it is draped on my coffee table. The loops at each end will make it easy to hang as garland at some point. This was so quick and fun I had to share.
Hi there, I’m Kate. Welcome to White Lane Decor. Thanks for stopping by. I love neutral, bright, and airy spaces. I’m always looking for new ways to turn our house into a home. Have a look around and find inspiration for your next project.
Search
Disclosure
Some of my blog posts, ads, and banners contain "affiliate links." This means if you click on the link and purchase the item, I will receive an affiliate compensation. However, I only recommend products or services I use personally and truly feel you will enjoy too! I am disclosing this in accordance with the Federal Trade Commission's 16 CFR, Part 255: "Guides Concerning the Use of Endorsements and Testimonials in Advertising.” White Lane Decor is a participant in the Amazon Services LLC Associates Program, an affiliate advertising program designed to provide a means for sites to earn advertising fees by advertising and linking to amazon.com.
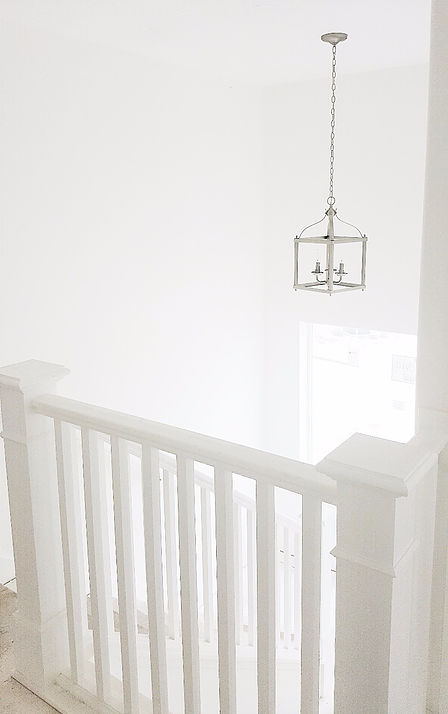
I get asked all the time about how I keep all the white in my house clean. I love white and how it makes a space feel so fresh and open. I also have two children and a lot of traffic that comes through our home. There is even more white at our new house than we had at our townhouse. So, I am letting you in on a few tricks I have learned.
Do not use Clorox wipes on your white cabinets. It will ruin the finish. It may take the dirt away for now, but over time it will leave a dulling film. Simple Green is your friend! It takes away the dirt without leaving a film. Simple Green has been a life saver. After every meal, I have to wipe down the island where my kids eat. Their dirty little footprints and food are covered all over the cabinets. I used to buy the spray bottles of Simple Green and paper towels to wipe down everything. Sometimes I would get lazy and not want to do that. I would just use plain old wet wipes. They didn’t really get the stains out. Or worse, I would use a Clorox wipe. Then I found these, Simple Green wet wipes! Seriously, changed my life by having these around. Wiping down everything is such a breeze. I also have white IKEA barstools. They usually are covered in the kids latest meal too. I can use Simple Green wipes to get the island and barstools all wiped down after every meal , quickly and easily.
The nice thing about having white bedding is bleach. I really haven’t even had a problem with our white bedding. Our master bedroom is the hub for our nighttime routine. We hang out there, read, talk, pray, and play. We have had our white bedding for 2 years and it still looks as white as it did the day I brought it home. I wash it regularly and spot treat, if needed, with Oxi Clean.
Our Rugs USA rug in the living room has taken a beating. I would not recommend this white rug in a living room. It does tend to show a lot of dirt and stains. They always come right out when I clean it, but it is a pain to keep clean. I will not have this rug in the living room at the new house. It will be going to a low traffic area, such as our master bedroom.
Tile grout is my nemesis. In our townhouse, we did not seal the grout when we moved in. It was nice and white for a few weeks, then it turned brown. Lesson learned, seal your grout on day one. I spent countless hours on my hands and knees using Grout Renew from Home Depot. I love this product. It took our grout back to the nice white color it used to be, and sealed it, all at once. Our entire main floor was tile , except for the living room. So, it took some time to apply but the finished result was worth it! At the new house, I will be sealing the grout before we move in!
I always keep baby wet wipes handy. They work wonders for wiping down the walls and baseboards. Food and fingerprints always seem to be smeared across our walls. I just grab a few wet wipes and easily wipe them off. Wet wipes work great for walls, in my experience, but not so much for bar stools and cabinets.
Now, let’s talk about sofas. I have always had leather because of durability. However, that changed a few years ago. I got my first, light colored fabric sofa. I was nervous and did not want to even sit on it. I would just admire it from afar. Let’s be real, that did not last long. I bought the protection plan for an extra $100, that also came with the entire sofa scotch guarded. I highly recommend this! Scotch Guard is amazing. The protection plan gives me such a peace of mind with kids. It pretty much covers any damage and stains that won’t come out. It really is worth the extra money. The new sofas I have picked out are also a light fabric. I will definitely be adding the protection plan to these beauties too.
I think that covers most of the things that help me keep my white house looking white. If you have any other tips, please do share in a comment below!
Kate
Hi there, I’m Kate. Welcome to White Lane Decor. Thanks for stopping by. I love neutral, bright, and airy spaces. I’m always looking for new ways to turn our house into a home. Have a look around and find inspiration for your next project.
Search
Disclosure
Some of my blog posts, ads, and banners contain "affiliate links." This means if you click on the link and purchase the item, I will receive an affiliate compensation. However, I only recommend products or services I use personally and truly feel you will enjoy too! I am disclosing this in accordance with the Federal Trade Commission's 16 CFR, Part 255: "Guides Concerning the Use of Endorsements and Testimonials in Advertising.” White Lane Decor is a participant in the Amazon Services LLC Associates Program, an affiliate advertising program designed to provide a means for sites to earn advertising fees by advertising and linking to amazon.com.
The following post contains affiliate links and is sponsored by Close5. Read my full disclosure here.
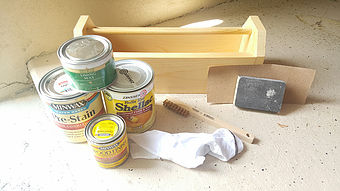
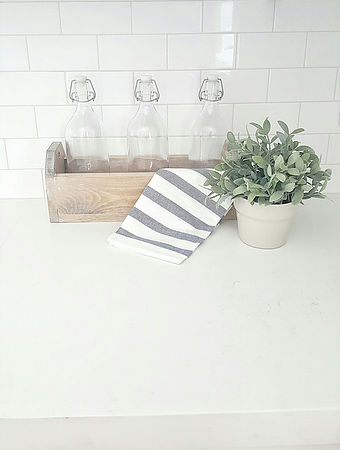
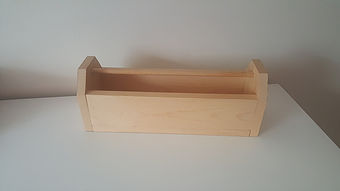
I am a bargain hunter (in most cases). It is what I do. I love yard sales and garage sales. I have been starting to collect decor for our new house. It takes time and I want to make sure I love the pieces. When I found this little wood tool box, I knew instantly how I wanted to transform this piece. I have to tell you how I came across this little gem. I downloaded this awesome buy and sell app for Android called Close5 (check out their Instagram for awesome inspiration). It is right up my alley and don’t worry the buy and sell app for iPhone is available too. The app is free and you can buy and sell items within a radius in your area (or any area). It is so easy to use. All of the communication with buyers and sellers are private through the selling app . I love that the alerts just pop up on my phone, about the items I have shown interest in. You have to give it a try!
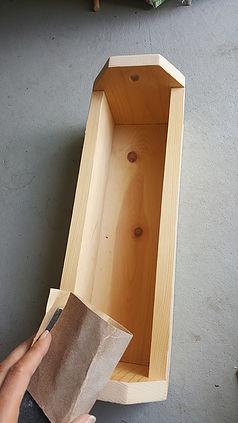
When this beauty came available, I quickly snatched it up. I know it looks basic but I had a vision for what it could be. My husband was extremely underwhelmed when I showed him. I assured him that it would look good when I was done. I brought it home and decided to get rid of the middle rod. It did not jive with the look I was going for.
.
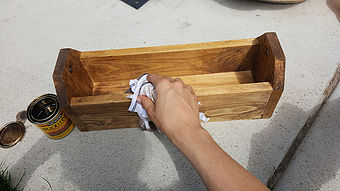
Next, was the refinishing. This box is made of pine. My first step was a light sanding using 150 grit sandpaper. Then I used wood conditioner. I like to use wood conditioner because it allows the stain to not penetrate as deep. I let the conditioner dry for 45 minutes. Then it was time to apply the stain. I just cut up an old shirt and wiped on the stain in the direction of the grain. Minwax “Early American” is still my favorite stain color. I let the stain dry for a couple hours in the sun.
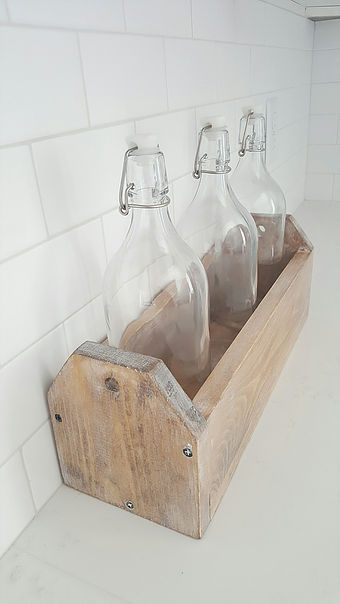
Once it was dry, I applied my shellac. Since I was going to use liming wax, the shellac was a must. The shellac allows the liming wax to grip to the wood better. After the shellac dried for an hour or two, I went over the box with 150 grit sand paper. I also went over the box with a brass bristle brush (in the direction of the grain). This helps open the pores of the wood. That allows the liming wax to show up better. I wiped all the dust off and applied my liming wax. I used a putty knife to scrape it over the wood surface. I did one side at a time and let it sit for a minute or two. I then took my rag and wiped off the excess liming wax. I sanded a few areas more to lighten the white wax. Now the box was complete…NOT! I had to hit up IKEA and grab some of my favorite bottles. I found these cute striped hand towels while I was there too. I may, or may not, have brought this to the new house (just to snap a pic against my newly installed backsplash).
Let’s recap this dreamy finshish:
*Wood conditioner
*Early American Minwax Stain
*Shellac
*Brass bristle brush sanding
*Liming Wax
* Sanding to liking
I love how it turned out and I can’t wait to find more goodies on Close5 for our house.
Kate
Hi there, I’m Kate. Welcome to White Lane Decor. Thanks for stopping by. I love neutral, bright, and airy spaces. I’m always looking for new ways to turn our house into a home. Have a look around and find inspiration for your next project.
Search
Disclosure
Some of my blog posts, ads, and banners contain "affiliate links." This means if you click on the link and purchase the item, I will receive an affiliate compensation. However, I only recommend products or services I use personally and truly feel you will enjoy too! I am disclosing this in accordance with the Federal Trade Commission's 16 CFR, Part 255: "Guides Concerning the Use of Endorsements and Testimonials in Advertising.” White Lane Decor is a participant in the Amazon Services LLC Associates Program, an affiliate advertising program designed to provide a means for sites to earn advertising fees by advertising and linking to amazon.com.
Hi there, I’m Kate. Welcome to White Lane Decor. Thanks for stopping by. I love neutral, bright, and airy spaces. I’m always looking for new ways to turn our house into a home. Have a look around and find inspiration for your next project.
Search
Disclosure
Some of my blog posts, ads, and banners contain "affiliate links." This means if you click on the link and purchase the item, I will receive an affiliate compensation. However, I only recommend products or services I use personally and truly feel you will enjoy too! I am disclosing this in accordance with the Federal Trade Commission's 16 CFR, Part 255: "Guides Concerning the Use of Endorsements and Testimonials in Advertising.” White Lane Decor is a participant in the Amazon Services LLC Associates Program, an affiliate advertising program designed to provide a means for sites to earn advertising fees by advertising and linking to amazon.com.


 .
.