Stay Connected With The Latest Posts

  • This field is for validation purposes and should be left unchanged.

Stay Connected With The Latest Posts

Cake Stand

Kate

Hi there, I’m Kate. Welcome to White Lane Decor. Thanks for stopping by. I love neutral, bright, and airy spaces. I’m always looking for new ways to turn our house into a home. Have a look around and find inspiration for your next project.

Disclosure

Some of my blog posts, ads, and banners contain "affiliate links." This means if you click on the link and purchase the item, I will receive an affiliate compensation. However, I only recommend products or services I use personally and truly feel you will enjoy too! I am disclosing this in accordance with the Federal Trade Commission's 16 CFR, Part 255: "Guides Concerning the Use of Endorsements and Testimonials in Advertising.” White Lane Decor is a participant in the Amazon Services LLC Associates Program, an affiliate advertising program designed to provide a means for sites to earn advertising fees by advertising and linking to amazon.com.

Shop My Home

Cake Stand

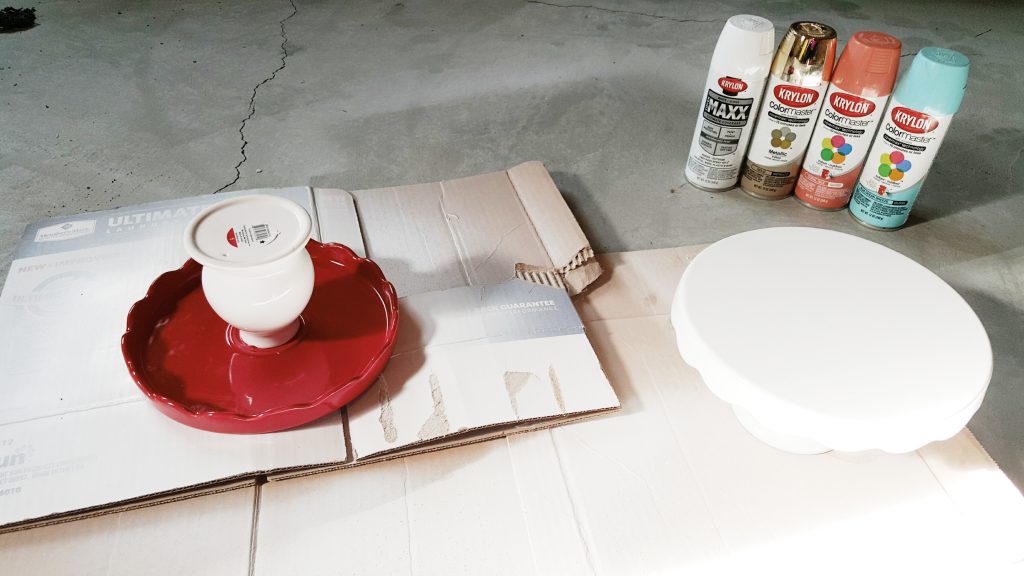
Target dollar spot. Enough said. 🙂 Ok, I walked into Target and saw these cute scalloped cake stands and snatched two up asap. $5, say what? Now if I could just find that black and white striped pitcher/vase from the dollar spot everybody else seems to have, I would be set. So I love the shape of the cake stand but red just wasn’t going to work for me. 1. I wanted to use this for more than just Valentines. 2. My valentines decor is mostly pink and gold this year, no red. I know, but I just wasn’t feeling red this year. So I decided to bust out my trusty spray paint and get busy. I know that painting them will make them not usable for food. That didn’t matter because they would be mostly decorative. If I want to use them for food then I will use doilies or some type of liner first on the stand.

Processed with VSCO with s2 preset

You know the drill by now. Kill primer first. I’m serious this is unlike any other primer I have used. It coats the object so well that it almost looks like it’s already painted. Truth be told, I have left a few items only primed around my house. It’s a flat white finish and I really liked it for a few things. Next, grab some Krylon spray paint. Here is a video of the way I like to spray paint. Go check it out. It will change your life.

Processed with VSCO with s2 preset

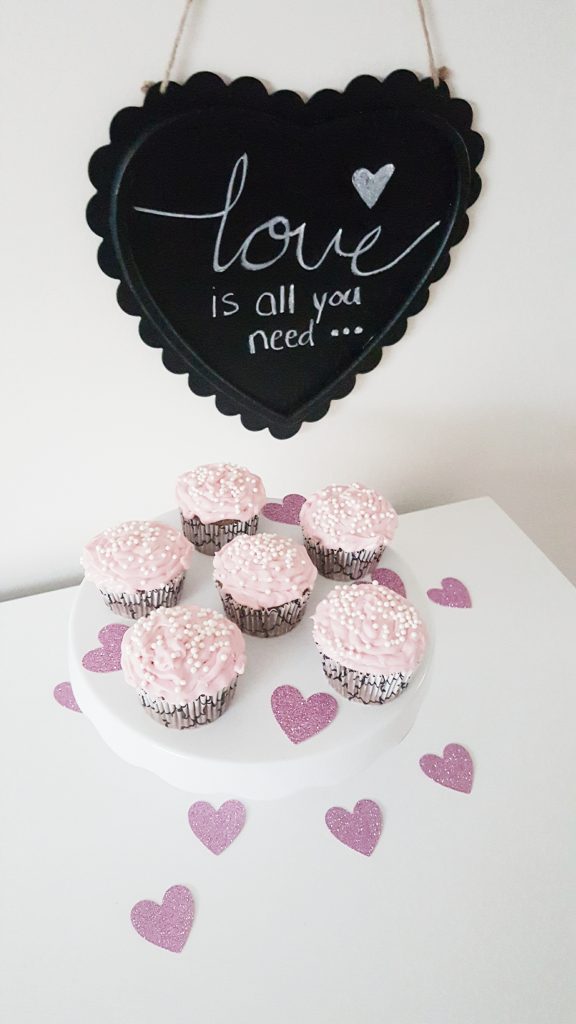
Now these cake stands can be used all year long. I’m thinking they will look awesome in the top glass cabinets on display in the new house. My kids had such a blast making these valentines cupcakes. Naturally, I had to display them on my cute cake stand. Again, there are cupcake liners so they are not directly on the painted stand. Walmart also had this cute glitter heart confetti for $0.98. This year Valentines Day is simple because we are in transition while waiting for our house to be built. Can’t wait to see these stands in action this summer in our new house.

Processed with VSCO with s2 preset


Kate

Hi there, I’m Kate. Welcome to White Lane Decor. Thanks for stopping by. I love neutral, bright, and airy spaces. I’m always looking for new ways to turn our house into a home. Have a look around and find inspiration for your next project.

Disclosure

Some of my blog posts, ads, and banners contain "affiliate links." This means if you click on the link and purchase the item, I will receive an affiliate compensation. However, I only recommend products or services I use personally and truly feel you will enjoy too! I am disclosing this in accordance with the Federal Trade Commission's 16 CFR, Part 255: "Guides Concerning the Use of Endorsements and Testimonials in Advertising.” White Lane Decor is a participant in the Amazon Services LLC Associates Program, an affiliate advertising program designed to provide a means for sites to earn advertising fees by advertising and linking to amazon.com.

Shop My Home

Newspaper Wreath

20160111_130718

I love this newspaper wreath. It is super cheap and simple to make. First, take a wooden/twig wreath from your local craft store the size you want. Next, take some coffee filters or paper similar in texture. Hot glue the coffee filters over the top and inside (everywhere except the back) of the wooden wreath. This just makes a good layer to glue your newspaper down. Gluing directly on the wood twigs is a lot harder. Now take some newspaper and cut it up into small squares as shown in the picture below. About 3.5” – 4″ on all sides for the squares is the size used on this wreath. You will need a lot of newspaper squares. If you have a paper cutter or can borrow one then I would!

Now you will take one square at a time and bunch it up in the center and hot glue it down at that center point of the square. It’s almost the same as how you stuff tissue paper in a gift bag. Grab it by the very middle making all four corners come to a point and glue that center piece down. This step gets a little tedious and repetitive because you have a whole wreath to fill with these little paper squares. The closer together the fuller it will be. Some of the ones on this wreath a super close and others are not quite as close. Just make sure you can’t see any of the white coffee filters you originally glued to the wreath.

Now make sure you go around the inner circle too. Just the very back will not have any newspaper. You can make some mini banners out of scrapbook paper and bakers twine like this “Welcome” one. You can also add a bow like the one on this wreath as well. The bow is secured with craft wire and not hot glue. Just tie off the wire in the very back of the wreath and it won’t show. This is to make sure it doesn’t fall off, since it is a little heavier than the newspaper.

I did not personally make this wreath. I actually bought it off a local yard sale page. Once I picked it up, I realized I could have easily made it for way cheaper. I have made a few others since seeing how easy this one looked to make. Hopefully, you can too!

Kate

Hi there, I’m Kate. Welcome to White Lane Decor. Thanks for stopping by. I love neutral, bright, and airy spaces. I’m always looking for new ways to turn our house into a home. Have a look around and find inspiration for your next project.

Disclosure

Some of my blog posts, ads, and banners contain "affiliate links." This means if you click on the link and purchase the item, I will receive an affiliate compensation. However, I only recommend products or services I use personally and truly feel you will enjoy too! I am disclosing this in accordance with the Federal Trade Commission's 16 CFR, Part 255: "Guides Concerning the Use of Endorsements and Testimonials in Advertising.” White Lane Decor is a participant in the Amazon Services LLC Associates Program, an affiliate advertising program designed to provide a means for sites to earn advertising fees by advertising and linking to amazon.com.

Shop My Home

Yarn Pom Poms

So I went searching everywhere to find some cute Valentines Day decor. I didn’t want red or bright pink. I wanted soft creams, whites, and blush tones. Well, I got a little side tracked for a minute and decided to make some yarn pom poms. I have seen so many beautiful pom pom garlands at Anthropology and on Etsy. They were a little pricey so I decided to make my own. I went to Michaels Arts and Crafts and grabbed some yarn (the thicker the better and wool if possible). One had a little gold tinsel in it and the other one was cream.

20160107_121213
I made this youtube video so you can also see the process. It is so simple and fast. I used yarn, a pair of scissors, and my hand. Cut a piece of yarn about 5 inches long and set that aside. Then take the rest of the yarn and wrap the yarn around your hand, as seen in the picture below, several times. Probably close to 60-80 times. You will be able to tell how big and thick you want your pom poms to be as you go. I wanted mine nice and full so I wrapped the yarn quite a few times. Next, carefully remove the bunch of yard from your hand and tie it off in the middle with the piece of 5-inch yarn you previously cut. Now you can cut each side of loops. There you have the pom pom. Some pieces will be longer and wild so trim it up until you like the shape of the pom pom. 20160107_121331  20160107_121410  20160107_121514


One package of yarn made 6 pom poms of medium size. If you want to make a wreath all you have to do is hot glue them on the wreath of your choice. I will be using these to make a garland. For that, just take more yarn ( or whatever type of string, jute, or hemp you want) and a large needle to thread through each pom pom leaving enough excess on the end to hang the garland. Also, you can just tie the pom pom onto the string of choice. It is best to use the two pieces of yarn from where you tied your bunch (meaning your 5-inch piece that you tied in a knot around your ball). Take those two pieces and tie another knot around the string of your choice. Then you have a garland. I actually braided some hemp string. Then I used a pencil to space out how far apart I wanted each pom on the hemp. Let me know what you think? Have you made any yarn pom moms yet? 
20160111_123727-1  20160111_123626 
2016-01-11-12-29-35-1

Kate

Hi there, I’m Kate. Welcome to White Lane Decor. Thanks for stopping by. I love neutral, bright, and airy spaces. I’m always looking for new ways to turn our house into a home. Have a look around and find inspiration for your next project.

Disclosure

Some of my blog posts, ads, and banners contain "affiliate links." This means if you click on the link and purchase the item, I will receive an affiliate compensation. However, I only recommend products or services I use personally and truly feel you will enjoy too! I am disclosing this in accordance with the Federal Trade Commission's 16 CFR, Part 255: "Guides Concerning the Use of Endorsements and Testimonials in Advertising.” White Lane Decor is a participant in the Amazon Services LLC Associates Program, an affiliate advertising program designed to provide a means for sites to earn advertising fees by advertising and linking to amazon.com.

Shop My Home

DIY Corbel Shelves

Ballard Designs. Heard of them? Well, they are kind of a big deal…..and so are their prices. They had some amazing bracket shelves that were perfect for the dining room in our townhouse. Only, problem is, they were like super expensive. So I started to look at Etsy, Target, and a few other places that might have some similar. I found some but they were all floating shelves. I really liked the brackets or corbels on the bottom. I know it is dumb that I wanted to buy them when I could have just made them right? Well, sometimes I get overwhelmed with all the projects on the to-do list. That’s when I just want to go out and buy it so I can check something off and be done. But checking off this project meant big bucks so I was forced to make them…..sort of. 😉

Well, I didn’t have a miter saw to build the shelves from scratch. So I had to get creative. I was at Home Depot and found some floating shelves that I really liked (image below is from the Home Depot website of the shelf I picked). I still thought they needed the corbels to finish them off. That’s when it hit me! I would just buy the floating shelves and add some corbels to them. DUH! I still had to do a little work but it would be quick and easy.1-9-15-09-am

I chose a 24-inch shelf and a 36-inch shelf in white. I then headed over to the wooden corbels. There is a section of a bunch of unfinished corbels in Home Depot. I couldn’t fin one that I like so I went to Lowes. I found the one I liked at Lowes in the picture below (picture of corbel is from Lowes website). I needed four of them (two for each shelf). They also have them online and that’s where I borrowed this picture from. I also picked up some wood fill and wood glue (pictures from the Home Depot website).


3-9-15-09-am

As you can see in the corbel picture they had holes where you would normally attach something. I wasn’t going to use these holes to attach the corbels so I used the wood fill to fill them. After the filler had dried I sanded the areas smooth. Now comes the fun part. I flipped my floating shelves main surface down and got my wood glue. I placed the wood glue on the top of the corbel and laid it on the bottom side of the shelf. I just kind of eyeballed how far apart I wanted them. I did this on each floating shelf. I left them with the corbels in place, where I wanted them to dry overnight. The next morning I came downstairs to my “want to be” Ballard Designs shelves. Only, problem was, my shelves were white and my corbels were unfinished wood.

I thought about taping off just the corbels and painting them since my shelves were already white. Then I would have to worry about the whites matching. So that’s right, I painted the already perfectly painted white shelves. It was the only way to make sure it all was the same color. I used my trusty Kilz primer first. Then I took my Krylon glossy white and spray painted the shelves. They turned out just like I wanted. It was less than $100 for the whole project. That is way cheaper than what I would have spent at Ballard Designs. The best part is that it was a super lazy, do it yourself project. It was practically already done for me. I just put it all together and slapped some spray paint on them. I know they could have been made for a lot cheaper from scratch too. I work with what I got, though. Some day I will have a miter saw and then nothing will be holding me back. Watch out! But seriously I got to get one of those by the time we move into the new house. And that’s a wrap….now you can go make your own “Ballard Designs” shelves.

P.S. here is a pic of my shelves when that one time I tried using colors other than white to decorate for fall….

Kate

Hi there, I’m Kate. Welcome to White Lane Decor. Thanks for stopping by. I love neutral, bright, and airy spaces. I’m always looking for new ways to turn our house into a home. Have a look around and find inspiration for your next project.

Disclosure

Some of my blog posts, ads, and banners contain "affiliate links." This means if you click on the link and purchase the item, I will receive an affiliate compensation. However, I only recommend products or services I use personally and truly feel you will enjoy too! I am disclosing this in accordance with the Federal Trade Commission's 16 CFR, Part 255: "Guides Concerning the Use of Endorsements and Testimonials in Advertising.” White Lane Decor is a participant in the Amazon Services LLC Associates Program, an affiliate advertising program designed to provide a means for sites to earn advertising fees by advertising and linking to amazon.com.

Shop My Home

Tufted Bench

Is Christmas over already? It doesn’t even feel real. I can’t believe how time has flown by this year. So many milestones have happened in our family and we have been truly blessed. I’m so thankful for the opportunity we have to build a house, sell our townhouse, and have so much love and support. Mr. Whitelane wanted to get me an entry bench four years ago when we bought our very first townhouse. We didn’t have very much money and what we did have was going to buy that little townhouse. He came home for our anniversary with this brown bench from Wal-Mart that was only $49. We didn’t even end up using it in our entry because it just didn’t work there. We ended up putting it in our master bedroom. Even when we built our new townhouse we still kept it in our bedroom. I wanted to paint it in our new townhouse and reupholster the seat. I was very worried about attempting to reupholster a tufted piece (I don’t know why because it wasn’t bad at all). It sat it in our bedroom for a year after we moved to the new townhouse. I was going to sell the bench and buy a new one. I looked a lot of places and all the benches were at least $100 or more. I found some I really liked but I just didn’t want to spend the money on that. So I decide I was going to paint it and reupholster.

imag0370
I took the top seat apart from the legs by unbolting the screws. I then took the base legs outside and used my trusty Kilz primer to get rid of the brown. After that had dried two hours I put on a nice even coat of Krylon semi-gloss white spray paint. I left that to dry and cure while I figured out how to tackle the reupholstering.

I had reupholstered tons of chairs and cushions before but nothing that was tufted. I went to Hobby Lobby and found this great neutral fabric. I also picked up some upholstery buttons and a long tufting needle. When I got back home I removed all the brown pleather from the cushion. now there was just foam. I could see the holes where to thread the buttons and then it all made sense. I used the fabric to cover the small upholstery buttons and snap them back together. Next, I placed my fabric on top of the cushion and used my long needle to thread the buttons through the fabric and the cushion seat holes. I did this in each place where the previous holes had been used for the tufting. I used twine to thread the buttons to the bench seat because it is stronger. I then stapled them to the bottom of the wood cushion base and tied them off. Now that all my buttons were tufted, it was time to staple my fabric to the cushion. Remember to do your corners last. I like to staple all my sides first. Then I take my four corners one at time, to fold them nicely and staple them down.

My legs had dried and I decided to take sand paper to lightly distress some areas. I then took the top cushion and screwed back together the legs and seat. It obviously was not perfect but it looked so much better. I decided it still needed something else so I went back to Hobby Lobby and got some oil rubbed bronze upholstery tacks. Let me tell you that was a whole lot of work. I got individual tacks and it was such a pain hammering in each one and trying to keep it on a straight line. I got off in multiple places but you can’t tell unless you examine closely. I don’t think I want to do upholstery tacks again unless I absolutely have to! I love the look of them and I think it finished off the bench nicely despite the trouble.

imag0477
After all that work I decided to sell this little bench. Since we decided to build a house and sell our newer townhouse; I knew this bench needed a new home. When we get settled in the new house I will probably finally splurge to buy a nice bigger bench for our master bedroom. I don’t know? I might even buy two sitting chairs instead. As you can imagine, my mind is spinning with design ideas for our new house. I can’t wait to actually move in and get started. Until then Ill be day dreaming….

Kate

Hi there, I’m Kate. Welcome to White Lane Decor. Thanks for stopping by. I love neutral, bright, and airy spaces. I’m always looking for new ways to turn our house into a home. Have a look around and find inspiration for your next project.

Disclosure

Some of my blog posts, ads, and banners contain "affiliate links." This means if you click on the link and purchase the item, I will receive an affiliate compensation. However, I only recommend products or services I use personally and truly feel you will enjoy too! I am disclosing this in accordance with the Federal Trade Commission's 16 CFR, Part 255: "Guides Concerning the Use of Endorsements and Testimonials in Advertising.” White Lane Decor is a participant in the Amazon Services LLC Associates Program, an affiliate advertising program designed to provide a means for sites to earn advertising fees by advertising and linking to amazon.com.

Shop My Home

Spray Painted Berry Wreath

Today I’m throwing it way back to our first townhouse we bought. I got this red berry wreath from Thai Pain Trading and I just loved it, until I didn’t. All of the sudden the red just was not working for me. I had a lot of red in my house when we first got married. After a few years, I started to add more bright fun colors. This is where the wreath update came into play.

IMAG1405
I had spray painted so many other things. So why not try to spray this wreath? I first used Kilz spray primer as usual. Then I chose Krylon Ocean Breeze spray paint. It took two coats and a lot of waiting for one side to dry. I would have to let sections dry and then roll it over to spray another section. There were a lot a berries and places to spray on this wreath.

IMAG1323
Its been a few years but I still love this turquoise wreath. It has a fun pop to it. I need to give it a fresh coat of Ocean breeze because some red is showing through on a few chips. Hey, I might even spray it white this time. You never know? Spray paint is a miracle worker and makes it easy to change up the color.

berry-wreath

Kate

Hi there, I’m Kate. Welcome to White Lane Decor. Thanks for stopping by. I love neutral, bright, and airy spaces. I’m always looking for new ways to turn our house into a home. Have a look around and find inspiration for your next project.

Disclosure

Some of my blog posts, ads, and banners contain "affiliate links." This means if you click on the link and purchase the item, I will receive an affiliate compensation. However, I only recommend products or services I use personally and truly feel you will enjoy too! I am disclosing this in accordance with the Federal Trade Commission's 16 CFR, Part 255: "Guides Concerning the Use of Endorsements and Testimonials in Advertising.” White Lane Decor is a participant in the Amazon Services LLC Associates Program, an affiliate advertising program designed to provide a means for sites to earn advertising fees by advertising and linking to amazon.com.

Shop My Home