Stay Connected With The Latest Posts

  • This field is for validation purposes and should be left unchanged.

Stay Connected With The Latest Posts

Newspaper Wreath

Kate

Hi there, I’m Kate. Welcome to White Lane Decor. Thanks for stopping by. I love neutral, bright, and airy spaces. I’m always looking for new ways to turn our house into a home. Have a look around and find inspiration for your next project.

Disclosure

Some of my blog posts, ads, and banners contain "affiliate links." This means if you click on the link and purchase the item, I will receive an affiliate compensation. However, I only recommend products or services I use personally and truly feel you will enjoy too! I am disclosing this in accordance with the Federal Trade Commission's 16 CFR, Part 255: "Guides Concerning the Use of Endorsements and Testimonials in Advertising.” White Lane Decor is a participant in the Amazon Services LLC Associates Program, an affiliate advertising program designed to provide a means for sites to earn advertising fees by advertising and linking to amazon.com.

Shop My Home

Newspaper Wreath

20160111_130718

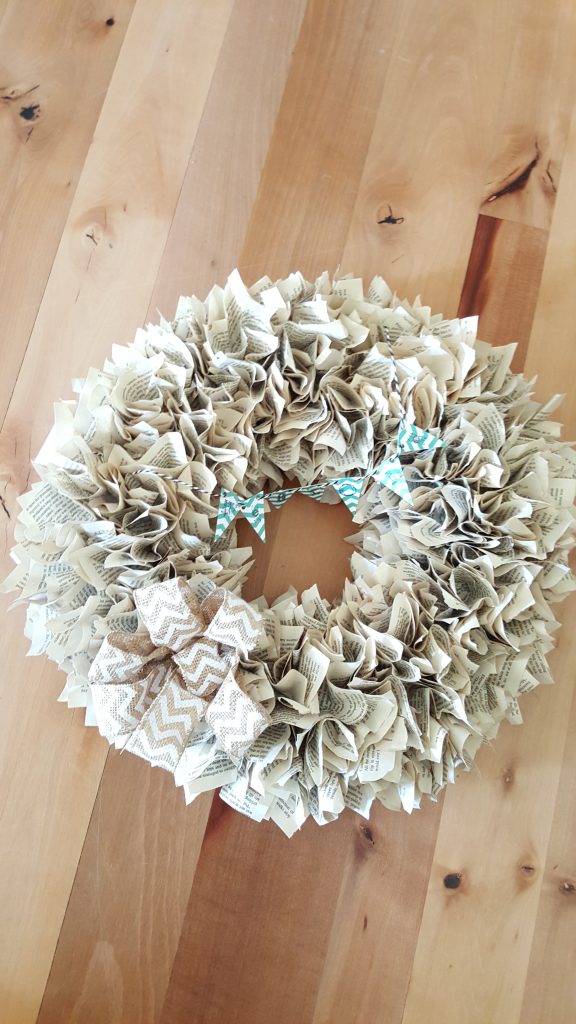
I love this newspaper wreath. It is super cheap and simple to make. First, take a wooden/twig wreath from your local craft store the size you want. Next, take some coffee filters or paper similar in texture. Hot glue the coffee filters over the top and inside (everywhere except the back) of the wooden wreath. This just makes a good layer to glue your newspaper down. Gluing directly on the wood twigs is a lot harder. Now take some newspaper and cut it up into small squares as shown in the picture below. About 3.5” – 4″ on all sides for the squares is the size used on this wreath. You will need a lot of newspaper squares. If you have a paper cutter or can borrow one then I would!

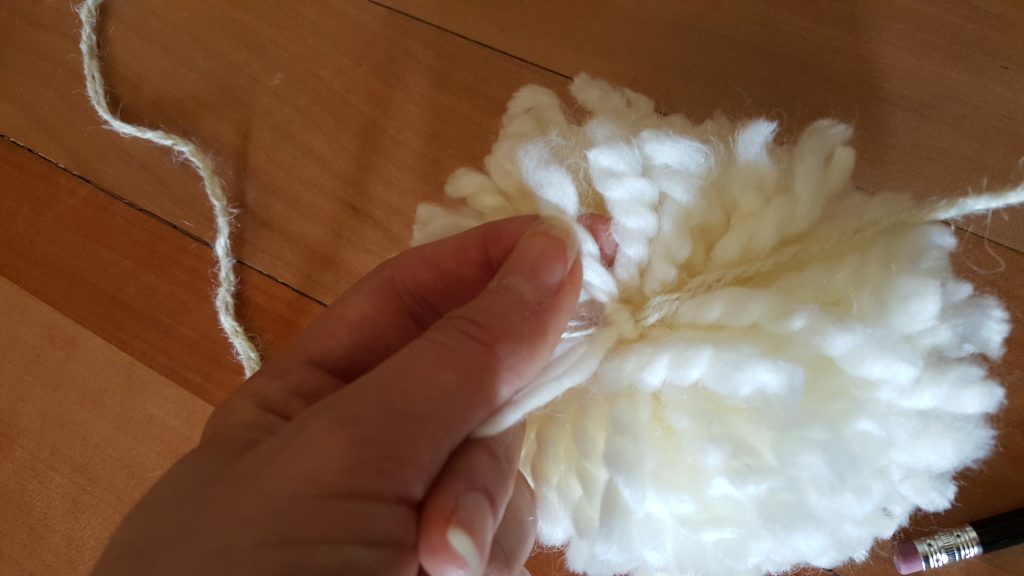
Now you will take one square at a time and bunch it up in the center and hot glue it down at that center point of the square. It’s almost the same as how you stuff tissue paper in a gift bag. Grab it by the very middle making all four corners come to a point and glue that center piece down. This step gets a little tedious and repetitive because you have a whole wreath to fill with these little paper squares. The closer together the fuller it will be. Some of the ones on this wreath a super close and others are not quite as close. Just make sure you can’t see any of the white coffee filters you originally glued to the wreath.

Now make sure you go around the inner circle too. Just the very back will not have any newspaper. You can make some mini banners out of scrapbook paper and bakers twine like this “Welcome” one. You can also add a bow like the one on this wreath as well. The bow is secured with craft wire and not hot glue. Just tie off the wire in the very back of the wreath and it won’t show. This is to make sure it doesn’t fall off, since it is a little heavier than the newspaper.

I did not personally make this wreath. I actually bought it off a local yard sale page. Once I picked it up, I realized I could have easily made it for way cheaper. I have made a few others since seeing how easy this one looked to make. Hopefully, you can too!

Kate

Hi there, I’m Kate. Welcome to White Lane Decor. Thanks for stopping by. I love neutral, bright, and airy spaces. I’m always looking for new ways to turn our house into a home. Have a look around and find inspiration for your next project.

Disclosure

Some of my blog posts, ads, and banners contain "affiliate links." This means if you click on the link and purchase the item, I will receive an affiliate compensation. However, I only recommend products or services I use personally and truly feel you will enjoy too! I am disclosing this in accordance with the Federal Trade Commission's 16 CFR, Part 255: "Guides Concerning the Use of Endorsements and Testimonials in Advertising.” White Lane Decor is a participant in the Amazon Services LLC Associates Program, an affiliate advertising program designed to provide a means for sites to earn advertising fees by advertising and linking to amazon.com.

Shop My Home

Yarn Pom Poms

So I went searching everywhere to find some cute Valentines Day decor. I didn’t want red or bright pink. I wanted soft creams, whites, and blush tones. Well, I got a little side tracked for a minute and decided to make some yarn pom poms. I have seen so many beautiful pom pom garlands at Anthropology and on Etsy. They were a little pricey so I decided to make my own. I went to Michaels Arts and Crafts and grabbed some yarn (the thicker the better and wool if possible). One had a little gold tinsel in it and the other one was cream.

20160107_121213
I made this youtube video so you can also see the process. It is so simple and fast. I used yarn, a pair of scissors, and my hand. Cut a piece of yarn about 5 inches long and set that aside. Then take the rest of the yarn and wrap the yarn around your hand, as seen in the picture below, several times. Probably close to 60-80 times. You will be able to tell how big and thick you want your pom poms to be as you go. I wanted mine nice and full so I wrapped the yarn quite a few times. Next, carefully remove the bunch of yard from your hand and tie it off in the middle with the piece of 5-inch yarn you previously cut. Now you can cut each side of loops. There you have the pom pom. Some pieces will be longer and wild so trim it up until you like the shape of the pom pom. 20160107_121331  20160107_121410  20160107_121514


One package of yarn made 6 pom poms of medium size. If you want to make a wreath all you have to do is hot glue them on the wreath of your choice. I will be using these to make a garland. For that, just take more yarn ( or whatever type of string, jute, or hemp you want) and a large needle to thread through each pom pom leaving enough excess on the end to hang the garland. Also, you can just tie the pom pom onto the string of choice. It is best to use the two pieces of yarn from where you tied your bunch (meaning your 5-inch piece that you tied in a knot around your ball). Take those two pieces and tie another knot around the string of your choice. Then you have a garland. I actually braided some hemp string. Then I used a pencil to space out how far apart I wanted each pom on the hemp. Let me know what you think? Have you made any yarn pom moms yet? 
20160111_123727-1  20160111_123626 
2016-01-11-12-29-35-1

Kate

Hi there, I’m Kate. Welcome to White Lane Decor. Thanks for stopping by. I love neutral, bright, and airy spaces. I’m always looking for new ways to turn our house into a home. Have a look around and find inspiration for your next project.

Disclosure

Some of my blog posts, ads, and banners contain "affiliate links." This means if you click on the link and purchase the item, I will receive an affiliate compensation. However, I only recommend products or services I use personally and truly feel you will enjoy too! I am disclosing this in accordance with the Federal Trade Commission's 16 CFR, Part 255: "Guides Concerning the Use of Endorsements and Testimonials in Advertising.” White Lane Decor is a participant in the Amazon Services LLC Associates Program, an affiliate advertising program designed to provide a means for sites to earn advertising fees by advertising and linking to amazon.com.

Shop My Home

Board and Batten Half Bath

I love board and batten and I am not afraid to say it. The first step is admitting you have a problem. Hey, when something looks good I don’t see why its a problem. ok? Just get ready because the new house will have a lot more board and batten. So I did the same method for my entry as I did on my dining room a few posts back. My cute nieces were in town to help with this one so I put them to work. When I am trying to get an Idea of how something will look, I always need helpers to hold stuff up.  As you saw with Mr. Whitelane in our dining room board and batten post. I also use painters tape as I mentioned before to tape off where everything thing will go. As you can see in the picture below, I also sometimes just stand the boards up and get idea of the look.

20150722_095756-1 
At the same time as I was finishing up my entry board and batten; I decided to tackle the half bathroom board and batten while I was at it. I decided to keep it simple in here because it is such a small space. No double row because the single would look great. Less painting and wood is a bonus of the single row. I love my cordless Ryobi Strike nail gun. It is so quick and easy to use for projects like this. I am so glad I had my caulking tool again too. It makes caulking less miserable. I introduced this little time-saving tool in my dining room board and batten post. After all, my caulking was done I turned up Pandora and got busy with three coats of white custom match paint to my baseboards. I was able to do all my cuts at Home Depot except for a few miter cuts. Thankfully my awesome neighbor had a miter saw I was able to borrow. I honestly had no idea what I was doing. I used scrap wood to play around with the cuts and angles until I figured out what worked for what I needed. I think the board and batten in the entry and the dining added so much character to our townhouse. I decided the entry board and batten needed some brushed nickel hooks to finish off the look. I found these at Home Depot of course. I will probably be doing something similar in the mudroom of our new house. What do you think? Do you love board and batten as much as me?

3-8-38-59-pm

board-and-batten-half-bath

Kate

Hi there, I’m Kate. Welcome to White Lane Decor. Thanks for stopping by. I love neutral, bright, and airy spaces. I’m always looking for new ways to turn our house into a home. Have a look around and find inspiration for your next project.

Disclosure

Some of my blog posts, ads, and banners contain "affiliate links." This means if you click on the link and purchase the item, I will receive an affiliate compensation. However, I only recommend products or services I use personally and truly feel you will enjoy too! I am disclosing this in accordance with the Federal Trade Commission's 16 CFR, Part 255: "Guides Concerning the Use of Endorsements and Testimonials in Advertising.” White Lane Decor is a participant in the Amazon Services LLC Associates Program, an affiliate advertising program designed to provide a means for sites to earn advertising fees by advertising and linking to amazon.com.

Shop My Home

Antique Shutter Love

And there she was just looking at me. That little shutter nestled between two others. I had been walking the antique store trying to find something good. I didn’t know I needed this, but she did. I picked her up and took her to front; to find out how much. $5 was a steal for this old shutter so I loaded it up and brought it home.

imag0775
I couldn’t just leave the natural wood. I know it is beautiful but it just didn’t work for the space I wanted to incorporate it too. So go check out my youtube video on spray paint to see my method of madness to spray painting. I used Kilz primer first and then my Krylon spray paint. I chose the color sea foam and loved how it turned out.

I knew I needed some kind of gallery wall at my entry. I wanted this shutter to be a part of that. I went to Ikea and found a bunch of white frames. I got home and played with the layout until I liked the look. Here is an easy tip. Use push pins to initially hang your frames for your gallery wall. It will hold light weight frames well enough to get an idea of how it is going to look. After you have the placement down you can use a real nail. Honestly, I still leave the push pins to hold the picture if it isn’t heavy. There was this really weird shaped frame that fit great into my gallery from Ikea. The only problem was finding a long rectangle shape picture to fit into it. All the pictures would be expensive to print that size. I wanted to use this frame because the shape just fit perfectly on my gallery wall. So I got out some left over fabric from upholstering my piano bench. I put into the frame and cut off the excess. Perfect! I can’t believe I didn’t think of it sooner. Easy cheap solution for those odd size frames.

20150722_095945-1
I also found a cute vintage looking key hanger/holder at Hobby Lobby. I thought this would fit in well with my gallery wall. I brought it home and gave it the same paint job as the shutter. I love how it all came together. I’m not sure if I will be using this gallery wall in the new house but it sure worked great for our townhouse. Also, this cute hanging lantern is from amazon. I got some similar ones from the Oakwood Homes design center that I can’t wait to see go up at our new house.

You never know what you will come home with from an antique shop…..

Processed with VSCO with s2 preset

Kate

Hi there, I’m Kate. Welcome to White Lane Decor. Thanks for stopping by. I love neutral, bright, and airy spaces. I’m always looking for new ways to turn our house into a home. Have a look around and find inspiration for your next project.

Disclosure

Some of my blog posts, ads, and banners contain "affiliate links." This means if you click on the link and purchase the item, I will receive an affiliate compensation. However, I only recommend products or services I use personally and truly feel you will enjoy too! I am disclosing this in accordance with the Federal Trade Commission's 16 CFR, Part 255: "Guides Concerning the Use of Endorsements and Testimonials in Advertising.” White Lane Decor is a participant in the Amazon Services LLC Associates Program, an affiliate advertising program designed to provide a means for sites to earn advertising fees by advertising and linking to amazon.com.

Shop My Home

Cute Canister Labels

Free is the best kind of stuff. My sister was moving and didn’t want these stainless steel canisters anymore. I gladly brought them home with me. I didn’t have any at the time. I put my flour, sugar, and powdered sugar in them. They were simple and got the job done. When we built our second townhouse, I wanted to spruce them up a little. I thought about putting a chalkboard sticker on them to write what was inside. Let’s be honest, we all saw how great my handwriting was on my chalkboard nook :). Not so much. Then I came across the cutest little printable labels from Alicia over at Thrifty and Chic Decor. They were already made and all I had to do was print them on adhesive paper. DONE!

I went to Office Max and picked me up some adhesive paper to go in my printer. I printed off Alicia’s (from Thrifty and Chic) cute labels from here . Then I cut them out and stuck them on my free canister set. I just kind of eyeballed where I wanted them in the middle of each jar. Now the best part is that she has tons of these already with the names labeled. Beans, flour, sugar, powdered sugar, and etc. I only needed three of them but I will be finding places for all the other cute ones too. My canisters sat close to the sink and got wet a few times. The paper started to look dilapidated where the water had hit. It was an easy fix to print off a few more labels and cut them out. This time, I moved them away from the water.

So cute and added a little pizazz to these dull canisters. In the new house, I am going to keep the countertops clutter free. I will probably keep these in the pantry. I want my pantry to be cute and organized too. So, these will still look great in the pantry. Head over to her blog and print some of these darling labels. They can go on just about any container and not just canisters.

Kate

Hi there, I’m Kate. Welcome to White Lane Decor. Thanks for stopping by. I love neutral, bright, and airy spaces. I’m always looking for new ways to turn our house into a home. Have a look around and find inspiration for your next project.

Disclosure

Some of my blog posts, ads, and banners contain "affiliate links." This means if you click on the link and purchase the item, I will receive an affiliate compensation. However, I only recommend products or services I use personally and truly feel you will enjoy too! I am disclosing this in accordance with the Federal Trade Commission's 16 CFR, Part 255: "Guides Concerning the Use of Endorsements and Testimonials in Advertising.” White Lane Decor is a participant in the Amazon Services LLC Associates Program, an affiliate advertising program designed to provide a means for sites to earn advertising fees by advertising and linking to amazon.com.

Shop My Home